


BRITEQ®
8
BTX-700BEAM
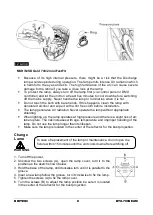
5.2 Lamp
MSR/ MSD Gold 700/2 miniFastFit
Because of its high internal pressure, there might be a risk that the Discharge
lamp would explode during operation. The lamp emits intense UV radiation which
is harmful to the eyes and skin. The high luminance of the arc can cause severe
damage to the retina if you take a close look at the lamp.
To protect the lamp, always turn off the lamp first (via control panel or DMX
controller) and let the unit run at least five minutes to cool down before switching
off the mains supply. Never handle the lamp or luminaries when it is hot.
Do not touch the bulb with bare hands. If this happens, clean the lamp with
denatured alcohol and wipe it with a lint free cloth before installation.
The lamp generates UV radiation. Never operate the lamp without appropriate
shielding.
When lighting up, the lamp operates at high pressure and there is a slight risk of arc
tube rupture. The risk increases with age, temperature and improper handling of the
lamp. Do not use the lamp longer than its lifespan.
Make sure the lamp is located in the center of the reflector for the best projection.
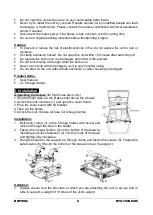
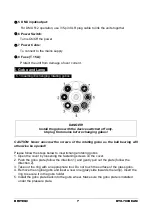
Change
Lamp
WARNING
1. Turn off the power.
2. Unscrew the two screws (A), open the lamp cover, turn it to the
position as the sketch shown below.
3. Hold the base of the lamp, anticlockwise turn until it is parallel to the
groove.
4. Inset a new lamp follow the groove, turn it clockwise to fix the lamp.
5. Tighten the screws (A) to fix the lamp cover.
6. Turn the screws (B) to adjust the lamp position be sure it is located
in the center of the reflector for the best projection.
In case of replacement of the lamp or maintenance, do not open the
fixture within 15 minutes until the unit cools down after switching off.
Содержание BTX-700BEAM
Страница 1: ......
Страница 2: ......
Страница 12: ...BRITEQ 10 BTX 700BEAM...
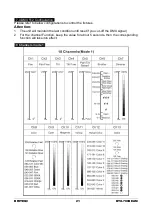
Страница 24: ...BRITEQ 22 BTX 700BEAM 18 Channels mode 2...
Страница 25: ...BRITEQ 23 BTX 700BEAM...
Страница 26: ...BRITEQ 24 BTX 700BEAM 25 Channels mode...
Страница 27: ...BRITEQ 25 BTX 700BEAM...
Страница 30: ......
Страница 31: ......


