Briteq BT-CHROMA 800 Скачать руководство пользователя страница 13

ENGLISH 

USER MANUAL 


BRITEQ

®


11/18 

BT-CHROMA800


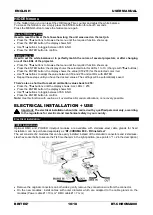
  Install  the  wires  firmly  on  the  wire  terminals  of both  modules,  pay  attention  to  the  inscriptions  for  correct 

wiring (power cable: “L”= brown wire * “N”= blue wire * “PE”= green/yellow wire) 

  Gently fix the connection wire to the module 

  Put the module in place and make sure that the rubber sealing is in place! 

  Firmly fix the module using the 4 screws. 

  Done! 


De-activation of the d buttons for permanent FIXED installations 

When the projector  is installed in a fixed  installation,  it is important that the d touch buttons can be 
turned  off  to  prevent  unwanted  tampering  or  unintentional  changes  in  settings  due  to  rainfall  on  the  touch 
buttons. Attention: this function can only be turned on / off by DMX, please follow the instructions carefully: 

De-activate d buttons: 

  Connect the projector to a DMX-console and make sure that ALL DMX-channels are set to 000. 

  Set channels 1+2+3 exactly to value 100 during at least 10 seconds 

Display and buttons are now turned off: the display will show 

DISPLAY BLOCKED


Activate d buttons again: 

  Connect the projector to a DMX-console and make sure that ALL DMX-channels are set to 000. 

  Set channels 1+2+3 exactly to value 101 during at least 10 seconds 

Display and buttons are turned on again. 


RENTAL / ENTERTAINMENT applications:  

Standard  equipped  with  3pin  XLR  and  lockable  IP65-Power  connector  in/outputs  for  easy  daisy-chaining. 
Simply connect the projectors together, using good quality power and DMX cables. The best option is to use 
our COMBI CABLES 

→ check our website for details and different lengths. 


Some general information on DMX: 


The DMX-protocol  is a  widely used high speed signal to control  intelligent light equipment.  You need to 
“daisy chain” your DMX controller and all the connected units with a good quality balanced DMX-cable. 
Both XLR-3pin and XLR-5pin connectors are used, however XLR-3pin is more popular. 


Pin layout XLR-3pin: Pin1= GND ~ Pin2= Negative signal (-) ~ Pin3= Positive signal (+)  


Pin layout XLR-5pin: Pin1= GND ~ Pin2= Negative signal (-) ~ Pin3= Positive signal (+) ~ Pins4+5 not used.  


To  prevent  strange  behavior  of  the  light  effects,  due  to  interferences,  you  must  use  a  90Ω  to  120Ω 
terminator at the end of the chain. Never use Y-

splitter cables, this simply won’t work!  


Make sure that all units are connected to the mains.  


Each unit in the chain has its proper starting address so it knows which commands from the controller it 
has to decode.  


Settings for different uses: 

STANDALONE WITH BUILT-IN PIXEL PROGRAM OR STATIC COLOR: 

Use this function when you want an instant show on only 1 projector. 

  Connect the projector to the mains and turn it on. 

  Make the following settings in the setup menu: 


NO DMX Mode:

 set to Stand-alone 


Show a static or changing color:  


Working Mode: 

select the option All Pixels ON


Color Effects: 

select one of the colors, make a custom color or chose a color fade with the desired 

speed.


Master Dimmer:

 set the desired level for the light output 


Show a Pixel Program with static or changing color:  


Working  Mode: 

select  one  of  the  22  internal  Programs  and  adjust  the  speed  and  afterglow 

parameters.


Color Effects: 

select one of the colors, make a customs color or chose a color fade with the desired 

speed.


Master Dimmer:

 set the desired level for the light output 


Note: No DMX-controller should be connected, otherwise the DMX-signal will have priority. 


Содержание BT-CHROMA 800

Страница 1: ......

Страница 2: ......

Страница 3: ...0 40 x 1 1 x 40 to get the perfect beam Empty magnetic filter frame to easily install the different beam shapers Elegant extruded aluminum housing finished with tempered glass cover Solid and multifun...

Страница 4: ...ervice agent or similarly qualified persons in order to avoid a hazard Never let the power cord come into contact with other cables This fixture must be earthed in order to comply with safety regulati...

Страница 5: ...irm a setting 4 ANTENNA antenna needed for wireless DMX signal reception 5 COOLING FANS due to the high power it is very important to make sure that the temperature controlled fans and ventilation ope...

Страница 6: ...Press the MENU button to ENTER the setup menu Press the buttons to browse the menu until the required function shows up Select the function with the ENTER button Use buttons to change the values Pres...

Страница 7: ...erse Square S Curve Fan Speed Auto Low High SETUP MENU Stand Alone Working Mode SLAVE Mode MASTER Full on MASTER Program 01 22 Program Speed 000 255 Afterglow 000 255 Master Dimmer 000 255 Color Effec...

Страница 8: ...ows up Use buttons to toggle between ON OFF DISPLAY AUTOLOCK Used to lock the setup menu against unwanted altering of the settings Press the buttons to browse the menu until the required function show...

Страница 9: ...ode LOW The fan speed is temperature controlled for the best possible balance between performance and low noise The fan speed is limited so the output will be reduced when the temperature is high HIGH...

Страница 10: ...preferred color temperature for exhibition booths WHITE 5600K preferred daylight color temperature good for camera work SET CUSTOM COLOR is a custom color that can be set by the user Follow these step...

Страница 11: ...for fault debugging Press the buttons to browse the menu until the required function shows up Press the ENTER button you can monitor the incoming DMX signal functions and values are displayed LED Temp...

Страница 12: ...u have the desired values The settings will be automatically saved There s also a shortcut to reset all calibration values back to 255 Press the buttons until the display shows ALL LEDs 255 Press the...

Страница 13: ...d different lengths Some general information on DMX The DMX protocol is a widely used high speed signal to control intelligent light equipment You need to daisy chain your DMX controller and all the c...

Страница 14: ...information TWO OR MORE UNITS IN DMX MODE Use this function when you want to control the projectors by any DMX controller First put the projectors in the desired DMX mode see the different DMX charts...

Страница 15: ...OGRAM SPEED 5 PROGRAM FADE SPEED 6 COLOR EFFECTS 1 1 HUE 2 HUE FINE 2 3 SATURATION 4 SATURATION FINE 3 5 INTENSITY 6 INTENSITY FINE 1 1 1 1 3 7 RED 2 2 RED FINE 2 3 2 3 4 8 GREEN 4 4 GREEN FINE 3 5 3...

Страница 16: ...m2 036 046 Program3 047 057 Program4 058 068 Program5 069 079 Program6 080 090 Program7 091 101 Program8 102 112 Program9 113 123 Program10 124 134 Program11 135 145 Program12 146 156 Program13 157 16...

Страница 17: ...5 5 9 000 255 PIXEL 02 RED 10 000 255 PIXEL 02 RED FINE 6 6 6 11 000 255 PIXEL 02 GREEN 12 000 255 PIXEL 02 GREEN FINE 7 7 7 13 000 255 PIXEL 02 BLUE 14 000 255 PIXEL 02 BLUE FINE 8 8 8 15 000 255 PIX...

Страница 18: ...DMX channels used by the projector Personality xx current personality or DMX working mode used by the projectors The DMX controller can send certain commands to each RDM device which allow remote setu...

Страница 19: ...statements and documents have been deposited by the manufacturer Power supply AC 100 240V 50 60Hz Power consumption RGB max 750Watt max all colors 100 Power factor PF 0 95 Power in out linking capaci...

Страница 20: ...ter frame to install beam shaper filters Different BEAM SHAPERS BT CHROMA 800 60x10 beam order code B05550 60 x10 beam shaper without frame BT CHROMA 800 10x60 beam order code B05551 10 x60 beam shape...

Страница 21: ......

Страница 22: ......

Страница 23: ......

Страница 24: ......

Отзывы: