background image

56

IF THE CAR IS NOT FITTED WITH CHILD 
RESTRAINT ANCHORAGE POINTS

For Sedans only - Drill 9mm diameter hole 
in the parcel shelf on the centre line of the 
seating position as shown in Fig 3. Before 
drilling the hole, check the underside for 
accessibility. Install the anchor bolt as 
shown in Fig 2.
For vehicles other than Sedans - In 
Australia, consult your nearest child 
restraint  fitting station or traffic authority 
for vehicle inspection to  find the best, 
correct position for the placement of 
the anchorage point, and for the correct 
attachment bolt length and use of spacers. 
In New Zealand, consult the agent for the 
vehicle.
Note to Queensland purchasers: The 
installation of anchorage points must be 
approved by authorised officers appointed 
by Queensland Transport. Authorised 
officers can be sourced from all 
Queensland Transport Customer Service 
and Queensland Ambulance Service 
Centres.

Front of Vehicle

Attachment Bolt

Anchor fitting

Spacer(s) if 
required
Vehicle metal 
structure
Reinforcing 
washer (cone 
downwards)

Lock washer

UPPER ANCHORAGE 

FITTINGS FOR SEDANS 

ONLY

Vehicle trim

Fig.2.

INSTALLATION OF CAR ANCHOR FITTING

Содержание UNITY

Страница 1: ...IMPORTANT KEEP THIS BOOKLET IN THE PLACE PROVIDED ON THE CHILD RESTRAINT Unity Infant Carrier Series No 40 A 2010 NOTE Style may vary from image shown ...

Страница 2: ...NSTALL HOW TO USE SHOULDER HEIGHT MARKERS AND THE NEXT STEP CARE MAINTENANCE ACCESSORIES TRAVELLING TIPS TRAVEL SYSTEM INTEGRAL LATCH TRAVEL SYSTEM BRITAX STROLLER CLICK GO ADAPTOR INSTALLATION OF CAR ANCHOR FITTING ALTERNATIVE INSTALLATION IF SEATBELT LOOSENS IN CASE OF ACCIDENT 3 PAGE 8 4 6 12 10 21 26 34 35 44 48 40 42 53 58 60 ...

Страница 3: ...ure that your child gets all the protection designed into the restraint PLEASE READ AND FOLLOW THESE INSTRUCTIONS EXACTLY and use only Safe n Sound recommended parts and accessories THIS RESTRAINT MUST BE ATTACHED TO A CHILD RESTRAINT ANCHORAGE POINT IN THE CAR REFER TO CAR OWNER S HANDBOOK FOR LOCATION OF ANCHORAGE POINTS REFER TO A CHILD RESTRAINT FITTING STATION IF NO ANCHORAGE POINTS ARE IN TH...

Страница 4: ...ns To ensure baby s back is evenly supported do not put more than one nappy on the baby and make sure the nappy is not thickly folded at the back Do not alter or modify this restraint Repairs must only be done by the manufacturer or agent Do not allow the restraint to come into contact with polishes oils bleach and other chemicals Destroy the restraint if it has been in a severe crash even if no d...

Страница 5: ...e restraint components straps and other fitments for correct function condition Seek prompt repair Protect all webbing from abrasion and cutting by sharp corners and edges Upper Anchorage Straps and extension straps may be damaged by unsecured cargo in a collision Secure or remove hazardous cargo before using this restraint The restraint should not be purchased or sold as a second hand item It is ...

Страница 6: ...restraint that will take larger babies in rear facing DO NOT MOVE TO THE NEXT RESTRAINT UNTIL SHOULDERS REACHES THE SHOULDER HEIGHT MARKER FRONT OF VEHICLE New Baby Shoulders below the Shoulder Height Marker Maximum Shoulder Height Marker Older Baby Shoulders inline with the Shoulder Height Marker then you will need to move to the next child restraint Maximum Shoulder Height Marker SHOULDER HEIGHT...

Страница 7: ...CHES THE SHOULDER MARKER When the child s shoulders reach this marker the child is now too big for the child restraint It is now time to move too the next child restraint see page 34 IMPORTANT Follow this advice SHOULDER HEIGHT MARKERS AND A GROWING CHILD ...

Страница 8: ...ders if fitted holders are on both sides of the Padded Insert or the sides of the cover 4 Harness Buckle 5 Harness Adjuster under flap 6 Harness adjustment strap hook disconnected 7 Harness adjustment strap 8 Cover 9 Harness SPECIAL FEATURES 1 2 3 6 7 4 8 9 8 5 ...

Страница 9: ... Adaptor if fitted 14 Infant Carrier 15 Base 18 10 13 20 11 12 14 19 15 17 23 21 22 16 16 Locating Slots for upper anchorage strap 17 Release Handle Located at the back of the Infant Carrier 18 Carry Handle 19 Canopy 20 Carry Handle release latch 21 Adjuster 22 Upper anchorage strap 23 Attachment Clip ...

Страница 10: ... infant restraint until child reaches this limit Infants are at risk of serious injury if they face forward too early If the baby s neck muscles are unable to support their head then the child should remain rear facing choose a restraint that will take larger babies in rear facing To ensure that the space is sufficient the purchaser should check the measurements between the vehicle s rear and fron...

Страница 11: ... car owner s handbook for warnings and instructions Seat belt extenders should not be used if the seat belt is not long enough to secure the child restraint If they are used then the buckle must sit above the Base moulding THE TETHER STRAP MUST ALWAYS BE FITTED WHEN THE CHILD RESTRAINT IS USED IN A VEHICLE Do not use the restraint without the Upper Anchorage Strap correctly attached The upper anch...

Страница 12: ...G INFANT CARRIER FROM BASE A Grasp the handle with one hand With the other hand lift the catch located at the front of the Infant Carrier B With the catch still lifted raise the Infant Carrier clear of the base Pull Catch Lift ...

Страница 13: ... Carrier to rock without the possibility of the Infant Carrier tipping over C To convert to a non rocking position depress both buttons and rotate the handle to the fixed position Ensure the handle is locked in position securely A To convert from carry to rocking position depress the large buttons on each side and rotate the handle towards the front of the Infant Carrier When you have started rota...

Страница 14: ...B Squeeze the latch again and start to rotate the handle then remove both hands from the latches and use one hand at the top of the handle to rotate down further until the handle latches in the second or non rocking position The carrier is now locked to the stroller ADJUSTMENT OF HANDLE POSITION WITH BRITAX STROLLER CLICK GO ADAPTOR 2 3 Push down until it clicks into place 3 A B 14 2 3 ...

Страница 15: ...o the dedicated elastic trim strap on each side of the Infant Carrier D The Canopy can be rotated to cover the baby or opened by rotating to the desired position TO REMOVE CANOPY A Ensure Canopy is in the collapsed position Unclip the elastic Canopy straps which are secured by plastic hooks under each handle attachment point B Grasp the Canopy and pull it away from the Infant Carrier ensuring the ...

Страница 16: ...rness Straps and pulling out desired amount of slack C Move the two harness tongues to the sides of the infant carrier and store in the Buckle Tongue Holder if fitted holders are on both sides of the Padded Insert or the sides of the cover Move the harness buckle towards the Harness Adjuster D Place baby into Infant Carrier lying on its back so that the buckle is between the baby s legs E This sec...

Страница 17: ...er is fitted with three shoulder strap positions As the baby grows the shoulder straps must be moved to higher slots The shoulder straps must be in the slots which are nearest to the child s shoulders but not lower than the child s shoulders If the baby is newborn you will need to use either slot 6 or 7 and crotch strap position 2 With the baby in the carrier check that the slot is just above the ...

Страница 18: ...ch and feed back through other slot as shown right CROTCH STRAP The Infant Carrier is fitted with two crotch strap positions Correct location of crotch strap will securely position the baby correctly in Infant Carrier and will prevent baby from slipping further into Infant Carrier As baby grows the crotch strap must be moved to the outer slot Crotch buckle Fabric Cover Crotch 3 bar Slide Infant Ca...

Страница 19: ...ctor is shown in diagram right B Pull the shoulder strap through slot C Insert the shoulder strap through the Infant Carrier slot which will position the shoulder strap level with or above the baby s shoulder see page 17 Ensure that the shoulder strap passes through matching slots in the cover and seat shell If a Padded Insert is used then that will need to be re positioned and the strap re insert...

Страница 20: ...is better to change one strap at a time so that the other strap will be a guide for re assembly FOR SMALL BABY FOR GROWING BABY FOR LARGER BABY Do not use the carrier with the harness shoulder straps set at different heights or fed through mismatching slots Ensure the harness straps are not twisted and that all straps are secured by pulling each harness strap IMPORTANT ...

Страница 21: ...ar For installing the Base to the car select a seating position with a child restraint anchor fitting directly behind the seating position INSTALLING THE BASE TO THE CAR A Place the base and Infant Carrier on vehicle seat in a seating position where a child restraint anchor fitting is installed The Level Indicator Line needs to be level with the road i e parallel with the road surface Check and ad...

Страница 22: ...d the underside of the base packing can be a firmly rolled up towel or nappy For some vehicles with flat seats some packaging may be required at the front edge of the base to get some recline The stabilising bar does not need to touch the car s seat back but should be close Always leave a rearward slope angle of approximately 10 to 15 ROAD ROAD Packing 10 to 15 10 to 15 ...

Страница 23: ...d seating position with the Stabilising bar beside the car s seat back as shown D Extend the seat belt to maximum length For a lap sash seat belt position the tongue in the middle of the fully extended belt Feed the seat belt through the blue REAR FACING SEATBELT PATH labels on each side through the Belt Guide Hooks ...

Страница 24: ... of seatbelt to remove slack Belt Guide Hooks To remove the base from the car release the seat belt pull the seat belt out If the seat belt will not stay tight in every day use then fit a 3 bar gated buckle to the lap sash belt to prevent loosening See pages 58 to 59 Not supplied with seat NOTE Seat belt extenders should not be used if the seat belt is not long enough to secure the child restraint...

Страница 25: ...nchor fitting Connect the Upper Anchorage Strap Attachment Clip to the Anchor Fitting Lengthen the strap by pressing the adjuster button 1 and pull the strap 2 so that the strap is ready to attach to the Carrier THIS UPPER ANCHORAGE STRAP MUST ALWAYS BE FITTED WHEN THE INFANT CARRIER IS USED IN THE CAR Fully press Adjuster Button 1 while pulling Upper Anchorage Strap 2 to lengthen 1 2 B While the ...

Страница 26: ...ended that bulky nappies are not used when baby is travelling in the Infant Carrier as they can cause incorrect positioning of the baby s back in the Infant Carrier Bottom curvature of Infant Carrier Flat section of Infant Carrier A Loosen Harness Straps by pressing the Harness Adjuster while grasping both the Shoulder Harness Straps and pulling out the desired amount of slack Press the Harness Ad...

Страница 27: ...of the infant carrier into the Buckle Tongue Holder if fitted Move the harness buckle towards the Harness Adjuster Buckle Tongue Holder if fitted NOTE 1 Discontinue using the Padded Insert if the Pad causes over heating discomfort or you need more room for baby to grow 2 Correct fitment of the harness is very important as it restrains the baby in the Infant Carrier The harness must fit firmly arou...

Страница 28: ...rness buckle followed by the other tongue until a click is heard If the second tongue does not engage press the red button and re insert the tongues Check secure engagement by pulling harness straps Tongue Buckle The end of the harness adjustment strap is connected to the cover to avoid tripping over the end Ensure the harness adjustment strap hook is attached when carrying the carrier see page 29...

Страница 29: ... slack in straps is minimal Do not use the restraint if straps do not tighten and contact your local authorised service agent for repair Pull Harness Straps through the buckle in direction of arrows Pull Harness Adjustment Strap to remove slack Hook the Adjuster Strap on to the loop to prevent tripping over the strap Ensure the end of the harness Adjustment Strap is connected to the cover to avoid...

Страница 30: ...ion IMPORTANT Lift again to check engagement CAUTION C The handle may be rotated into other positions if needed although this may be difficult with the seat in front B Push down on the Infant Carrier until an audible click is heard Pull on the Infant Carrier to ensure it is correctly locked into position If fitted with the Britax Stroller Click Go Adaptor ensure to operate the handle as per pages ...

Страница 31: ...de of the handle and through the locating slots in the front of the Infant Carrier F Adjust the Upper Anchorage Strap by pulling as shown below to remove any slack in the straps Do not over tighten Upper Anchorage Strap Pull to remove slack Press button to lengthen Adjuster Upper anchorage strap Locating Slots The Upper anchorage strap must be fitted at all times when the baby is in the car IMPORT...

Страница 32: ...is will keep the upper anchorage strap visible and ready for use when the Infant Carrier is put back in the car D Rotate the Carry Handle to the carry position location page 13 E Grasp the handle with one hand lifting the Infant Carrier release catch with the other hand With the catch lifted raise the Infant Carrier clear of the base Always ensure the handle is locked in position before lifting F ...

Страница 33: ... Tongues will be released Place Buckle tongues through Buckle Tongue Holder s if fitted on each side of the cover or Padded Insert D Feed the baby s arms through each side of the Harness and place the straps on each side of the carrier clear of the baby Lift the baby out of the carrier Buckle Tongue Holder if fitted NOTE Once the baby gets heavier you may wish to leave the carrier in the car In th...

Страница 34: ...ars of age OR Dedicated forward facing seat with in built harness for children who have outgrown their baby carrier up to approximately 4 years of age OR Convertible booster seat with in built harness that faces forward for children who have out grown their rear facing seat This can be used up to approximately 4 years of age which can then be converted to a booster seat up to approximately 8 years...

Страница 35: ...ure there are no cracks in moulding or the plastic moulding D Check the harness adjuster is operating and is clamping the webbing E If any part of the Infant Carrier is cracked or broken seek repair immediately or replace the Infant Carrier F Check that the Infant Carrier catch retains the Infant Carrier to the base Check screws and rivets are firmly in place If not seek repair CLEANING Use only m...

Страница 36: ...oint B Disconnect the shoulder harness straps from the Metal Strap Connector and feed through shoulder slots in both infant carrier and cover Refer to page 19 C Feed the shoulder harness straps and tongues through lap strap slots in the Cover only There is no need to remove the harness straps from the Infant Carrier D Lift the cover around the rim of the infant carrier at the harness adjuster end ...

Страница 37: ...lder strap slots in cover and then in through the Infant Carrier Refer to page 17 for correct shoulder harness position for your baby Attach the shoulder harness straps to the strap connector E Feed the crotch buckle as well as the harness adjuster strap through the slots in the cover F Refit plastic hooks on cover to Infant Carrier as shown right G Engage shoulder harness tongues and crotch buckl...

Страница 38: ...straint with the cover supplied or a manufacturer authorised replacement cover with identical shoulder height markers IMPORTANT Do not pull sticky items from covers as the cover may be damaged soak in water and gently remove The seat cover and accessories must not be replaced with any other than the one recommended by Safe n Sound because the cover is an integral part of the child restraint and ho...

Страница 39: ...isengage the Harness Tongues and Buckles several times until a strong audible click is heard D If you still cannot hear a strong audible click after engaging the last Harness Tongues into Buckle then repeat cleaning several times If the Harness Buckle cannot be returned to its original working condition then contact Britax Childcare Customer Service E Refit the harness buckle to the restraint with...

Страница 40: ...er height marker to allow longer use of the Carrier A Disengage the harness buckle and feed the buckle out through buckle slot in the Padded insert B Remove the insert pad from the shoulder harness straps Installation is the reverse of removal procedure C Discontinue use of the Padded insert if it causes discomfort or cramps the space available for baby within the Infant Carrier SHOULDER PADS The ...

Страница 41: ...econd car These bases can mean that the Carrier can be easily and quickly switched between cars An extra upper anchorage strap is supplied with the Base ACCESSORIES OTHER ACCESSORIES Only use accessories designed and recommended by Britax Childcare Pty Ltd for this product ...

Страница 42: ...n to be secured in child restraints or adult seat belts where available Plan your trip with frequent comfort stops to reduce stress on babies young children and driver Keep the car well ventilated to reduce heat stress Two car windows should be kept open to maintain a good flow of fresh air if air conditioning is not used Never leave babies or toddlers in a stationary car in the sun because of the...

Страница 43: ...c bag FEEDING Never breast feed a baby while car is in motion Babies will require extra feeding if travelling in the heat For bottle fed babies make up the bottles and refrigerate before leaving home for a day trip Place in a cool bag and reheat as needed with hot water from a thermos Alternatively bring boiled water in a thermos and pre measured amounts of baby formula in small containers Use the...

Страница 44: ...be connected to compatible strollers The following pages provide a general instructions about using the Infant Carrier with a stroller which may differ slightly for some strollers Preferably use the attachment instructions provided with your stroller Use the stroller in accordance with the instructions supplied with the stroller This Infant Carrier will not fit all strollers There are two systems ...

Страница 45: ...ft the release catch with the other hand C With the release catch depressed lift the Infant Carrier D When Infant Carrier clears the base hooks raise Infant Carrier further and remove from the car PREPARING THE STROLLER A Ensure the Stroller has been assembled correctly before fitting the Infant Carrier B Open the Stroller apply the brakes and lower the backrest to the fully reclined position C Re...

Страница 46: ...on on both sides of the armrests B Position the Infant Carrier over the Stroller with the baby s head end of the Infant Carrier over the Stroller arm bar or tray C Lower the Infant Carrier and ensure that it locates onto the Arm Bar or tray and the latches engage Arm Bar Latch Tray Arm Bar Latch TRAVEL SYSTEM INTEGRAL LATCH ...

Страница 47: ...INFANT CARRIER FROM THE STROLLER A Fold the Infant Carrier handle up to the carry position and grip firmly in one hand B Raise the Infant Carrier release catch located on the rear of the Infant Carrier C Lift the Infant Carrier clear of the stroller ENSURE THE BABY IS SECURED IN THE INFANT CARRIER WITH THE HARNESS AT ALL TIMES THE INFANT CARRIER IS FITTED WITH A CANOPY WHICH CAN BE USED WHEN THE C...

Страница 48: ...sition the non rocking position To do this A Where applicable remove the stroller seat or bassinet from the stroller frame refer to stroller instructions With the Infant Carrier handle in the carry position place the Click Go Stroller Adaptor on each side directly over the stroller frame mouldings and push down 48 TRAVEL SYSTEM BRITAX STROLLER CLICK GO ADAPTOR A Only use Infant Carrier with compat...

Страница 49: ...t Carrier to the stroller frame by rotating the handle VERY IMPORTANT 2 3 Push down until it clicks into place C If the baby is not already in the Infant Carrier then secure your baby into the Infant Carrier by the harness see page 26 Pull up Carrier to ensure it is locked in position IMPORTANT Refer to page 13 for handle position ...

Страница 50: ...re the Carrier s Handle is in Rocking position and trim is placed aside to align the holes TRAVEL SYSTEM BRITAX STROLLER CLICK GO ADAPTOR TO RELEASE INFANT CARRIER FROM STROLLER WITH BRITAX STROLLER CLICK GO ADAPTOR A Squeeze both carry handle release latches to release the handle and rotate upwards B Rotate the handle upwards towards the carry position to unlock the carrier from the stroller C On...

Страница 51: ...Carrier ensure the Carrier s Handle is in Rocking position disconnect the elastic under the handle boss and pull the trim away from the side of the carrier and trim is placed aside to align the holes B TRAVEL SYSTEM BRITAX STROLLER CLICK GO ADAPTOR 2 Push in Locking Pin C C Insert Locking Pin into hole Align both top and bottom holes 2 Refer to page 13 for handle position ...

Страница 52: ...om carry handle Store for future use with these instructions The Stroller instruction book will also provide full instructions for use on a Stroller TRAVEL SYSTEM BRITAX STROLLER CLICK GO ADAPTOR E Now replace the trim pull elastic underneath the adaptor and hook Place elastic in groove shown below hook loop Hook elastic behind the adaptor and place in groove D Then push the Press Pin in the botto...

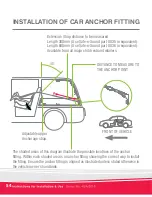
Страница 53: ...ng in the rear vertical panel can only be installed in one way Please refer to vehicle owner s handbook or a child restraint fitting station for correct method INSTALLATION OF CAR ANCHOR FITTING 53 THE ATTACHMENT CLIP COVER MUST ALWAYS BE USED AS IT PREVENTS THE RISK OF INCORRECT FITMENT OF THE ATTACHMENT CLIP TO THE ANCHOR FITTING ALWAYS ENSURE THAT THE ATTACHMENT CLIP IS CORRECTLY ENGAGED TO THE...

Страница 54: ...NCE TO MEASURE TO THE ANCHOR POINT The shaded areas of this diagram illustrate the possible locations of the anchor fitting Within each shaded area is an anchor fitting showing the correct way to install the fitting Ensure the anchor fitting is aligned as illustrated unless stated otherwise in the vehicle owner s handbook Adjustable upper Anchorage strap FRONT OF VEHICLE INSTALLATION OF CAR ANCHOR...

Страница 55: ...g from the parcel shelf floor roof etc and install anchor bolt and fitting as shown in Fig 1 CAUTION DO NOT OVERTIGHTEN ANCHOR BOLT OVERTIGHTENING MAY FRACTURE OR BREAK BOLT MAXIMUM TORQUE IS 20 Nm 14 75 ft lb Note Minimum of five full turns of anchor bolt is required before tightening force is applied Front of Vehicle UPPER ANCHORAGE FITTING Attachment Bolt Lock washer Anchor fitting Spacer s if ...

Страница 56: ... position for the placement of the anchorage point and for the correct attachment bolt length and use of spacers In New Zealand consult the agent for the vehicle Note to Queensland purchasers The installation of anchorage points must be approved by authorised officers appointed by Queensland Transport Authorised officers can be sourced from all Queensland Transport Customer Service and Queensland ...

Страница 57: ...MUST NOT BE HOOKED ONTO ANY OTHER OBJECT CAR INSTALLATION ACCESSORIES From retailers of Safe n Sound products EXTRA ANCHOR KITS Available for using the restraint in additional cars Re order no 0038 EXTENSION STRAPS May be required for cars without a fixed parcel shelf Re order no 0035 length 300mm or 0036 length 600mm GATED 3 BAR SLIDE Locking clip For converting lap sash seat belt to lap belt and...

Страница 58: ...ap sash seat belt by using the Gated 3 Bar Slide stored under the carrier Hollow side Inner strap A Hold the lap and sash straps together and fold as shown Slide the inner strap into the Gated 3 Bar Slide followed by the outer strap B The two straps should slide freely in the Gated 3 Bar Slide slot Faces towards restraint C Repeat previous step A for the other slot in the Gated 3 Bar Slide Ensure ...

Страница 59: ...uctions on pages 23 to 24 Sash belt portion Lap belt portion When fitting the Curved Gated Slide the seat belt route can only go one way as shown above ALTERNATIVE INSTALLATION IF SEATBELT LOOSENS Remove the gated 3 bar slide from the seat belt as soon as the child restraint is removed so that an adult can use the seat belt as a lap sash seatbelt IMPORTANT ...

Страница 60: ...amage is obvious The joint Australian New Zealand Standards committee CS 85 advise that this statement applies whether a child was in the child restraint or not We consider a server crash as being one where the main body structure of the vehicle is distorted There is no method of determining if the restraint has been damaged and we concur with the Australian New Zealand Standards in recommending d...

Страница 61: ...vere crash is taken out of the market There is no method of determining if the restraint has been damaged in a severe crash so the restraint should be destroyed as the crash may reduce the child restraints ability to perform Since its inception in 2006 the Crash Exchange program has helped 100 s of families ensure that their children have new restraints and that the restraints are not sold second ...

Страница 62: ...NOTES 62 ...

Страница 63: ...NOTES 63 ...

Страница 64: ... Britax Childcare Pty Ltd Australia The Britax and Click Go trademark are the property of Britax Excelsior Limited UK We reserve the right to alter this product without notice 2002 2012 Britax Childcare Pty Ltd Patent Pending Part No 2201321 A 16 ...

Отзывы: