background image

14

15

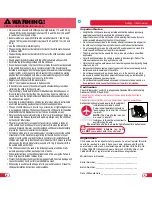
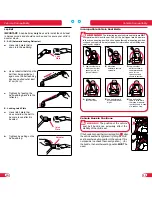
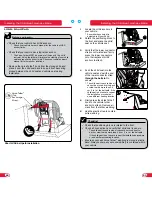
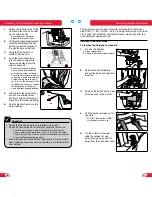
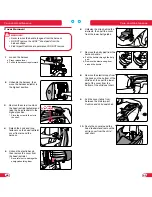
WARNING!

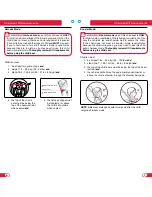
  Head restraint adjustment is for use in Booster 

Mode ONLY. 

DO.NOT

 Use the head restraint adjuster when the 

harness is attached.

Lift the head restraint 

adjuster release to move 

the head restraint.

Booster Mode: Head Restraint Adjustment

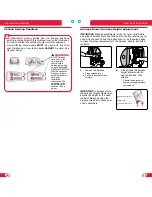
Remove the locking screw 

from the head restraint 

adjuster and insert into the 

shell to store for later use. 

IMPORTANT:

 The vehicle seat belt must be positioned at or above 

the child’s shoulder through the shoulder belt guide.

Locking.Screw.

storage

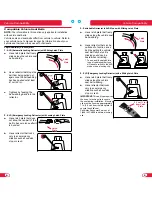
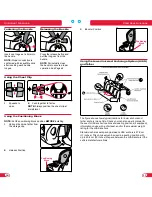
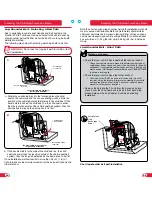
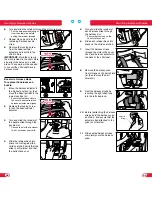
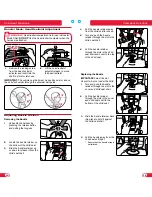
Adjusting Buckle Position

Removing.the.Buckle

Unbuckle the harness by 

pressing the release button 

and pulling the tongues. 


Locate the buckle retainer on 

the bottom of the child seat.

Slide the buckle retainer up 

or down to release it from the 

child seat shell.

Pull the buckle retainer away 

from the child seat to loosen.

Turn and push the buckle 

retainer through the slot in the 

child seat shell. 

2

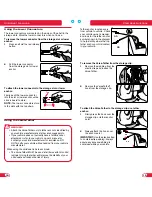
Pull the buckle retainer 

through the slots in the child 

seat shell and cover to the top 

of the child seat.

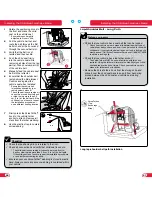
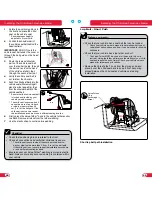
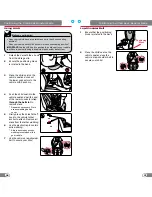
Replacing


the


Buckle

IMPORTANT:

 Select the slot 

closest to, but not under the child. 

Turn and push the buckle 

retainer through the slot in the 

cover and child seat shell.

Pull the buckle retainer 

through the slots in the cover 

and child seat shell to the 

bottom of the child seat.

Pull the buckle away from the 

child seat until tight. 

*  Ensure that the buckle strap is 

not twisted.

Slide the buckle retainer back 

into place to hold it against 

the child seat shell. 

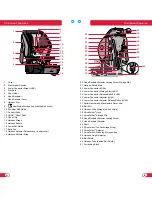
Child Seat Functions

Child Seat Functions

Содержание Frontier XT SICT

Страница 1: ...before installing this child seat Store this user guide in the pocket behind the cover See features pages for reference IMPORTANT Veuillez lire attentivement et comprendre toutes les instructions avant d installer ce siège pour enfant Rangez ce guide dans la pochette sous la housse Voir pages de caractéristiques ...

Страница 2: ...nstalling the Child Seat 20 General Information 20 Harness Mode 20 Booster Mode 21 Installing the Child Seat Harness Mode 22 Lower Universal Anchorage System LUAS Short Path 22 Lap Shoulder Belt Selecting a Belt Path 24 Lap Shoulder Belt Short Path 25 Lap Shoulder Belt Long Path 27 Lap Belt Short Path 29 Switching Between Modes 31 Harness to Booster Mode 31 Booster to Harness Mode 32 Positioning t...

Страница 3: ...passenger cars or trucks Follow all instructions on the child seat labels and in this user guide Failure to do so may result in death or serious injury Prevent the Side Impact Cushions from being punctured Puncture damage will cause the cushions not to perform as intended in a crash When using in a vehicle with airbags refer to your vehicle owner s manual for child seat installation instructions a...

Страница 4: ...fety Mark 22 Lower Connector LUAS 23 Lower Connector Storage Slot LUAS 24 Lower Connector Release Button LUAS 25 Lower Connector Adjuster LUAS 26 Lower Connector Adjuster Release Button LUAS 27 Serial Number and Manufacture Date Label 28 Belt Slot 29 Harness Yoke Storage on belt shield 30 Versa Tether Hook 31 Versa Tether Storage Clip 32 Head Restraint Adjuster Locking Screw 33 Head Restraint Adju...

Страница 5: ...nd shoulder belt to secure the child If the child does not meet all booster mode requirements because the child is too small you may need to use this child seat in harness mode Thoroughly review all fit requirements before using the child seat Children must 1 be at least 18 1 54 4 kg 40 120 lbs and 2 stand 106 7 165 1 cm 42 65 in in height and 3 the top of the child s ears must be below the top of...

Страница 6: ... ALR by pulling the vehicle seat belt fully out until a clicking sound can be heard when retracting To use a child seat with this type of vehicle seat belt you will need to switch to the ALR mode or use a locking clip 2 ELR Emergency Locking Retractor with Locking Latch Plate a Has a latch plate that does not allow the lap part of the belt to become loose after it is buckled b Has a retractor that...

Страница 7: ...le lies near the incorrect position when the vehicle seat belt is tightened try fitting the child seat in another seating position in the vehicle If it is not possible to achieve the correct position for the buckle then another seating position MUST be used WARNING The following types of vehicle seat belts are NOT compatible with this child seat If any of the belt types listed below are in the cho...

Страница 8: ...ING Harness Mode Harness Height Adjustment IMPORTANT Make all adjustments for the fit of your child before using the child seat Place the child seat on the floor and have your child sit in the seat Follow the instructions on the following pages to make the proper adjustments to the harness buckle and head restraint 1 Loosen the harness a Press release lever b Pull both harness straps forward 2 Lif...

Страница 9: ...bottom of the child seat 3 Slide the buckle retainer up or down to release it from the child seat shell 4 Pull the buckle retainer away from the child seat to loosen 5 Turn and push the buckle retainer through the slot in the child seat shell 2 6 Pull the buckle retainer through the slots in the child seat shell and cover to the top of the child seat Replacing the Buckle IMPORTANT Select the slot ...

Страница 10: ...Unhook the Versa Tether from the storage clip 2 Harness Position 3 Booster Position Positioning Block Positioning Block Using the Lower Universal Anchorage System LUAS and Tether The figure above shows typical locations for lower anchors and tether anchors in a vehicle Check your vehicle owner s manual for the exact LUAS anchor locations and seating positions if equipped information on use with a ...

Страница 11: ...to tether anchors identified by your vehicle manufacturer as tether anchorage points If your vehicle does not currently have a tether anchor attachment refer to your vehicle owner s manual or contact your vehicle man u fac tur er for assistance DO NOT modify your vehicle without advice from your vehicle manufacturer When using the child seat in harness mode The Versa Tether MUST be used at all tim...

Страница 12: ...re than 2 5 cm 1 in of front to back or side to side movement at the belt path try the other option See page 24 for information on selecting a belt path to install this child seat in your vehicle Use this child seat in harness mode with children at least 2 years of age and 11 3 29 5 kg 25 65 lbs who stand 76 2 144 8 cm 30 57 in in height Britax recommends using harness mode to 65 lbs 29 5 kg See t...

Страница 13: ...e lower connectors onto their adjacent LUAS anchors to attach 4 Push the child seat into the vehicle seat and pull the end of the lower connector strap through the belt slot to secure The child seat is secure when it cannot be moved front to back or side to side more than 2 5 cm 1 in at the belt path If the child seat is not secure repeat the installation procedure or use a different seating locat...

Страница 14: ...method results in more than 2 5 cm 1 in of front to back or side to side movement at the belt path then try the other method Before you begin 9 9 Check that your vehicle has a seat belt that can be locked Check your vehicle owner s manual to determine what type of vehicle seat belt you have and how it can be locked for use with child seats If your vehicle seat belt does not lock a locking clip mus...

Страница 15: ...ver the child seat back to keep it from becoming pinned between the child seat and vehicle seat during installation Versa Tether Top Anchorage Strap Long lap shoulder belt path installation Lap Shoulder Belt Long Path Installing the Child Seat Harness Mode Installing the Child Seat Harness Mode 1 Rotate the positioning block to the front and place the child seat on the vehicle seat Ensure harness ...

Страница 16: ...tra webbing 3 4 OR OR Checklist 9 9 Check that positioning block is rotated to the front 9 9 Check all connections and verify that child seat is secure The child seat is secure when it cannot be moved front to back or side to side more than 2 5 cm 1 in at the belt path If the child seat is not secure repeat the installation procedure or use a different seating location 9 9 Ensure any excess Versa ...

Страница 17: ...e front 9 9 Check all connections and verify that child seat is secure The child seat is secure when it cannot be moved front to back or side to side more than 2 5 cm 1 in at the belt path If the child seat is not secure repeat the installation procedure or use a different seating location 9 9 Ensure any excess Versa Tether webbing is stored in elastic band Always ensure any excess webbing is cont...

Страница 18: ... slide the retainer of the buckle strap through the buckle slot Choose the slot that is closest to but not under your child 4 Slide the retainer back into place to hold it against the child seat shell Verify that the strap is not twisted and that the button faces out Locking Screw storage 9 Nest the harness straps by inserting the right strap loop into the left strap loop 8 Remove the harness yoke...

Страница 19: ... lap and shoulder belt system when securing a child in booster mode Never secure a child with a lap belt only in booster mode Always secure the unoccupied child seat If the LUAS anchors in your vehicle prevent proper vehicle seat belt fit across your child you cannot use the LUAS to position this seat in booster mode The vehicle seat belt fits properly when the lap part sits low across the child s...

Страница 20: ...vehicle have LUAS anchors in the chosen seating position IMPORTANT Use the LUAS only to position this child seat to your vehicle seat Secure your child using the vehicle s lap shoulder belt system 5 Firmly press the Versa Tether hook to the vehicle tether anchor to attach Remove all slack from the tether webbing 6 Use the elastic strap to contain extra webbing Always ensure any excess webbing is c...

Страница 21: ...kle and place the harness straps around the armrests 4 Place the child in the child seat and position the harness straps around the child 5 Fasten the harness buckle Proper connection is confirmed with an audible click after inserting each buckle tongue 7 Fasten the chest clip The correct height for the chest clip is at the middle of the chest at armpit level The HUGS chest pads may be placed in a...

Страница 22: ...ur vehicle seat back is adjustable ensure it is in the upright position before placing the child seat on the vehicle seat 1 Place the child seat on the vehicle seat and have the child sit in the child seat 2 Adjust the head restraint so the shoulder belt guides position the vehicle seat belt at or just above the child s shoulders The child s ears should be below the top of the head restraint Check...

Страница 23: ...estraint cover from around the harness 6 Unfasten the clips behind the armrests then pull the cover from the lower belt guides 8 Remove the elastic loops from the hooks on the bottom of the child seat then pull the lower part of the cover from the bottom of the child seat shell 10 Route the cover around the head restraint and remove the entire cover from the child seat shell 9 Pull the cover fabri...

Страница 24: ...Replacing the Cover 1 Fit the cover around the head restraint Be careful not to damage the energy absorbing foam 2 Pull the cover fabric tight and slide it between the child seat shell and Side Impact Cushion 2 3 Fit the bottom of the cover over the lower part of the child seat shell then pull the elastic loops over the hook on the bottom of the child seat shell 4 Push the cover under the lower be...

Страница 25: ...f clicks are not heard repeat the cleaning procedure TOWEL DRY DO NOT Soak Lubricate Use solvents Use soap or household detergents Removing the Buckle 1 Locate the metal retainer on the bottom of the child seat and slide the retainer up to release it from the child seat shell 2 Turn and push the buckle retainer through the shell and cover to the top of the seat Pull the belly pad over the buckle r...

Страница 26: ...seat belt or attach the lower connectors to the vehicle anchors Pull the vehicle buckle stalk or lower connectors into the belt slot to properly align it into the belt path Tighten TIP When installing the child seat with the vehicle seat belt and the vehicle buckle stalk is too long Consult your vehicle owner s manual to see if you can lower the vehicle buckle position by twisting the vehicle buck...

Страница 27: ...ing devices is not approved by Britax Their use could cause this child seat to fail Federal Motor Vehicle Safety Standards or not perform as intended in a crash Their use automatically voids the Britax warranty LIMITATION OF DAMAGES The warranty and remedies as set forth above are exclusive and in lieu of all others oral or written express or implied In no event will Britax or the retailer selling...

Страница 28: ... pour enfant 74 Informations générales 74 Mode harnais 74 Mode rehausseur 75 Installer le siège pour enfant Mode harnais 76 Dispositif Universel d Ancrage DUA Chemin court 78 Ceinture baudrier sous abdominale Choisir un chemin de ceinture 78 Ceinture baudrier sous abdominale Chemin court 79 Ceinture baudrier sous abdominale Chemin long 81 Ceinture sous abdominale Chemin court 83 Basculer entre cha...

Страница 29: ... sont attachés dans un siège arrière que les sièges avants L utilisation de housses pièces rapportées accessoires ou dispositifs d attache non conçus par Britax n est pas approuvé par Britax Leur utilisation pourrait empêcher ce siège pour enfant de passer les normes de sécurité automobile canadiennes ou de ne pas performer comme prévu lors d un accident Lorsque vous utilisez un véhicule avec des ...

Страница 30: ...bles du véhicule non sécurisés Lors d un arrêt soudain ceci pourrait empêcher le siège pour enfant de performer tel que voulu Informations de sécurité Informations de sécurité Certification Cet ensemble de retenue pour enfant est conforme à toutes les normes de sécurité automobile canadienne applicables CMVSS 213 et 213 2 Cet ensemble de retenue est certifié pour une utilisation dans les véhicules...

Страница 31: ...l attache inférieures DUA 25 Ajustement de l attache inférieure DUA 26 Bouton de relâchement de l ajustement de l attache inférieure DUA 27 Étiquette portant le numéro de série et la date de fabrication 28 Fente de ceinture 29 Rangement de l attelage du harnais sur le bouclier de ceinture 30 Crochet Versa Tether 31 Attache de rangement Versa Tether 32 Vis de verrou 33 Dispositif d ajustement de l ...

Страница 32: ...ivent être en dessous du haut de l appui tête lorsqu il est assis et 5 les sangles du harnais doivent se situer au niveau ou au dessus des épaules de l enfant lorsqu il est assis MISE EN GARDE L utilisation du mode rehausseur avec ce siège pour enfant est SEULEMENT pour les enfants qui répondent à TOUTES les conditions suivantes Utilisez seulement les ceintures baudrier et sous abdominales du véhi...

Страница 33: ...un rétracteur qui peut être changé pour fonctionner en tant que rétracteur autobloquant en tirant la ceinture de sécurité du véhicule complètement jusqu à ce que vous entendiez un déclic Pour utiliser un siège pour enfant avec ce type de ceinture vous devez convertir le rétracteur au mode autobloquant ou utiliser une pince de verrouillage 2 Rétracteur à blocage d urgence avec boucle auto verrouill...

Страница 34: ...icule pour l installation d un siège pour enfant dans votre véhicule 1 Ceinture baudrier sous abdominale avec un point d ancrage supérieur ou inférieur sur la porte du véhicule 2 Ceinture de sécurité avec baudrier automatique 3 Ceinture de sécurité dont la section baudrier et la section sous abdominale ont chacune leur rétracteur 4 Ceinture baudrier sous abdominale gonflable 5 Ceinture sous abdomi...

Страница 35: ...fants de 12 ans et moins MISE EN GARDE Compatilbilité du véhicule Mode harnais Ajuster de la hauteur du harnais IMPORTANT Faire tous les ajustements du siège avec l enfant avant d utiliser le siège pour enfant Placez le siège pour enfant sur le plancher et installez votre enfant Suivez les instructions sur les pages suivantes pour effectuer les ajustements du harnais et de l appui tête 1 Desserrez...

Страница 36: ...la boucle IMPORTANT Sélectionnez la fente la plus proche de l enfant et non celle en dessous 1 Tournez et poussez la boucle au travers de la fente dans la housse et la coque du siège pour enfant 2 Situez l arrêtoir de la boucle au dessous du siège 3 Faites glisser l arrêtoir de la boucle vers le haut ou vers le bas pour le dégager de la coque 4 Tirez sur l arrêtoir pour désserrer 5 Tournez et pous...

Страница 37: ...e positionnement Utiliser le dispositif universel d ancrages d attaches inferiéurs DUA et la courroie d attache L illustration ci haut affiche les emplacements typiques pour les barres d ancrage inférieures et les boulons d ancrage dans un véhicule Vérifiez votre manuel de l utilisateur du véhicule pour situer exactement l emplacement des barres d encrage DUA et des positions assises l information...

Страница 38: ...férer au manuel de l utilisateur du véhicule ou contactez le fabricant du véhicule pour obtenir de l aide NE PAS modifier votre véhicule sans aide du fabricant Vous DEVEZ toujours utiliser la courroie d attache Versa Tether en mode harnais L utilisation de la courroie d attache augmente la stabilité du siège pour enfant et réduit le risque de blessures Les emplacement des boulons d ancrage peuvent...

Страница 39: ... aide d un seul chemin de ceinture baudrier chemin de ceinture long ou court Si la première méthode d installation résulte en un mouvement de plus de 2 5 cm 1 po de l avant vers l arrière ou d un côté à l autre au niveau de l acheminement de ceinture essayez l autre option Voir la page 78 pour d autres information sur la sélection du chemin de ceinture pour installer ce siège pour enfant dans votr...

Страница 40: ...la sangle de l attache inférieure n est pas entortillé et appuyez fermement les attaches inférieure à leur barres d ancrage DUA pour les attacher 4 Poussez sur le siège pour enfant dans le siège du véhicule et tirez sur le bout de la sangle de l attache inférieure au travers de la fente de ceinture pour sécuriser Le siège pour enfant est sécuritaire lorsqu il ne peut pas être déplacé de l avant ve...

Страница 41: ...alors le chemin de ceinture le plus court peut être essayé en premier Avant de commencer 9 9 Vérifiez que votre véhicule possède une ceinture de sécurité qui peut être vérouillée Vérifiez le manuel de l utilisateur du véhicule pour déterminer quel type de ceinture de sécurité vous possèdez et la façon dont elles se bloquent Si votre ceinture du véhicule ne se bloque pas une pince de verrouillage s...

Страница 42: ... bloc de positionnement est pivoté vers l avant 9 9 Vérifiez toutes les connexions et que le siège pour enfant est sécuritaire Le siège pour enfant est sécuritaire lorsqu il ne peut pas être déplacé de l avant vers l arrière et d un côté à l autre plus de 2 5 cm 1 po au chemin de la ceinture Si le siège pour enfant n est pas sécuritaire répétez l installation ou utilisez une autre position assise ...

Страница 43: ...st pivoté vers l avant 9 9 Vérifiez toutes les connexions et que le siège pour enfant est sécuritaire Le siège pour enfant est sécuritaire lorsqu il ne peut pas être déplacé de l avant vers l arrière et d un côté à l autre plus de 2 5 cm 1 po au chemin de la ceinture Si le siège pour enfant n est pas sécuritaire répétez l installation ou utilisez une autre position assise 9 9 Assurez vous que l ex...

Страница 44: ...taire Le siège pour enfant est sécuritaire lorsqu il ne peut pas être déplacé de l avant vers l arrière et d un côté à l autre plus de 2 5 cm 1 po au chemin de la ceinture Si le siège pour enfant n est pas sécuritaire répétez l installation ou utilisez une autre position assise 9 9 Assurez vous que l excédant de courroie Versa Tether est rangé à l aide de la bande élastique Assurez vous toujours q...

Страница 45: ...Faites glisser chaque arrêtoir en place dans la coque du siège pour enfant Mode rehausseur au mode harnais Replacer le harnais et la boucle 1 Déplacez l ajusteur du harnais jusqu au bout a déplacez l appui tête jusqu en bas b Assurez vous que les fentes du harnais dans la housse l appui tête et l ajusteur du harnais sont alignés 2 Replacez la vis de verrouillage pour verrouiller l ajusteur de l ap...

Страница 46: ... position assise avec une ceinture baudrier sous abdominale Utilisez seulement le système de ceinture baudrier et sous abdominale du véhicule lorsque vous attachez l enfant en mode rehausseur Ne jamais attacher un enfant avec une ceinture sous abdominale seulement en mode rehausseur Toujours attacher un siège non occupé Si les barres d ancrage DUA de votre véhicule empêchent d utiliser le système ...

Страница 47: ...rieure pour la position assise choisie 9 9 Est ce que votre véhicule possède des barres d ancrage DUA pour la position assise choisie IMPORTANT Utilisez le DUA pour positionner le siège dans le siège du véhicule Attachez l enfant à l aide du système de ceinture baudrier et sous abdominale 5 Poussez fermement le crochet Versa Tether sur le boulon d ancrage pour attacher Retirer le jeu de la courroi...

Страница 48: ... onglets b Détachez 3 Détachez la boucle et placez les sangles autour des accoudoirs 4 Placez l enfant dans le siège pour enfant et positionnez les sangles du harnais autour de l enfant 5 Attachez la boucle du harnais Une bonne connexion est confirmée lorsqu un déclic audible est entendu après avoir attaché chaque patte 7 Bouclez l attache à la poitrine La bonne hauteur pour l attache à la poitrin...

Страница 49: ...ionnement est en position rehausseur Si le dossier du siège est ajustable assurez vous qu il est en position vertical avant de placer l enfant 1 Placez le siège pour enfant dans le siège du véhicule et placez l enfant dans le siège pour enfant 2 Ajustez l appui tête pour que le guide de ceinture positionne la ceinture baudrier au niveau ou juste au dessus des épaules de l enfant Les oreilles de l ...

Страница 50: ... pour ne pas endommager la mousse absorbante d énergie Rangement de la vis de verrouillage 4 4 Ajustez le harnais à sa position la plus haute puis détachez du harnais les bandes à crochet et boucle de la housse de l appui tête 6 Détachez les pinces sous les accoudoirs et tirez la housse des guides de ceinture inférieure 8 Retirez les bandes élastiques des crochets en dessous du siège pour enfant p...

Страница 51: ...eront pas comme prévu lors d un accident Remplacement de la housse 1 Placez la housse autour de l appui tête Faites attention de ne pas endommager la mousse absorbante d énergie 2 Tirez le tissu de façon serrée et glissez le entre la coque du siège pour enfant et le coussin d impact latéral 2 3 Placez le bas de la housse par dessus la partie basse de la coque du siège pour enfant puis passez les b...

Страница 52: ...nez et poussez l arrêtoir de la boucle au travers de la coque et de la housse du siège Tirez le coussinet abdominal par dessus la boucle pour le retirer 11 Ré attachez les pinces derrière les accoudoirs et faites glisser le matériel sous les guides de ceintures inférieurs 9 Replacez le coussinet abdominal a Tirez les bandes élastiques autour de la boucle b Poussez la boucle au travers du coussin a...

Страница 53: ...cule ou attachez les attaches inférieures au barres d ancrage Tirez sur la tige de la boucle de ceinture ou les attaches inférieures dans la fente de ceinture pour l aligner correctement dans le chemin de ceinture Serrer CONSEIL Pendant l installation du siège pour enfant si la ceinture avec la boucle du véhicule est trop longue vous pouvez Entortillez la ceinture du véhicule avec la boucle pour u...

Страница 54: ...ssoires ou appareils de serrement non conçu par Britax Child Safety Inc n est pas approuvé par Britax Leur utilisation pourrait rendre ce siège pour enfant non conforme aux normes de sécurité de véhicule automobile ou ne pas performer tel que voulu lors d un accident Leur utilisation annule la guarantie de Britax LIMITATION DES ENDOMMAGEMENTS Cette guarantie et ces recours ci haut sont exclusifs e...

Страница 55: ...106 Notes ...
Страница 56: ...Britax Child Safety Ltd P O Box 7289 RPO Brunswick Square Saint John NB E2L 4S6 A Britax Childcare Group Limited company Une société de Britax Childcare Group Limited Tel 1 888 427 4829 www Britax ca ...

Отзывы: