


Installing the EnergyTrak Mobile App
You can download the EnergyTrak mobile app from the respective app store for your mobile device. Scan the QR code
below from your mobile device for easy access! You can also navigate to
in your
browser for quick forwarding to the app store for your device
Alternatively, you can search “EnergyTrak” in the respective app store to find and install the app.
User Creation and Management
Users can be managed and created from the Users screen in the EnergyTrak Mobile App. User account types include:
Pro Admins
With the most permissions available to Pro users, Pro Admins have the ability to:
•
Create and manage users, including Pro Admins, Pro Technicians, and System Owners
•
Create and manage customer sites
•
Add or remove sites to Pro Technician user accounts
•
Setup new products
•
Reconfigure installed products
•
View all customer sites under their business
•
Receive notifications for all registered sites
Pro Technicians
Designed for Pro users who are working with customer products every day, Pro Technicians have a streamlined feature
set to help them focus on what needs to get done:
•
Create new sites
•
Create new System Owner users
•
Setup new products
•
View assigned customer sites
•
Reconfigure installed products at assigned customer sites
•
Receive notifications from assigned customer sites
System Owners
For users purchasing an EnergyTrak-enabled product and installing it at their site, System Owners get the information
and control they need over their site and installed products, including:
•
View site and product details
•
Control installed products
•
Change WiFi network settings
•
Receive notifications from registered sites
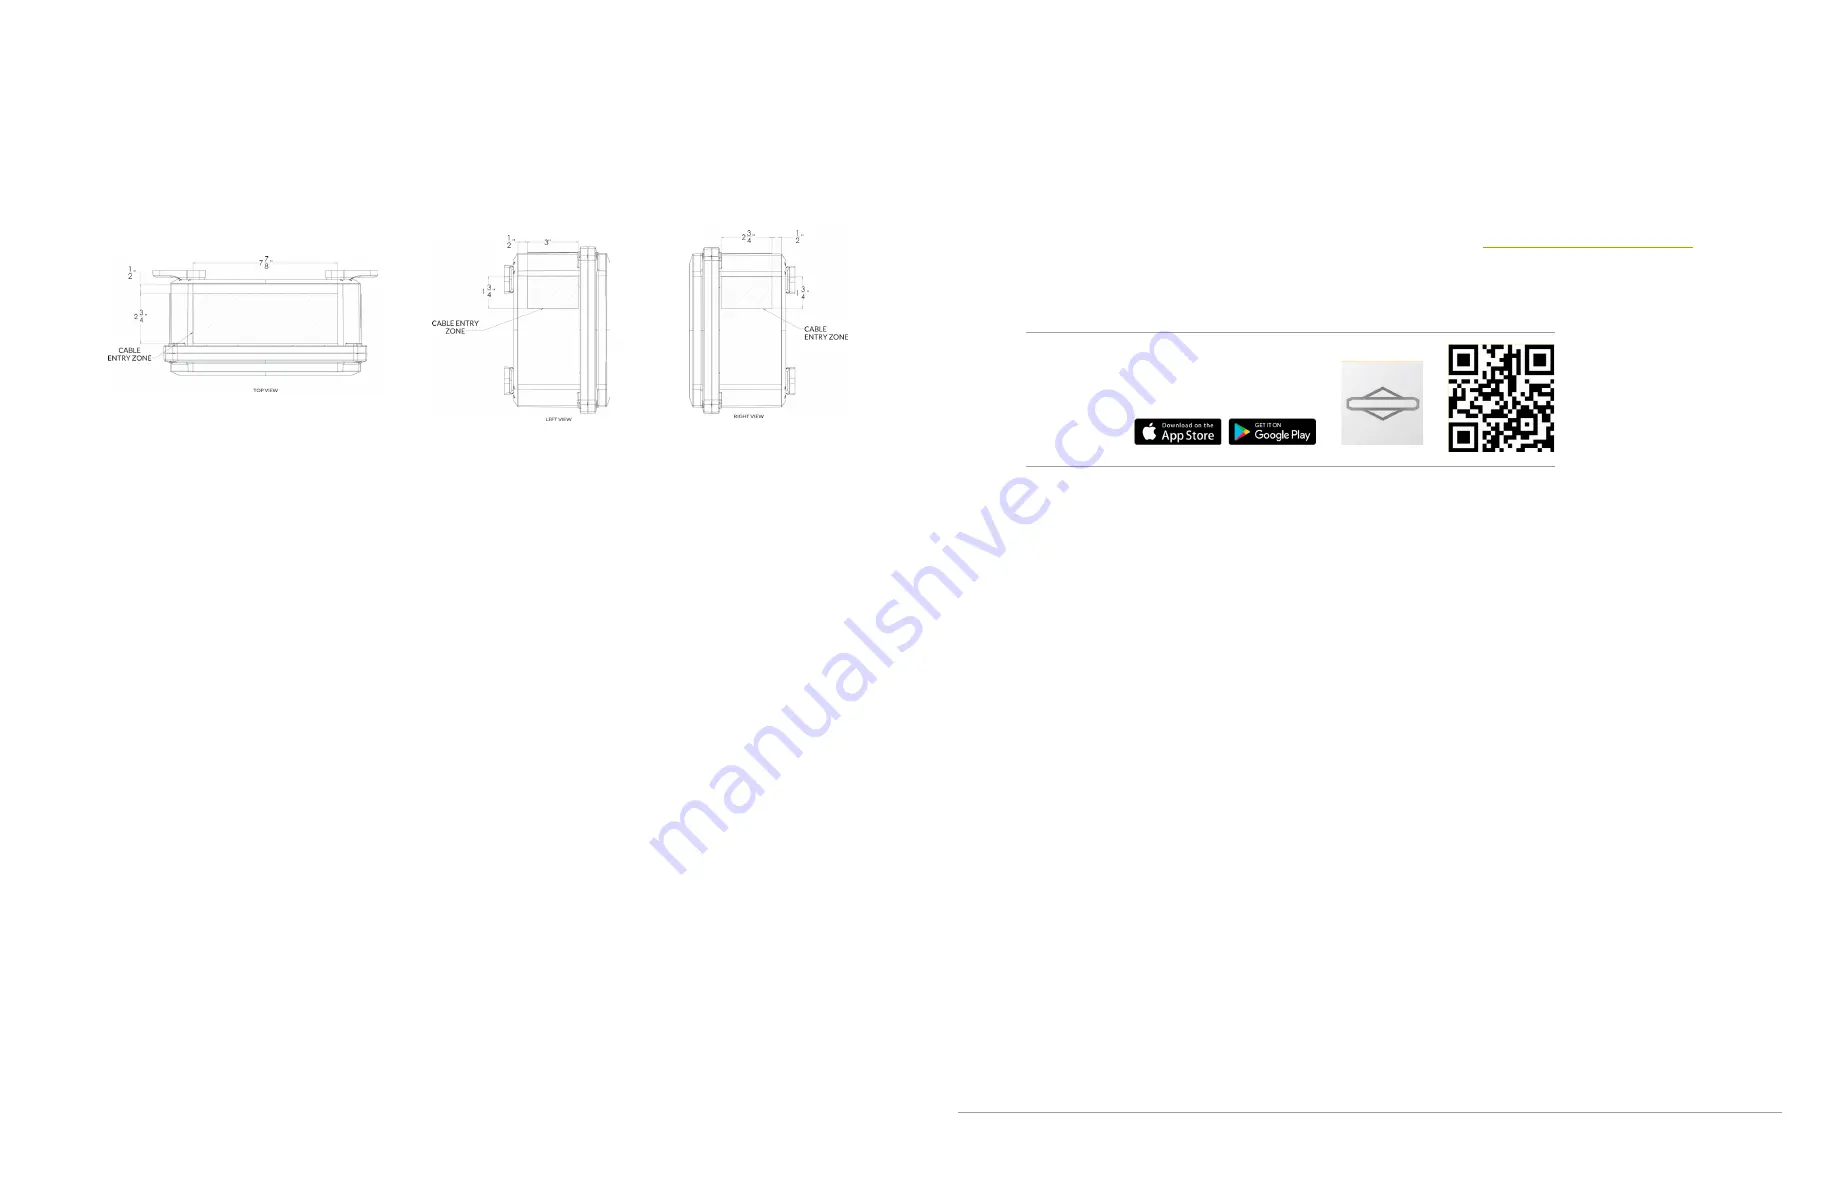
Gateway Enclosure Conduit Entry Points
1. Entry points for cabling should be drilled into the flat surface plane on the top of the gateway enclosure and/or the upper sides of the
gateway enclosure. Use the visual diagrams in this section for more specific guidance on proper entry point locations.
2. It is recommended to drill the fewest possible entry points to accommodate the required cabling based on the specific installation.
3. Use the appropriate conduit fittings for the installation to maintain the outdoor rating per local AHJ (authority having jurisdiction).
Wiring Install Instructions
4. Connect GW-1 to the RJ45 port labeled BMS on the SimpliPHI 6kW Inverter.
5. Connect one end of GW-8 to the RJ45 port on GW-1 and the other end to the RJ45 port labeled DEVICE on one of the SimpliPHI
4.9kWh Batteries. If there are multiple batteries installed in parallel, the installer can connect this to the port on any of the
batteries.
6. Connect the 3 position connector on GW-2 to the CAN port on the EnergyTrak Gateway.
7. Connect one end of GW-10 to the RJ45 port on GW-2 and the other end to one of the two open RJ45 ports labeled BATTERY on
the battery bank. An available RJ45 terminator should be installed in the other open RJ45 port labeled BATTERY on the battery
bank.
8. Connect GW-3 to GW-6 using the DB9 connectors.
9. Connect GW-6 to any of the four open USB ports on the EnergyTrak Gateway.
10. Connect one end of GW-9 to GW-3 and the other end to the RJ45 port labeled RS-232 on the SimpliPHI 6kW Inverter.
11. Connect the 2 position connector on GW-4 to the POWER port on the EnergyTrak Gateway.
12. Connect the black wire on GW-4 to the -Vin port on the DC-DC power supply unit.
13. Connect the red wire on GW-4 to the +Vin port on the DC-DC power supply unit.
14. Connect one end of GW-11 to the ETHERNET port on the EnergyTrak Gateway and the other end to an open port on the site’s
network switch or router (customer owned). NOTE: Verify with the site owner that the port on the site’s network switch or router
can provide Internet access to the Gateway. This step is optional if using WiFi to connect the EnergyTrak Gateway to the Internet.
15. Ensure GW-5 is securely installed between the fuse terminal block and the DC-DC power supply unit. This wire was pre-installed
prior to shipping.
16. Connect GW-7 ring terminals onto the GW-12 electrical wires. It is recommended to use one red wire and one black wire for easy
identification of the DC circuit.
17. Connect the red electrical wire assembly to the positive power terminal on the SimpliPHI 4.9kWh Battery using the GW-7 ring
terminal, and connect the other end to the 3A Fuse Terminal Block.
18. Connect the black electrical wire assembly to the negative power terminal on the SimpliPHI 4.9kWh Battery using the GW-7 ring
terminal, and connect the other end to the -Vo port on the DC-DC power supply unit.
Once the SimpliPHI ESS and EnergyTrak Gateway installations are complete, proceed with setup in the EnergyTrak app.
Review the following section for guidance on using EnergyTrak.
>>>
EnergyTrak
Briggs & Stratton
EnergyTrak for Pros
E N E R G Y T R A K U S E R M A N U A L | 9


