background image

29

Part 4 - Reassembly

Refer to the Torque Specifications provided on the
pump sectional view found at the beginning of this
section when reassembling this product.

Pump Head Assembly

The pop off valve is not serviceable. The entire head
assembly must be replaced if a problem occurs in these
components.
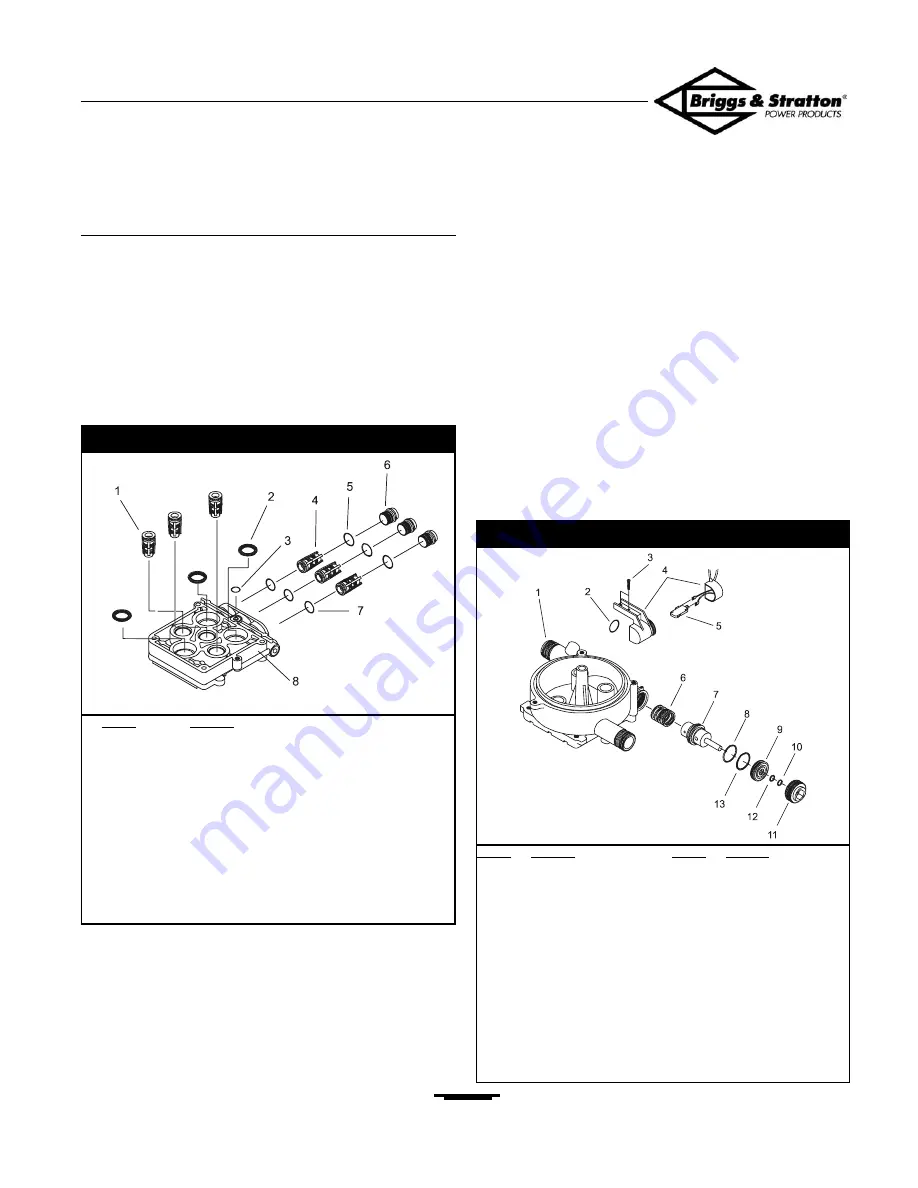
To assemble the pump head, refer to Figure 4.13 for the
following steps:

1. Install three (3) outlet check valve o-rings (item 7). Ensure

they lie flat at the bottom of the cavity.

2. Install three (3) outlet check valves, with large end first

(item 4).

3. Install and snug the three (3) M18-1.5 outlet caps with

pre-installed o-rings (items 5 & 6).

After the pump is assembled, tighten the three (3) outlet
caps to the torque value specified in the Torque Chart,

found on Figure 4.2 (Exploded View) at the beginning of this
chapter.
4. Press three (3) inlet check valves (item 1) into place.

Notice that the small end of the valve goes into the cavity
first, and that the valve is pressed in until it is flush with
the head surface. It may be necessary to pre-lubricate the
check valve o-rings with silicone spray before installation.

5. Pre-lubricate three (3) high pressure water seals (item 2)

with silicone spray. Insert a seal into each piston cylinder
cavity with the flat side facing out. Review Figure 4.11,
seen earlier, for a view of proper seal orientation.

6. Install the pop off valve o-ring (item 3). Petroleum jelly

will help to hold it in place.

Auto Start Switch Assembly

Refer to Figure 4.14 for this assembly.

Section 4 • Small Frame Electric Pump

Portable Pressure Washer Familiarization and Troubleshooting Guide

Item

Name

1

Inlet check valve assembly

2

High pressure water seal

3

Pop off valve o-ring

4

Outlet check valve assembly

5

Outlet port cap o-ring

6

Outlet port cap

7

Check valve o-ring

8

Pump head

Item

Name

1

Piston housing

2

Rubber diaphragm

3

Taptite screw

4

Auto switch
housing

5

Auto switch

6

Auto switch piston
spring

7

Auto switch piston
assembly

Item

Name

8

O-ring

9

Auto switch piston
return stop

10

Backup ring

11

Retainer cap

12

O-ring

13

Backup ring

Figure 4.13 — Pump Head

Figure 4.14 — Auto Start Switch

Содержание CE8070

Страница 1: ... Products line 86262GS Portable Generators Familiarization Troubleshooting Guide 190275 Hand Held Generator Familiarization Troubleshooting Guide 275110 Outboard Motor Repair Manual Quality Starts With A Master Service Technician TM Visit us at www briggsandstratton com www generac portables com www briggspowerproducts com For Briggs Stratton Discount Parts Call 606 678 9623 or 606 561 4983 www my...

Страница 2: ...Pressure Washer Familiarization Troubleshooting Guide Electronic Version B3277 Rev 1 4 03 Please click the Bookmarks tab at left to enable the search and navigational features of this document ...

Страница 3: ...y possible hazards and or results of each procedure or method We have not undertaken any such wide evaluation Therefore anyone who uses a procedure or method not described by the manufacturer must first satisfy himself that neither his safety nor the safety of the product will be endangered by the service or operating procedure selected All information illustrations and specifications contained in...

Страница 4: ...me Electric Pump 17 Part 1 Specifications and Views 17 Performance Specifications 17 Cross Sectional View 18 Exploded View 20 Part 2 Disassembly 22 General Information Special Tools 22 Pump Head 22 Piston Housing Removal 23 Piston Housing Disassembly 24 Chemical Injection System 24 Auto Start Switch Assembly 25 Axial Cam 26 Part 3 Inspection 27 Seals O Rings and Gaskets 27 Piston Spring Assemblies...

Страница 5: ... 51 Cross Sectional View 52 Exploded View 55 Part 2 Disassembly 56 General Information Special Tools 56 Pump Head 56 Axial Cam Drive Components 57 Pistons and Piston Springs 57 Pump Head 58 Spacer Plate 58 Inlet Check Valves 59 Outlet Check Valves 59 Unloader Spindle Assembly 59 Chemical Injection System 60 Thermal Bypass Actuator Removal 60 Part 3 Inspection 61 Seals O Rings and Gaskets 61 Seals ...

Страница 6: ...on 87 Seals O Rings and Gaskets 87 Oil Seals 87 Inlet Check Valve Seals 87 Outlet Check Valve Seals 87 Head Gasket 88 Engine Adapter Gasket 88 Engine Adapter Pump Crankcase Spacer Plate and Head 88 Axial Cam Drive Components 88 Piston Spring Assemblies 89 Unloader Pressure Regulator Valve 90 Part 4 Reassembly 91 Engine Adapter 91 Piston Oil Seals and Pistons 94 Spacer Plate 96 Pump Head Assembly 9...

Страница 7: ...4 Table of Contents Portable Pressure Washer Familiarization and Troubleshooting Guide ...

Страница 8: ... water is drawn into the piston chamber On the piston s pressure stroke that piston s inlet check valve closes and its outlet check valve is forced open so pressurized water can leave the chamber There is one inlet check valve and one outlet check valve for each piston PRESSURE WASHER OPERATION Section 1 Operation Pressure Washer Familiarization and Troubleshooting Guide Item Name 1 Spray nozzle 2...

Страница 9: ...valve which automatically replaces hot water with cool water 9 The optional chemical injection assembly item 8 permits detergents or other chemicals to be drawn into the water stream and along with the water discharged from the nozzle 10 The nozzle collar item 2 a part of the spray gun nozzle permits easy selection of high or low velocity spray or a fan or stream spray pattern 11 An optional easy ...

Страница 10: ... engine or electric motor 4 The number of pistons Theoretically a pump will always move the same volume of water regardless of flow restrictions The pump s axial cam is coupled to the engine crankshaft so that it revolves at the same speed as the engine Figure 2 1 depicts a simplified cross sectional diagram of a typical pressure washer pump mechanism If the pump simply discharges water to atmosph...

Страница 11: ...re counterclockwise to decrease pressure The pressure washer is provided with an unloader pressure regulator valve to protect the pump and hose system whenever water flow is blocked upstream Blockage is caused when the spray gun trigger is normally closed or by a kinked pressure hose or a clogged nozzle Without an unloader system water pressure could increase until the engine stalls or part of the...

Страница 12: ...enturi a spring loaded ball and seat a chemical siphon tube and a strainer As low pressure water flows through the injector venturi throat its velocity increases and its pressure decreases The suction created by the low pressure at the venturi throat draws the liquid chemical through a strainer into the siphon tube around and past the spring loaded ball through small orifices in the venturi and in...

Страница 13: ...ting condition Inlet water is connected to the pump s garden hose connector Air has been purged from the pump s water passages The check ball is attached to its restraint magnet magnet not shown In this condition the pump s internal water pressure is at garden hose pressure Water is free to circulate throughout the pump without restriction thus permitting an easier pull on the starter rope As soon...

Страница 14: ...ac Portable Products does not recommend exceeding a total length of 100 feet between pump and nozzle because excessive length may adversely affect chemical injection and adequate high pressure operation Spray Guns Generac Portable Products uses several types of spray guns for different model pressure washers A diagram of a typical spray gun with the trigger closed is seen in Figure 2 11 Section 2 ...

Страница 15: ...pressure Use of a nozzle having too large an orifice will result in a reduced system pressure In addition to establishing system pressure the nozzle breaks the liquid into droplets forms the spray pattern and propels the liquid in the proper direction Several different types of spray nozzles may be used The most popular type provides adjustable pressure and spray patterns For Generac Portable Prod...

Страница 16: ...d so that the pointed part the screen points away from the pump towards the garden hose A typical inlet supply connection is seen in Figure 3 2 Clean the strainer or replace it if it is damaged torn or perforated Reassemble the connectors using petroleum jelly as necessary to ease the connections Hose Spray Gun and Wand Systems With the pressure washer OFF inspect the hose connection to the spray ...

Страница 17: ...ng Generac nozzle kit part number 96961 A length of 17 gauge 0 039 inch wire may be used to clean the nozzle If desired a nozzle cleaning rod may be ordered by specifying Generac nozzle kit part number 96869 6 Remove any additional dirt from the wand by back flushing with water as described below and shown in Figure 3 4 a Hold the water supply against the wand and back flush for about 30 seconds t...

Страница 18: ...p is equipped with a pump drain plug Please refer to the maintenance instructions that were shipped with your non Generac Portable Products manufactured pump if it is necessary to change pump oil Pay particular attention to the manufacturer s recommended torque values when tightening drain plugs and breather dipstick caps To change oil in Generac Portable Products manufactured pumps refer to Figur...

Страница 19: ... Drain water from the high pressure hose then coil the hose and stow it properly 4 Store the unit in a clean dry area Protection Against Freezing To protect the pump against freezing proceed as follows 1 Draw automotive windshield washer fluid into the pump a Connect a three 3 foot length of garden hose to the pump inlet b While holding the open hose end higher than the pump pour the washer fluid ...

Страница 20: ...ectric pumps sectional and exploded views and a table showing recommended torque values are provided below Performance Specifications Pressure in pounds per square inch is adjustable up to the unit s rated pressure Flow rate is given in gallons per minute Pump assemblies are listed by part number and were current at time of publication Other pump assemblies will become available as our products ev...

Страница 21: ...ical small frame electric pump is shown in Figure 4 1 in cross section Section 4 Small Frame Electric Pump Portable Pressure Washer Familiarization and Troubleshooting Guide Figure 4 1 Small Frame Electric Pump cross sectional view ...

Страница 22: ...rn spring 24 3 Oil seal 25 3 Pilot spacer Item Qty Description 26 3 High pressure water seal 27 4 Lock washer M6 ribbed 28 4 SHCS M6 1 0 x 35mm 29 3 Piston 30 1 Pump head 31 3 Inlet check valve 32 3 Outlet check valve 33 1 Hex socket set screw w Locktite DO NOT REMOVE 34 1 Taper plug DO NOT REMOVE 35 1 Pop off valve spring 36 1 Pop off valve ball seat 37 1 Pop off valve check ball 38 1 O ring 39 4...

Страница 23: ...rame Electric Pump Portable Pressure Washer Familiarization and Troubleshooting Guide Item Torque Value 6 15 17 ft lbs 19 7 9 ft lbs 28 9 12 ft lbs 33 9 12 ft lbs 40 2 4 ft lbs 41 2 4 ft lbs 48 10 12 ft lbs 54 Brass 15 23 ft lbs Nylon 10 12 ft lbs 57 20 30 in lbs Figure 4 2 Small Frame Electric Pump exploded view ...

Страница 24: ...n return spring 24 3 Oil seal 25 3 Pilot spacer 26 3 High pressure water seal 27 4 Lock washer M6 ribbed 28 4 SHCS M6 1 0 x 35mm 29 3 Piston Item Qty Description 30 1 Pump head 31 3 Inlet check valve 32 3 Outlet check valve 33 1 Hex socket set screw w Locktite DO NOT REMOVE 34 1 Taper plug DO NOT REMOVE 35 1 Pop off valve spring 36 1 Pop off valve ball seat 37 1 Pop off valve check ball 38 1 O rin...

Страница 25: ...clamp and use an 8mm wrench to remove the three 3 M8 1 5 outlet port caps items 5 6 5 Remove the three 3 outlet check valves and o rings items 4 7 6 Do not attempt to remove the pipe plug item 10 from the head item 15 It is installed with a thread locking compound to secure the pop off components and is not meant to be removed Should these components be damaged or broken the entire head assembly m...

Страница 26: ...he motor Remove these bolts slowly and evenly 4 Using a 5mm wrench gradually loosen each of the three 3 M6 1 0 x 20 bolts that hold the motor to the piston housing as seen in Figure 4 5 NOTE Piston housing is full of gear oil Take care to handle the fluid safely Section 4 Small Frame Electric Pump Portable Pressure Washer Familiarization and Troubleshooting Guide Item Name 1 Piston housing 2 Pisto...

Страница 27: ...l injection fitting check ball and spring items 3 4 5 2 Using a large straight tip screwdriver unscrew and remove the chemical injection venturi and o ring items 1 2 from discharge port It may be necessary to insert a sheet metal screw into the venturi hole then pull on the screw with a pliers to remove the venturi and o ring Section 4 Small Frame Electric Pump Portable Pressure Washer Familiariza...

Страница 28: ...o non destructively remove the components grasp the end of the piston shaft with a soft jaw locking pliers and lever the assembly out of its port prying against the port rim b If no soft jaw pliers are available a short length of brass tubing can be slipped over the piston shaft A standard locking jaw plier can be used to grasp the tubing and squeeze it against the shaft then remove as described i...

Страница 29: ...assembly Because the gear is pressed onto the cam with special factory tooling the cam and gear must be replaced as an assembly 5 Remove the remaining thrust washers and needle bearing Section 4 Small Frame Electric Pump Portable Pressure Washer Familiarization and Troubleshooting Guide Item Name 1 Axial cam idler shaft 2 Bearing washer 3 Axial cam gear assembly 4 Needle thrust bearing 5 Motor 6 B...

Страница 30: ... piston and unloader housing Note the oil seal and pilot spacer illustrated in Figure 4 11 The oil seal lip will face towards the piston spring and retainer to retain the pump oil Inspect the three 3 piston springs Replace any spring that is damaged or broken Pump Head and Piston Housing Clean all parts Inspect carefully for cracks damage wear etc Check for corrosion Replace any damaged defective ...

Страница 31: ... not worn or cracked Ensure that the fastening bosses are not cracked or chipped Inspect the housing for the absence of cracks chips evidence of oil leaks or other damage Inspect the motor drive gear for evidence of wear or damage Inspect the motor wires for evidence of corrosion fraying or damaged connectors wires or other defects Replace the motor assembly as a unit if any defects are found Sect...

Страница 32: ... pressed in until it is flush with the head surface It may be necessary to pre lubricate the check valve o rings with silicone spray before installation 5 Pre lubricate three 3 high pressure water seals item 2 with silicone spray Insert a seal into each piston cylinder cavity with the flat side facing out Review Figure 4 11 seen earlier for a view of proper seal orientation 6 Install the pop off v...

Страница 33: ... auto switch housing to the piston housing Make sure the auto switch housing is anchored at the midpoint of its lateral adjustment After the pressure washer is assembled it may be necessary to adjust the position of the auto switch housing to ensure proper auto switch operation Chemical Inject Assembly Refer to Figure 4 15 for this assembly 1 Install the check ball into the chemical inject fitting...

Страница 34: ...ll the three 3 check valve o rings item 4 Use a small amount of petroleum jelly to hold them in place 2 Install the three 3 pilot spacers item 3 over the pistons with large end inserted in piston housing 3 Install the shuttle valve o ring item 5 Use a small amount of petroleum jelly to hold it in place 4 Carefully lift the pump head assembly invert it and align the high pressure water seals with t...

Страница 35: ...rust bearing item 1 on the thrust washer either side up 9 Install the large o ring into the piston housing groove 10 Ensure that the idler shaft protrudes from the axial cam bearing assembly about 8mm This will make motor alignment easier Oil Fill Pour the specified amount of 80W90 oil into the piston housing For specific recommendations for oil type and capacity please refer to the table given in...

Страница 36: ... its mating spade lug in the housing and switch assembly 4 Fasten the housing and switch assembly to the motor cover housing with four 4 Plastite 6 19 x 0 75 screws 5 Reassemble the pump into the pressure washer housing taking care to avoid pinching wires etc 6 Cthe pressure washer to a water supply and connect the high pressure hose wand and spray gun Connect the pressure washer to line voltage t...

Страница 37: ...r missing motor adapter o ring b Motor adapter cap screws not tightened properly a Install new o ring b Tighten to correct torque 4 Oil leak between motor adapter and piston unloader housing a Missing or bad o ring seal b Cap screws not tightened properly a Install new o ring seal b Tighten to correct torque 5 Pump does not produce pressure exhibits erratic pressure chatters or has a low water vol...

Страница 38: ...so presented are sectional and exploded views of this type of pump assembly Performance Specifications Pressure in pounds per square inch is adjustable up to the unit s rated pressure Flow rate is given in gallons per minute A suffix denotes pumps with thermal relief valve Pump assemblies are listed by part number and were current at time of publication Other pump assemblies will become available ...

Страница 39: ...w A typical small frame gas pump is shown in cross section in Figure 5 1 Section 5 Small Frame Gas Pump Portable Pressure Washer Familiarization and Troubleshooting Guide Figure 5 1 Small Frame Gas Pump cross sectional view ...

Страница 40: ...e if equipped w sealant 23 3 Outlet check valve cap 24 1 Unloader seat 25 1 Unloader seat O Ring 26 1 Unloader piston 27 2 Unloader split ring seal 28 1 Unloader spring 29 1 Unloader cap O Ring 30 1 Unloader cap 31 1 Pipe plug if item 22 not equipped w sealant 32 1 Chemical injection hose barb 33 1 Plug w sealant 34 1 Chemical injection ball 35 1 Chemical injection spring 36 1 Chemical injection v...

Страница 41: ...as Pump Portable Pressure Washer Familiarization and Troubleshooting Guide Torque Chart Item Torque 23 15 17 ft lbs 30 Brass 15 18 ft lbs Plastic 7 10 ft lbs 31 15 18 ft lbs 32 9 12 in lbs 33 12 15 ft lbs 36 20 30 in lbs 40 9 12 ft lbs 42 9 12 ft lbs 43 15 18 ft lbs Figure 5 2 Small Frame Gas Pump exploded view ...

Страница 42: ...ve cap 24 1 Unloader seat 25 1 Unloader seat O Ring 26 1 Unloader piston 27 2 Unloader split ring seal 28 1 Unloader spring 29 1 Unloader cap O Ring 30 1 Unloader cap 31 1 Pipe plug if item 43 not equipped w sealant 32 1 Chemical injection hose barb 33 1 Plug w sealant 34 1 Chemical injection ball 35 1 Chemical injection spring 36 1 Chemical injection venturi 37 6 Low pressure transfer O Ring 39 7...

Страница 43: ...ure transfer boss 4 Remove the three 3 M8 1 5 outlet check valve caps and O Rings 5 Remove the three 3 outlet check valves and O Rings 6 Do not attempt to remove the pipe plug item 7 It is installed with a thread locking compound and is not meant to be removed Piston Unloader Housing Removal Refer to Figure 5 4 for this procedure Before disassembling the piston and unloader assembly do the followi...

Страница 44: ...Figure 5 6 for this disassembly as follows 1 Remove O Ring from housing 2 Remove the three 3 pistons springs and retainers To do this grasp the piston springs and pull straight out The retainers will stay attached to the pistons 3 Remove the three 3 piston oil seals 4 Remove the thermal relief valve if present It is not necessary to remove the pipe plug if installed in place of the thermal relief ...

Страница 45: ...ight differences depending on production date If the entire unloader system is replaced newer assemblies are completely interchangeable with older models 2 Remove the unloader spring and the unloader piston These pieces should just slide out 3 Remove the unloader seat by inserting a 90 O Ring pick into the orifice machined in the side of the seat then gently pull the seat out of the housing Sectio...

Страница 46: ...f all seals and O Rings for any defects that may affect the proper operation of the pressure washer Piston Spring Assemblies Referring to Figure 5 10 inspect the three 3 pistons carefully Reject any piston that is scratched dented or otherwise damaged CAUTION Do not strike a piston with any object or use a piston to strike any object Do not drop the piston Dropping the piston will result in damage...

Страница 47: ...ry Axial Cam Drive Components Referring to Figure 5 12 carefully inspect the engine adapter bearing and the axial cam bearing assemblies for wear damage and freedom of rotation Replace any damaged or defective bearing assembly Inspect the retainer washer and the thrust washer Replace if damaged Inspect the axial cam Replace if worn excessively or damaged Section 5 Small Frame Gas Pump Portable Pre...

Страница 48: ... Install the M25 1 0 unloader cap and O Ring 7 Tighten the unloader cap to the torque value specified in the Torque Chart found on Figure 5 2 Exploded View at the beginning of this chapter Chemical Injection Assembly Refer to Figure 5 14 for this assembly 1 Install the check ball into the chemical injection nipple followed by the spring with the small end of the spring towards the ball 2 Install t...

Страница 49: ...the thermal relief valve item 3 4 Tighten the thermal relief valve or substitute plug to the torque value specified in the Torque Chart found on Figure 5 2 Exploded View at the beginning of this chapter Pump Head Assembly Refer to Figure 5 16 for this assembly 1 Install the three 3 low pressure transfer O Rings Use a small amount of petroleum jelly to hold them in place 2 Install the high pressure...

Страница 50: ... holes on the housing 6 Referring to Figure 5 18 install the three 3 M6 1 0 x 25 socket head cap screws into the mounting screw holes on the engine adapter and thread them into the piston housing 7 Tighten the M6 1 0 cap screws to the torque value specified in the Torque Chart found on Figure 5 2 Exploded View at the beginning of this chapter NOTE The engine adapter bolt holes line up with the hol...

Страница 51: ... over the pistons which will be protruding from the piston housing 3 Install the three 3 low pressure transfer O Rings around the inlet openings on the piston housing as seen in Figure 5 20 Section 5 Small Frame Gas Pump Portable Pressure Washer Familiarization and Troubleshooting Guide Figure 5 19 Invert Pump Assembly Figure 5 20 Install Pilot Spacers O Rings Item Name 1 Pump head 2 Pilot spacer ...

Страница 52: ...d amount of 80W90 oil through the port used by the engine crankshaft Verify that the oil level reaches the upper lip of the piston housing as shown in Figure 5 23 The pump can now be installed onto the engine For specific recommendations for oil type and capacity please refer to the table given in Part 1 at the beginning of this section Section 5 Small Frame Gas Pump Portable Pressure Washer Famil...

Страница 53: ...missing motor adapter o ring b Motor adapter cap screws not tightened properly a Install new o ring b Tighten to correct torque 4 Oil leak between motor adapter and piston unloader housing a Missing or bad o ring seal b Cap screws not tightened properly a Install new o ring seal b Tighten to correct torque 5 Pump does not produce pressure exhibits erratic pressure chatters or has a low water volum...

Страница 54: ...s Rated Pressure is given in pounds per square inch Flow Rate is given in gallons per minute MEDIUM FRAME PUMP Section 6 Medium Frame Pump Portable Pressure Washer Familiarization and Troubleshooting Guide Pump Rated Flow Unit Engine Pump Head Piston Oil Type Assembly Pressure Rate Style Shaft Material Capacity Part No A1803 2250 2 222 Horizontal Straight Aluminum Ceramic 80w90 280ml A1803A 2000 2...

Страница 55: ...l View A typical medium frame pump is shown in cross section in Figure 6 1 Section 6 Medium Frame Pump Portable Pressure Washer Familiarization and Troubleshooting Guide Figure 6 1 Medium Frame Pump cross sectional view ...

Страница 56: ...Unloader spring 24 1 Thermal actuator piston o ring 25 1 Thermal actuator spring 26 1 Thermal actuator piston 27 3 Piston Item Qty Description 28 1 Oil breather cap 29 Loctite 30 1 O ring 31 1 Axial cam bearing assembly 32 1 Axial cam 33 1 Engine adapter 34 1 Engine adapter bearing 35 1 Thrust washer 36 1 O ring 37 1 Washer retainer 38 1 Engine shaft adapter 39 1 C ring cam retainer 40 4 Button he...

Страница 57: ...e 1 20 30 ft lbs 11 10 12 ft lbs 14 9 12 ft lbs 19 20 23 ft lbs 29 24 36 in lbs w Loctite 40 18 20 ft lbs 44 10 12 ft lbs 50 18 20 ft lbs Certain components have been changed added or deleted since this Medium Frame pump became available Always refer to the Owner s Manual shipped with each model pressure washer for appropriate part number references Figure 6 2 Medium Frame Pump exploded view ...

Страница 58: ...ew M6 1 0 x 8mm 22 1 Plastic cap 23 1 Unloader spring 24 1 Thermal actuator piston o ring Item Qty Description 25 1 Thermal actuator spring 26 1 Thermal actuator piston 27 3 Piston 29 1 Oil breather cap 30 1 O ring 31 1 Axial cam bearing assembly 32 1 Axial cam assembly 33 1 Engine adapter 34 1 Engine adapter bearing assembly 36 1 O ring 40 4 Button head cap screw 5 16 24 or 4 Socket head cap scre...

Страница 59: ...pan underneath the pump crankcase to catch pump oil Remove the pump as described below 1 Referring to Figure 6 3 replace the two 2 M6 1 0 x 20 cap screws identified with arrows on the figure with two 2 M6 1 0x 45 hex head bolts 2 Ensure the two bolts described in 1 above are tight then remove the four 4 remaining M6 1 0 x 20 cap screws CAUTION Do Not attempt to disassemble the pump without install...

Страница 60: ...its so equipped completely remove the engine adapter gasket If necessary remove the pilot sleeve from these older style engine adapters This sleeve is secured into the housing with LockTite Pistons and Piston Springs Refer to Figure 6 7 for this disassembly The three 3 pistons along with their springs can be removed from the pump crankcase by grasping the springs and pulling straight out Section 6...

Страница 61: ...iston 2 Remove the thermal bypass piston and the thermal bypass spring 3 Remove the three 3 low pressure water seals from the spacer plate 4 Completely remove all traces of the head gasket from the mating surface 5 Remove the three 3 white pilot spacers from the pump crankcase 6 Using a small flat blade screwdriver gently remove the three 3 piston oil seals from the pump crankcase Section 6 Medium...

Страница 62: ...k valves Unloader Spindle Assembly Referring to Figure 6 11 1 Unscrew and remove the unloader handle turning it counterclockwise 3 Carefully loosen and unscrew the unloader spindle assembly with a 19mm deep socket or wrench Section 6 Medium Frame Pump Portable Pressure Washer Familiarization and Troubleshooting Guide Figure 6 10 Inlet Check Valve Removal Figure 6 11 Unloader Regulator and Chemical...

Страница 63: ...dle opening Push out the trapped line pressure seat the 9 32 ball and the rest of the unloader components It may be necessary to gently tap the end of the rod with the dead blow hammer Thermal Bypass Actuator Removal 1 Referring to Figure 6 12 secure the pump head to a rigid surface taking care to not damage the milled surfaces 2 Insert a medium sized flat blade screwdriver in the pump head water ...

Страница 64: ... pump illustrated in this chapter are the same for the inlet and outlet as shown in Figure 6 14 Earlier pump models used inlet check valves different from outlet check valves Be sure to observe the type of valve as they are removed so that proper reassembly can be performed Replacement check valves and o rings are provided in the seal kit Head Gasket The head gasket is installed between the pump h...

Страница 65: ...unit if the keyway or cam unit is worn or damaged Piston Spring Assemblies Referring to Figure 6 7 seen earlier inspect the three 3 pistons carefully Reject all three pistons if any one piston is scratched dented chipped or otherwise damaged WARNING Do not strike a piston with any object or use a piston to strike any object Do not drop the piston Measure the piston diameter and the piston length a...

Страница 66: ...ion Assembly Referring to Figure 6 20 inspect the chemical injection and unloader components for signs of damage obstructions or wear Replace any damaged or defective parts as necessary Section 6 Medium Frame Pump Portable Pressure Washer Familiarization and Troubleshooting Guide Figure 6 20 High Pressure Outlet Chemical Inject Assembly Item Name 1 Setscrew M6 1 0 x 8mm 2 Unloader handle 3 Unloade...

Страница 67: ...word TOP cast into it The oil breather designates the top of the pump crankcase Both top sides must be matched for proper pump operation 3 Retain the engine adapter to the engine with four 4 5 16 24x 3 4 screws and four 4 o rings or washers CAUTION When installing the engine adapter having the O Ring seals be sure to use the correct button head cap screws DO NOT use any other type fastener 4 Tight...

Страница 68: ...ls with 80W90 oil 2 Press a seal into one of the piston bores provided on the pump crankcase with the writing on the face of seal toward the installer Press the seal in until it bottoms Repeat this step for the two 2 remaining seals 3 Install the three 3 pilot spacers over the piston oil seals as shown in Figure 6 24 a The larger diameter flange of the pilot spacer mates with the crankcase bore b ...

Страница 69: ...the socket cast into the upper portion of the pump crankcase as shown in Figure 6 27 A small amount of petroleum jelly will hold these parts in the crankcase during subsequent assembly tasks Section 6 Medium Frame Pump Portable Pressure Washer Familiarization and Troubleshooting Guide Item Name 1 Crankcase 2 Thermal bypass spring 3 Thermal bypass piston 4 Thermal bypass o ring Item Name 1 Return s...

Страница 70: ...e that the thermal bypass piston remains aligned with its mating seat on the spacer plate High Pressure Seal Assembly Refer to Figure 6 29 for this assembly 1 Insert a bearing ring into each of the head s piston cylinders small end first Ensure that the ring is fully seated on its boss 2 Pre lubricate the three 3 high pressure seals with silicone spray 3 Insert a seal in each piston cylinder so th...

Страница 71: ... 3 outlet check valves a Position the pump head so that the outlet check valve ports are up b Install an o ring seal into the bottom of each check valve port c Align a check valve with the port so that the o ring end goes in first d Press the check valve into the bore e Ensure that an o ring is installed on an outlet port cap f Hand thread the cap into the port containing an installed check valve ...

Страница 72: ...njection venturi into the head 8 Carefully tighten the venturi to the torque value specified in the Torque Chart found on Figure 6 2 Exploded View at the beginning of this chapter Avoid stripping out the slot Unloader Spindle Assembly Refer to Figure 6 32 for this assembly 1 Lightly coat the unloader spindle threads and o rings with silicone spray 2 Insert the spindle into the bore provided on the...

Страница 73: ...he small stem of the thermal bypass actuator does not fall out during installation of the pump head 5 Install six 6 M8 1 25 socket head cap screws with six 6 M8 washers 6 Tighten the socket head screws in the order shown on Figure 6 34 to the torque value specified in the Torque Chart found on Figure 6 2 Exploded View at the beginning of this chapter Section 6 Medium Frame Pump Portable Pressure W...

Страница 74: ...adapter mounting holes and also position the three piston pivot shoes so that they engage the axial cam bearing race properly 6 When you are sure the pump crankcase and piston pivot shoes are properly aligned and positioned thread the two long hex head bolts into the engine adapter mounting holes 7 Visually verify that the piston shoes remain properly seated on the bearing race as you tighten the ...

Страница 75: ... chapter Referring to Figure 6 37 insert a funnel into the Oil Fill Breather cap threaded opening at top of the pump crankcase Add the amount and type of oil recommended in the table in Part 2 of the Common Pump Components section earlier in this manual Section 6 Medium Frame Pump Portable Pressure Washer Familiarization and Troubleshooting Guide Item Name 1 Funnel 2 Breather cap 3 Assembled pump ...

Страница 76: ...n spring c Bad o ring on thermal bypass piston d Low pressure water seals leaking a Install thermal bypass piston b Install new spring c Install new o ring d Install new low pressure seals 3 Water leakage between pump head and spacer plate a Head bolts improperly torqued b Defective head gasket c Damaged head d Missing or damaged o rings a Torque head bolts b Install good head gasket c Replace hea...

Страница 77: ... erratic pressure chatters or has a low water volume a Nozzle is set to low pressure mode b Incorrect spray nozzle is used c Spray nozzle is obstructed d Water Inlet blocked e Inadequate water supply to pump f Water supply hose kinked or leaking g Clogged inlet hose strainer h Water supply too hot i Worn or defective pump j Unloader regulator valve set wrong k Obstructed nozzle oe chemical venturi...

Страница 78: ... per minute Pump assemblies are listed by part number and were current at time of publication Other pump assemblies will become available as our product evolves LARGE FRAME PUMP Section 7 Large Frame Pump Portable Pressure Washer Familiarization and Troubleshooting Guide Pump Rated Engine Pump Head Flow Rate Piston Oil Type Assembly Pressure Shaft Material Capacity Part No 21300A 2250 Straight Alu...

Страница 79: ...View A typical large frame pump is shown in cross sectional view in Figure 7 1 Section 7 Large Frame Pump Portable Pressure Washer Familiarization and Troubleshooting Guide Figure 7 1 Large Frame Pump cross sectional view ...

Страница 80: ...ve 13 1 Retainer washer Item Qty Description 14 1 Straight engine shaft adapter 15 1 C ring cam retainer 16 1 Engine adapter gasket 17 4 Socket head cap screw 5 16 24 18 6 M6 ribbed lock washer 19 6 Socket head cap screw M6 1 x 20mm 20 6 Socket head cap screw M8 1 25 x 0 75 21 6 M8 ribbed lock washer 22 1 Engine adapter o ring 23 1 Tapered engine shaft adapter 24 4 O ring 25 4 Button head cap scre...

Страница 81: ...1 in Aluminum head 12 15 ft lbs 41 in Brass head 15 17 ft lbs 49 5 8 ft lbs Drain plug 180 in lbs max if equipped The larger view above is a typical tapered engine shaft parts group The inset is a typical straight engine shaft adapter axial cam parts group Certain components have been changed added or deleted since this large frame pump began production Always refer to the Owner s Manual shipped w...

Страница 82: ...adapter o ring 23 1 Tapered engine shaft adapter 24 4 O ring 25 4 Button head cap screw 5 16 24 x 0 75 Item Qty Description 26 1 Belleville washer 27 1 Jam nut 28 3 Piston 29 3 Piston return spring 30 1 Breather cap 31 1 Pump crankcase 32 3 Oil piston seal 33 3 Pilot spacer 34 3 Low pressure water seal 35 3 High pressure seal 36 3 Bearing seal ring 37 3 Backup ring 38 3 O ring 39 3 High pressure p...

Страница 83: ...le must necessarily be different than the axial cam used on a pump rated at 3 gallons per minute Special tools needed Special engine shaft adapter puller tool Generac Portable Products part number SRV95523 Dead blow mallet 0 25 dia 7 long brass rod Pump Head Before removing the pump head disconnect the inlet water hose from the pump s water inlet Also disconnect the spray gun high pressure hose fr...

Страница 84: ...aded portion of the engine shaft adapter b Turn the bolt on the tool firmly against the engine tapered shaft putting tension on the engine adapter Then strike the bolt head with a dead blow mallet c Continue tightening the tool bolt against the engine shaft and striking with the mallet until the engine shaft adapter is completely free of the engine shaft Remove the engine shaft adapter 7 Remove fo...

Страница 85: ... their springs can be removed from the pump crankcase by grasping the springs and pulling straight out Newer model pumps have the retaining ring attached permanently to the piston upper illustration On older models the springs are retained by spring retainers and a lock ring It is not necessary to remove the spring retainer and lock ring unless they are obviously damaged and require replacement Re...

Страница 86: ...de 8 Guide plug 9 Support ring 10 Elastic pin Item Name 11 Guide stem 12 Support ring 13 Piston 14 Zinc plated nut 15 Regulator spring 16 Spring guide stop 17 Knob insert 18 Pressure knob 19 Self locking nut 20 Piston seal Item Name 21 Stainless steel spring 22 Chemical injector body 23 Stop ring 24 Washer 25 Hose barb coupling 26 Adjusting screw 27 Chemical injection knob 28 Hose barb connection ...

Страница 87: ...nlet low pressure check valves refer to Figure 7 14 and proceed as follows 1 Insert the T handle through the puller tool thimble item 1 2 Turn the puller upper tee handle clockwise until the puller threads have engaged the check valve threads NOTE Do not turn the tool in too far An engagement of 2 or 3 threads is sufficient 3 With the puller threads engaged in the check valve threads hold the uppe...

Страница 88: ... the high pressure port tower and the outlet check valve will be removed 6 Repeat steps 2 to 5 for the other outlet check valves Thermal Bypass Actuator Removal Refer to Figure 7 16 and 1 Remove the small bypass piston 2 Obtain a brass rod approximately 1 4 5 35 mm in diameter and 7 long 3 Insert rod from the unloader pressure regulator valve side of the head 4 Tap the rod gently with the dead blo...

Страница 89: ...e pilot spacers 4 Remove the three 3 piston oil seals from the pump crankcase 5 Remove the thermal bypass piston and the thermal bypass spring 6 Completely remove all traces of the head gasket from the mating surface Section 7 Large Frame Pump Portable Pressure Washer Familiarization and Troubleshooting Guide Figure 7 17 Spacer Plate Removal Item Name 1 Thermal bypass spring 2 Thermal bypass pisto...

Страница 90: ... are pressed into cylindrical openings machined in the pump head followed by an o ring seal backup ring and check valve seat support Outlet Check Valve Seals The three 3 outlet check valves are assembled into the head with the components shown in Figure 7 20 Section 7 Large Frame Pump Portable Pressure Washer Familiarization and Troubleshooting Guide Figure 7 19 Inlet Check Valve Figure 7 20 Outle...

Страница 91: ... seen later in Figure 7 28 Replace if worn or damaged The engine adapter sleeve is retained to the engine adapter with Permabond No HM160 LOCTITE Referring to Figure 7 23 inspect the engine adapter bearing and the axial cam bearing assemblies for wear damage freedom of rotation and evidence of overheating Replace any damaged or defective bearing assembly Check the axial cam for wear damage scoring...

Страница 92: ...y one piston is scratched dented chipped or otherwise damaged CAUTION Do not strike a piston with any object or use a piston to strike any object Do not drop the piston Dropping the piston will result in damage Measure the piston diameter and the piston length as shown in Figure 7 25 If the values are not within the tolerances specified below replace all three pistons as a set Piston diameter 14 9...

Страница 93: ...y a force of 51 0 to 56 4 pounds 227 2 to 251 1 Newtons At the stated load spring length should be 39 8 mm 1 567 Replace any spring that is damaged or broken replace spring if free length or load length is not as stated Unloader Pressure Regulator Valve Refer to Figure 7 11 seen earlier Replace any damaged or defective parts as necessary Section 7 Large Frame Pump Portable Pressure Washer Familiar...

Страница 94: ...asten the engine adapter to the engine with four 4 5 16 24 socket head cap screws and four 4 M8 ribbed lock washers c Tighten the cap screws to the torque value specified in the Torque Chart found on Figure 7 2 Exploded View at the beginning of this chapter NOTE When installing the engine adapter having the glued in sleeve be sure to use the correct socket head cap screws Pump assemblies used on e...

Страница 95: ...ARING ROLLERS That is the flat unchamfered side of the race must ride against the rollers The inside diameter of the outer cam bearing race is larger than the piston shoe bearing race b For BALL BEARINGS the bearing races are grooved to accept the bearing balls MAKE SURE THE BEARING BALLS ARE RIDING IN THE BEARING RACE GROOVES 7 Install the Belleville washer and the M16 1 50 jam nut over the engin...

Страница 96: ...eal and button head cap screws with o ring seals refer to Figure 7 32 a Use a new O ring around the housing pilot and install the engine adapter onto the engine b Retain the engine adapter to the engine with four 4 5 16 24x 3 4 button head cap screws and four 4 o rings c Tighten the cap screws to the torque value specified in the Torque Chart found on Figure 7 2 Exploded View at the beginning of t...

Страница 97: ...dge of the bearing races must face AWAY FROM THE BEARING ROLLERS That is the flat unchamfered side of the race must ride against the rollers The inside diameter of the outer cam bearing race is larger than the piston shoe bearing race b For BALL BEARINGS the bearing races are grooved to accept the bearing balls MAKE SURE THE BEARING BALLS ARE RIDING IN THE BEARING RACE GROOVES Piston Oil Seals and...

Страница 98: ...E 80W90 oil to the lip of the oil seals and the piston surface 5 With spring in place around piston as shown in Figure 7 34 install the piston through the crankcase oil seal and pilot spacer as shown in Figure 7 35 6 Install the thermal bypass piston and spring into the bore provided in the center of the pump crankcase as shown in Figure 7 36 Section 7 Large Frame Pump Portable Pressure Washer Fam...

Страница 99: ... three 3 inlet check valves along with their o ring seals use a 7 16 20 bolt of sufficient length along with a nut washer and one of the high pressure port towers similar to that depicted earlier in Figure 7 15 a Thread a jam nut onto the bolt then the washer b Install the high pressure port tower over the bolt until it contacts the washer and leaves 4 or 5 bolt threads exposed c Thread the 7 16 2...

Страница 100: ...ower and engage the bolt threads with the internal threads of the outlet check valve e Snug the jam nut down against the washer to force the end of the tower firmly against the backup ring of the outlet check valve f Lubricate an outlet check valve and tower with silicone spray g As shown in Figure 7 40 carefully align the check valve and tower with the high pressure bore provided in the pump head...

Страница 101: ...he pump head 4 Install six 6 M8 1 25 socket head cap screws with six 6 M8 ribbed lock washers to retain the head 5 Tighten the socket head screws in the order shown on Figure 7 42 to the torque value specified in the Torque Chart found on Figure 7 2 Exploded View at the beginning of this chapter 6 Install the garden hose connector with filter screen onto the pump head Section 7 Large Frame Pump Po...

Страница 102: ...e sure the engine adapter has been properly installed Check that the axial cam drive components are installed properly The pump may now be installed as follows 1 Install a new o ring seal around the mounting flange of he pump crankcase 2 To aid reassembly apply a dab of axle grease or petroleum jelly to the piston pivot shoes as indicated by item 1 in Figure 7 44 This will allow the shoes to stick...

Страница 103: ... adapter mounting holes Turn the two screws alternately to compress the piston springs and pull the pump crankcase against the engine adapter 7 Install four 4 M6 1 0 socket head cap screws through the mounting holes of the pump crankcase and thread them into the mounting holes of the engine adapter Snug the four cap screws 8 Remove the two 2 jacking hex head bolts and replace them with the two 2 r...

Страница 104: ...d the amount and type of oil recommended in the table in Part 2 of the Common Pump Components section earlier in this manual On units so equipped the oil level should reach the center of the sight gauge 4 When pump has been properly serviced with the recommended oil install and tighten the Oil Fill Breather cap to the torque value specified in the Torque Chart found on Figure 7 2 Exploded View at ...

Страница 105: ... head d Missing or damaged o rings and backup rings a Torque head bolts b Install good head gasket c Replace head d Install new o rings and backup rings 4 Water leaks from high pressure out connector a Connector not properly seated b Damaged connector a Seal with teflon tape and tighten properly b Replace bad connector 6 Water leaking out behind spacer plate a Thermal bypass piston missing or defe...

Страница 106: ...rect spray nozzle is used c Spray nozzle is obstructed d Water Inlet blocked e Inadequate water supply to pump f Water supply hose kinked or leaking g Clogged inlet hose strainer h Water supply too hot i Worn or defective pump j Unloader regulator valve set wrong k Obstructed nozzle l Obstructed chemical injection system a Reset nozzle to high pressure b Replace with correct nozzle c Clear obstruc...

Страница 107: ...104 Section 7 Large Frame Pump Portable Pressure Washer Familiarization and Troubleshooting Guide ...

Страница 108: ...ands for engine or engineering FAIP a pressure washer pump manufacturer FH same as flathead pump now known as a medium frame pump Foamer a device used to inject soap wax or other additives into a stream of low pressure water General a pressure washer pump manufacturer GFCI same as ground fault circuit interrupter a device used to almost instantly cut off circuit power when an improper grounding co...

Страница 109: ... Automotive Engineers SF designates a specific grade of automotive oil SG same as sf SH same as sf Side valve a type of internal combustion engine that uses a conventional L type cylinder head with intake and exhaust valves on the side SHCS same as socket head cap screw a type of fastener Spark Arrestor a device or screen that prevents the emission of sparks from an engine s exhaust Sprint a trade...

Отзывы: