


Not for
Reproduction
C. Gently scrape away stubborn accumulations of dirt
and other deposits using a plastic putty knife or stiff
bristle brush.
D. Apply a light solvent to bristle brush to loosen and
remove grit and oily residue, if necessary.
5.
Install three hex flange screws to fasten cylinder heat
shield to crankcase and cylinder head.
Cylinder Heat Shield Screws
Torque
Models
40-60 lb-in (4.5-6.8 N-m)
130G00, 131G00, 13R200
71-124 lb-in (8-14 N-m)
13U100, 13U200
NOTE: Hex flange screw to engine base captures both
heat shield and blower housing.
6.
Orient rewind starter as noted before removal.
NOTE: Rewind starter may be installed in the 2 o'clock,
8 o'clock, 10 o'clock, or 12 o'clock positions.
7.
Loosely install three hex flange screws to fasten rewind
starter to blower housing.
NOTE: To ensure that pawls evenly engage flywheel
starter cup, pull starter rope, tighten hex flange screws
until snug, and then release starter rope.
8.
Alternately tighten three hex flange screws as follows.
Rewind Starter Screws
Torque
Models
25-35 lb-in (2.8-4 N-m)
130G00, 131G00, 13R200
71-89 lb-in (8-10 N-m)
13U100, 13U200
Check/Adjust Valve Clearance
NOTE: For best results, check valve clearance with the
engine cold.
1.
Remove spark plug wire from spark plug terminal.
2.
Thoroughly clean area around spark plug to keep dust
and dirt out of the combustion chamber.
3.
Remove spark plug from cylinder head using the 5/8
inch Spark Plug Wrench (Part No. 19576S).
4.
Remove four hex flange screws to release valve cover.
5.
Move piston 1/4 inch (6 mm) past Top Dead Center
(TDC) of the compression stroke. Proceed as follows:
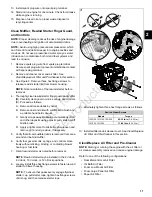
A. See Figure 14. While rotating flywheel end of
crankshaft (A) by hand in the direction of engine
rotation, watch the rocker arms to determine the
action of the valves. After the exhaust valve closes,
the intake valve begins to open.
14
B. When the intake valve closes (so that both valves
are closed with the rocker arms loose), insert a
wooden dowel (B) through the spark plug hole until
seated at the top of the piston (C).
C. Rotate engine in the same direction until the piston
pushes the wooden dowel to its highest point. This
is TDC of the compression stroke.
D. Place a mark on the wooden dowel that is even
with the machined surface at the top of the spark
plug hole. Make a second mark 1/4 inch (6 mm)
above the first.
E. Rotate engine in the same direction until the second
mark on the wooden dowel is even with the
machined surface at the top of the spark plug hole.
Remove wooden dowel.
6.
Insert feeler gauge between rocker arm and exhaust
valve stem (D). Verify that exhaust valve clearance is
as follows.
Exhaust Valve Clearance
Models
0.006-0.008 in (0.15-0.20 mm)
130G00, 131G00, 13R200
0.005-0.007 in (0.13-0.18 mm)
13U100, 13U200
18
2
Содержание 130G00
Страница 1: ...N o t f o r R e p r o d u c t i o n ...
Страница 2: ...N o t f o r R e p r o d u c t i o n ...
Страница 6: ...N o t f o r R e p r o d u c t i o n ...
Страница 8: ...N o t f o r R e p r o d u c t i o n ...
Страница 26: ...N o t f o r R e p r o d u c t i o n 20 2 ...
Страница 32: ...N o t f o r R e p r o d u c t i o n 26 3 ...
Страница 44: ...N o t f o r R e p r o d u c t i o n TOP END DISASSEMBLY 41 38 5 ...
Страница 50: ...N o t f o r R e p r o d u c t i o n 44 5 ...
Страница 73: ...N o t f o r R e p r o d u c t i o n SECTION 7 ASSEMBLE ENGINE BOTTOM END ASSEMBLY 68 TOP END ASSEMBLY 73 67 7 ...
Страница 90: ...N o t f o r R e p r o d u c t i o n 123 84 8 ...
Страница 100: ...N o t f o r R e p r o d u c t i o n 94 8 ...
Страница 108: ...N o t f o r R e p r o d u c t i o n This page is intentionally left blank 102 9 ...
Страница 109: ...N o t f o r R e p r o d u c t i o n This page is intentionally left blank 103 9 ...
Страница 110: ...N o t f o r R e p r o d u c t i o n This page is intentionally left blank 104 9 ...
Страница 111: ...N o t f o r R e p r o d u c t i o n This page is intentionally left blank 105 9 ...
Страница 112: ...N o t f o r R e p r o d u c t i o n ...


