


Not for
Reproduction
22. Install hose with clamp onto fuel filter fitting. Squeeze
tangs and move hose clamp about 1/8 inch (3 mm)
from end of hose with tangs pointing upward for best
access.
23. Start three hex flange screws to fasten control panel
trim to fuel tank. Engage end of control panel trim in
slot of air cleaner base. Starting with screw above
rewind starter, tighten screws to 20-40 lb-in (2.3-4.5
N-m).
24. If equipped, install hex flange screw to fasten high oil
fill tube flange to control panel trim. Tighten screw to
5-15 lb-in (0.6-1.6 N-m).
25. Install plastic knob onto throttle control lever.
26. Install air filter and air cleaner cover. See
Clean/Replace
Air Filter and Pre-Cleaner in this section.
27. Install spark plug wire onto spark plug terminal.
Clean Carburetor Sediment Bowl
WARNING
Wrap shop towel around sediment bowl to catch any
fuel leakage. Gasoline is extremely flammable and
highly explosive. Inadequate safety precautions can
result in death or serious injury. Always observe the
following precautions when working with fuel system
components:
• Wear proper eye protection.
• Be sure there is no open flame or potential ignition
sources in the area.
• Keep a dry chemical fire extinguisher on hand in
case of emergencies.
• Thoroughly wipe up any spilt fuel immediately.
• Collect any fuel and/or shop towels in approved
containers and dispose of properly.
1.
Start and run engine until fuel tank is empty.
2.
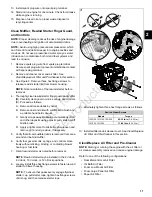
See Figure 13. Position fuel valve (A) to OFF.
3.
Remove spark plug wire from spark plug terminal.
Secure spark plug wire to prevent unintentional contact
with spark plug terminal.
4.
Remove sediment bowl (B) with O-ring (C) from
carburetor body.
5.
Thoroughly clean sediment bowl of sediment, gum or
varnish deposits. Use Carburetor Cleaner (Part No.'s
100041 or 100042), if necessary.
6.
Inspect O-ring for cuts, tears, or general deterioration.
Replace as necessary.
7.
Install sediment bowl with O-ring. Tighten sediment
bowl to 49-80 lb-in (5.5-9 N-m).
8.
Install spark plug wire onto spark plug terminal.
13
Clean Air Cooling System
NOTE: Avoid using high pressure compressed air, which
can force dirt and debris deeper into engine cavities and
crevices. Do not use a pressurized water spray as water
intrusion can contaminate both oil and fuel systems and
lead to corrosion.
1.
Remove spark plug wire from spark plug terminal.
Secure spark plug wire to prevent unintentional contact
with spark plug terminal.
2.
Remove three hex flange screws to release rewind
starter from blower housing.
NOTE: Note orientation of the rewind starter before
removal.
3.
Remove three hex flange screws to release cylinder
heat shield from crankcase and cylinder head.
4.
Clean cylinder cooling fins, the inside of the rewind
starter, and the flywheel fan as follows:
A. Remove all loose debris by hand.
B. Remove dust and dirt with a soft bristle brush and
a portable hand held vacuum.
17
2
Содержание 130G00
Страница 1: ...N o t f o r R e p r o d u c t i o n ...
Страница 2: ...N o t f o r R e p r o d u c t i o n ...
Страница 6: ...N o t f o r R e p r o d u c t i o n ...
Страница 8: ...N o t f o r R e p r o d u c t i o n ...
Страница 26: ...N o t f o r R e p r o d u c t i o n 20 2 ...
Страница 32: ...N o t f o r R e p r o d u c t i o n 26 3 ...
Страница 44: ...N o t f o r R e p r o d u c t i o n TOP END DISASSEMBLY 41 38 5 ...
Страница 50: ...N o t f o r R e p r o d u c t i o n 44 5 ...
Страница 73: ...N o t f o r R e p r o d u c t i o n SECTION 7 ASSEMBLE ENGINE BOTTOM END ASSEMBLY 68 TOP END ASSEMBLY 73 67 7 ...
Страница 90: ...N o t f o r R e p r o d u c t i o n 123 84 8 ...
Страница 100: ...N o t f o r R e p r o d u c t i o n 94 8 ...
Страница 108: ...N o t f o r R e p r o d u c t i o n This page is intentionally left blank 102 9 ...
Страница 109: ...N o t f o r R e p r o d u c t i o n This page is intentionally left blank 103 9 ...
Страница 110: ...N o t f o r R e p r o d u c t i o n This page is intentionally left blank 104 9 ...
Страница 111: ...N o t f o r R e p r o d u c t i o n This page is intentionally left blank 105 9 ...
Страница 112: ...N o t f o r R e p r o d u c t i o n ...


