background image

Quick start and installation  

8

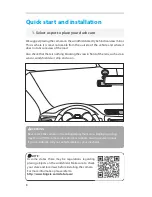
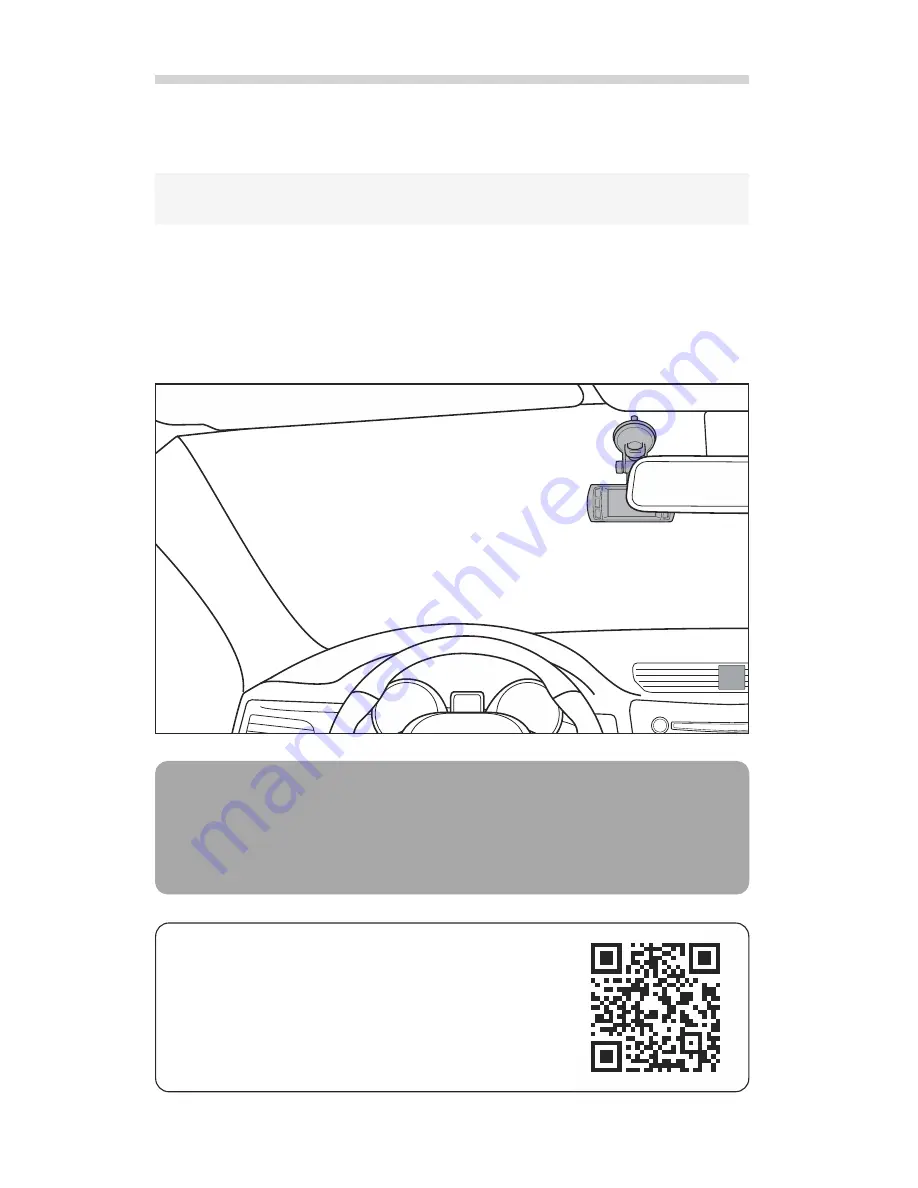
1. Select a spot to place your dash cam

We suggest placing the camera on the windshield directly behind rearview mirror.
This is where it is least noticeable from the outside of the vehicle and where it
does not obscure view of the road.

Also check that there is nothing blocking the view in front of the lens, such as rain
sensor, windshield visor strip and so on.

 

NOTE:

In  some  states  there  may  be  regulations  regarding
placing objects on the windshield. Make sure to check
your state and local laws before installing the camera. 

For more information please refer to

http://www.brigele.com/state-laws/

 

WARNING:

Never place the camera in the airbag deployment area. Deploying airbag
may throw off the camera into vehicle occupants, causing severe injuries.

If you’re in doubt, call your vehicle dealer or your mechanic.

Содержание DR 2100

Страница 1: ...s device please carefully read through this entire User Manual Please retain this User Manual for future reference If you ever pass this device to someone please also give this User Manual along with the device For more information please visit http www brigele com support ...

Страница 2: ...iable mount the device may detach during driving because of vibrations and temperature changes This is normal for suction cup and adhesive tape mounts and is not a defect When mounting the device make sure it won t damage the vehicle or injure vehicle occupants due to falling off You assume responsibility for damages to the vehicle and its occupants resulting from the device falling off If you are u...

Страница 3: ...d workmanship within one year after purchase from retail or online store Should this product fail within warranty period Brigele or its agents at their option will replace or repair it or refund the amount paid for the product less reasonable allowance for its usage upon its return This warranty does not cover any defects resulting from unauthorized repairs or modifications use of faulty non compl...

Страница 4: ...or hit and ran1 Some models can even record your speed and GPS location No matter what you will always have an eyewitness standing by your side because dash cam video can even be accepted as evidence in court But the dash cam can be used not only as protection device It can give you much fun by capturing scenic views driving through memorable places or simply catching a rare or stunning event such...

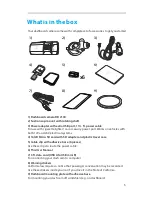
Страница 5: ...16 GB Micro SD card with SD adapter and plastic travel case 5 Cable clip with adhesive base 6 pieces Use these clips to route the power cable 6 This User Manual 7 3 ft data cord USB A to USB mini B For connecting your dash cam to computer 8 Warning stickers California law requires a notice that passenger conversation may be recorded Use these stickers inside your car if you drive it in the State o...

Страница 6: ...and Playback modes Menu button Brings up settings menu for current mode Status indicator Red connected to power blinking recording Power button Press to toggle display on and off press and hold to switch on or off Lens Suction cup mount point Down Mute button Press to mute or unmute the mic OK OK Rec button Press to start or stop recording manually Up button MicroSD card slot HDMI out port Microphon...

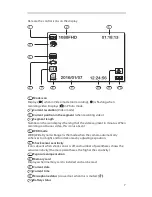
Страница 7: ...recording continuous video this icon is absent WDR mode WDR Wide Dynamic Range is the mode when the camera automatically enhances too bright and too dark areas by adjusting exposition Shock sensor sensitivity Icon is absent when shock sensor is off and number of parentheses shows the sensor sensitivity the more parentheses the higher the sensitivity Exposure compensation Memory card Displays when m...

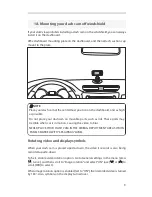
Страница 8: ...w in front of the lens such as rain sensor windshield visor strip and so on NOTE In some states there may be regulations regarding placing objects on the windshield Make sure to check your state and local laws before installing the camera For more information please refer to http www brigele com state laws WARNING Never place the camera in the airbag deployment area Deploying airbag may throw off t...

Страница 9: ...tings in the menu press twice and then scroll to Image rotation and select ON use or to scroll OK to select When image rotation option is enabled set to ON then recorded video is turned by 180º Also symbols on the display turned over 9 1A Mounting your dash cam off windshield NOTE Place your dash cam at the centermost position on the dashboard and as high as possible Do not place your dashcam on mo...

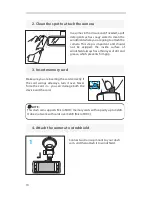
Страница 10: ...h prevents firm grip Make sure you are inserting the card correctly If the card swings sideways turn it over Never force the card in you can damage both the device and the card Connect suction cup mount to your dash cam and then attach it to windshield 10 NOTE This dash cam supports Micro SDHC memory cards with capacity up to GB It does not work with cards over GB Micro SDXC 2 Clean the spot to at...

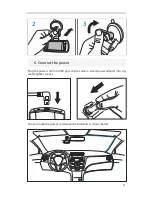
Страница 11: ...11 Plug the power cord into USB port on the camera Insert power adapter into cig arette lighter socket You can route the power cord around windshield as shown below 2 3 5 Connect the power ...

Страница 12: ...d buttons to change values OK button to proceed Press button to exit when finished Now you are all set Enjoy your dashboard cam 1 6 Check date and time setting WARNING Never place the device the cables or mounts in the area of airbag deployment Specifically if the vehicle is equipped with side curtain airbags never place the cable under A pillar headliner on the side facing the door Deploying airb...

Страница 13: ...era starts recording immediately When it is recording indicator light blinks red and there is a flashing red dot on the display To stop or start recording press button 1 Turning your dash cam on and off Starting and stopping recording NOTE Pull out the power adapter from cigarette lighter socket if you plan to leave your vehicle for more than several days Power adapter has electronic components tha...

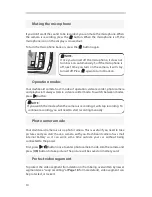
Страница 14: ...ome time outside your car without being connected to the power First press button once to enter photo camera mode Aim the camera and press OK button to take picture The picture will be saved on memory card To protect the video segment from deletion or from being overwritten by newer segments see Loop recording at Page 18 for more details video segment can be protected or locked 1 Muting the microp...

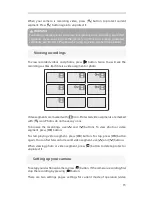
Страница 15: ... video segment press OK button To stop press OK button again You can fast forward or rewind video segment use and buttons When viewing photo or video segment press button to delete protect or unprotect it To setup your dashboard camera press button If the camera is recording first stop the recording by pressing button There are two settings pages settings for current mode of operation video 1 View...

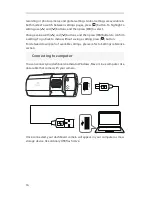
Страница 16: ...n press OK button to confirm a setting To go back to menu without saving a setting press button For detailed description of available settings please refer to Settings reference section You can connect your dashboard camera toWindows Mac or Linux computer Use data cable that comes with your camera Once connected your dashboard camera will appear in your computer as mass storage device like ordinar...

Страница 17: ... connect your dashboard camera toTV use analog AV cable or mini HDMI cable both not included with your camera Once connected the screen of dashboard camera will be mirrored on your TV 17 Connecting to TV ...

Страница 18: ...ent length menu By default the segment length is minutes loop recording is on Mode of operation Video recording Setting Segment length To conserve free space on memory card your dashboard camera can record video only when it sees a motion in front This can be particularly useful if you frequently use your dashboard camera when a vehicle is stationary By default motion detection is off Mode of opera...

Страница 19: ...cker with the frequency of alternating current in the power grid This flicker is invisible to human eye but can be captured by video camera There is a setting to compensate this Frequency in the global settings of your dashboard camera By default it is set to 60Hz exactly the frequency in power grid in the United States Normally you don t need to change it But if you travel abroad where the altern...

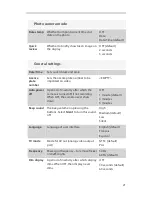
Страница 20: ...e on memory card ON OFF default Power off delay A delay between the engine is stopped and the camera shutdown When OFF camera shuts down right after the engine is stopped OFF 10 seconds default 0 seconds 0 seconds Power on delay A delay between the engine is started and the camera starts recording When OFF camera starts recording immediately after engine is started OFF default 10 seconds 0 seconds ...

Страница 21: ...m default Low Silent Language Language of user interface English default Français Español TV mode Mode for AV out analog video output port NTSC default PAL Frequency Power grid frequency to remove flicker on traffic lights 0 Hz 60 Hz default Dim display A period of inactivity after which display dims When OFF then display never dims OFF 0 seconds default 60 seconds Date stamp Whether to imprint curr...

Страница 22: ...ation Increase select positive values to make video brighter Decrease to make video darker 0 0 default from 0 to 0 with 1 intervals Image rotation Rotates image upside down Useful when you mount your dashboard camera on the dashboard upside down ON OFF default Format Formats memory card Will completely erase memory card contents including protected video segments Factory defaults Reverts all setti...

Страница 23: ...ally shortly after stratup Check if there is a memory card installed Recorded video or dispay icons are rotated upside down Image rotation option is set to ON Check Image rotation setting in General Settings menu Only few last minutes are recorded This is because there is no more available space on memory card Most probably there are too many protected video segments Format memory card and decreas...

Страница 24: ... 01 016 Brigele Inc All rights reserved UM 001 R1 EN US ...

Отзывы: