BRAVILOR BONAMAT FreshOne Скачать руководство пользователя страница 29

GB

version

1.0

E

Copyright Bravilor Bonamat B.V.

17

6.2.6

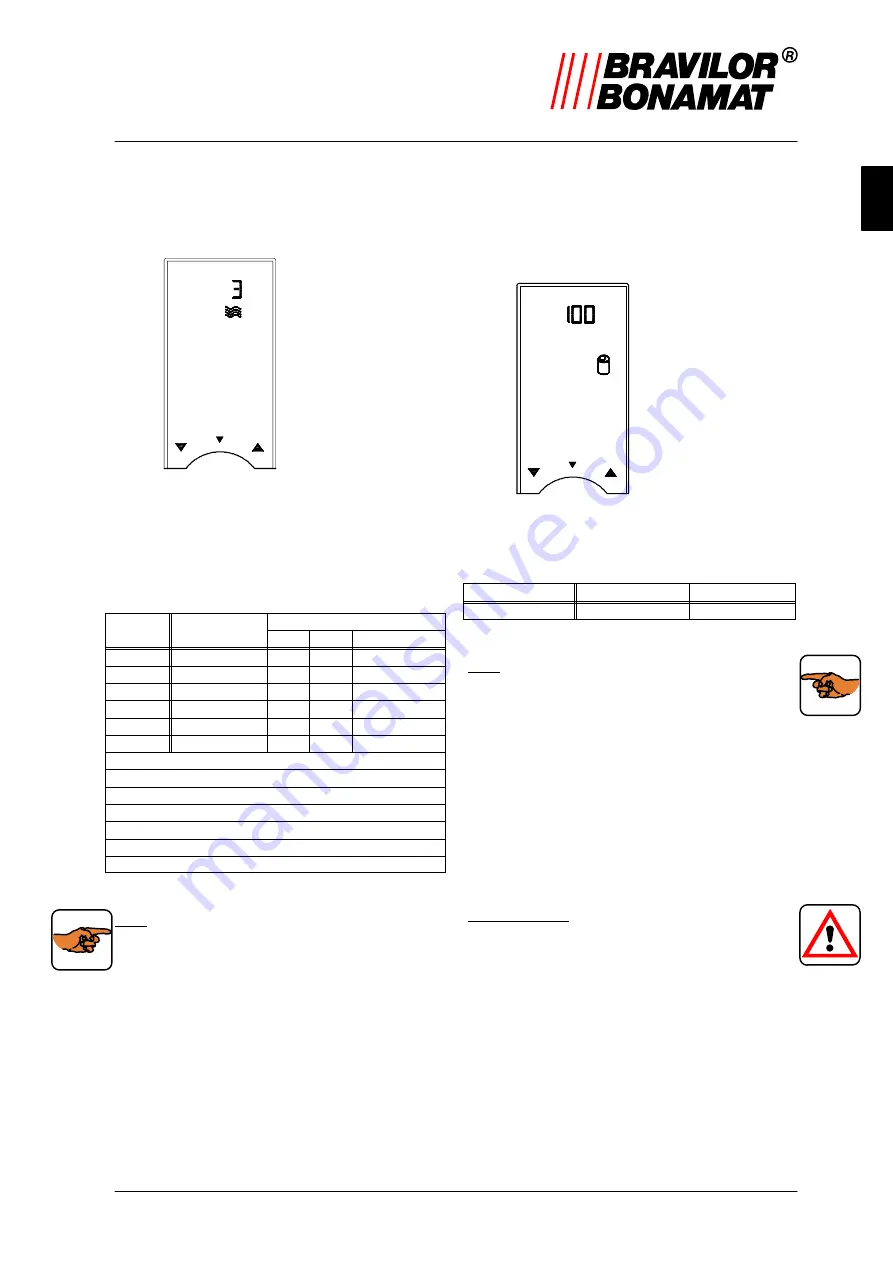
Setting descaling signal

D

Press the programming key (19.4) to start the
programming.

D

Press four times the [Enter] key (5.7).

Fig. 17 Descaling signal

D

Set with the setting key (5.6 or 5.8) the
required value, taking the water hardness into
account (table 4 ).

D

Press the programming key (19.4) to finish the
programming.

Position 

Signal  after

Water  hardness


g

number  of  liters

5

DH

5

TH

Description 

OFF

No  signal 

1

±

  250  liter 

18−30 32−55 hard 

2

±

  500  liter 

12−18 22−32 rather  hard 

3

±

  1000


liter 

8−12 15−22 average 

4

±

  1500  liter 

4−    8

7−15 soft 

5

±

  2000  liter 

0−    4

0−    7 very  soft 

4,0

°

DH  = 0,714  mmol/liter 

5,6

°

DH  = 1,000  mmol/liter 

8,0

°

DH  = 1,429  mmol/liter 

12,0

°

DH  = 2,143  mmol/liter 

18,0

°

DH  = 3,214  mmol/liter 

30,0

°

DH  = 5,357  mmol/liter 

10,0

°

TH  = 1,000  mmol/liter 

Table 4 Settings water hardness

TIP

– Inquire with your local waterworks about the

hardness of the water supplied and always
choose the correct setting. The default setting
of the machine is position 3.

The machine automatically records the number of
liters of water after each descaling cycle. When
the settings are incorrect and/or the descaling
sign on the display is ignored, the guarantee is no
longer valid!

6.2.7

Setting the ‘litter bin full’

indication / stop function

D

Press the programming key (19.4) to start the
programming.

D

Press five times the [Enter] key (5.7).

Fig. 18 Litter bin indication

D

Set with the setting key (5.6 or 5.8) after how
many cycles the machine must stop because
of a full litter bin (table 5 ).

Stop  function 

Factory  setting 

Set  by  you


Cyclus 

100  x

Table 5 Litter bin full

TIP

– By pressing the key (5.6 or 5.8) longer you

quickly go through the range.

D

Press the programming key (19.4) to finish the
programming.

6.2.7.1

Switch off the ‘litter bin full’

indication

D

Decrease the set value (§6.2.7) to the
minimum. ‘OFF’ appears on the display. Not
the indication/stop function ‘litter bin full’ has
been switched off.

WARNING

n

Only switch off the ‘litter bin full’
indication/stop function when you make use
of an external litter bin below the worktop
(§3.2.2).

Содержание FreshOne

Страница 1: ...26 4 26 5 26 7 26 6 1 2 3 4 5 7 8 6 9 10 11 12 13 14 15 16 26 1 26 2 26 3 24 1 24 2 24 3 24 4 24 5 24 6 24 7 24 11 24 10 24 9 24 8 29 28 27 26 25 24 17 18 19 20 21 23 22...

Страница 2: ...378 55 476 990 748 59 162 W 41 E 41 W E 114 189...

Страница 3: ...GB Bravilor Bonamat Operating Instructions FRESHONE 700 403 291B Bravilor Bonamat 3 2001 Bravilor Bonamat Pascalstraat 20 1704 RD Heerhugowaard The Netherlands...

Страница 4: ...reason the instructions contained in this document should be treated as a guide to the installation use and maintenance of the machine indicated on the front cover This document applies to the standa...

Страница 5: ...ls are applied WARNING n Risk of electric shock WARNING n Procedures that can result in serious damage to the machine or in physical injury if they are not carried out with due care In this document t...

Страница 6: ...the following details at hand Model code Type number Serial number These data can be found on the identification plate Write down the data of the identification plate in the intended fields fig 1 Gua...

Страница 7: ...vironment VIII Packaging material VIII Disposal of the machine VIII 1 Introduction 1 1 1 General description 1 1 2 Main components 1 1 2 1 Outside 1 1 2 2 Inside 1 2 Technical data 2 2 1 General 2 2 2...

Страница 8: ...Reading counter positions of tapped drinks 13 6 1 2 Reading counter positions per drink 13 6 1 3 Resetting the counter positions to zero 13 6 2 Setting possibilities 13 6 2 1 Setting the amount of dri...

Страница 9: ...gramme 10 Fig 8 Coffee deposit 11 Fig 9 Counter positions 13 Fig 10 Initial situation programming 14 Fig 11 Setting the amount of drink 14 Fig 12 Initial situation programming 15 Fig 13 Strongness dri...

Страница 10: ...ngs and instructions attached to the machine form part of the safety provisions They must not be covered or removed and they must be present and remain legible throughout the life of the machine Any i...

Страница 11: ...bmerge the machine in water D Keep the operating controls free from dirt and grease D Note that during use some parts of the machine become very hot D Disconnect the electricity grid and the water sup...

Страница 12: ...ion and discharge possibilities to prevent trouble caused by spilled drink Automatic stop function when the filter paper is finished Automatic stop function counter when the litterbin is full Automati...

Страница 13: ...echanism optional 3 Door 4 Window text plate 5 Operating panel front 6 Hot water outlet 7 Coffee outlet 8 Drip tray plate 9 Drip tray 10 Indicator drip tray full 11 Foot 4x 12 Lock 13 Identification p...

Страница 14: ...Capacity Start up time 2 minutes Delivery time per cup 125 ml 20 seconds 2 6 Environmental conditions In view of danger of freezing the machine may never be placed in rooms where the temperature can f...

Страница 15: ...the back and front of the machine D Leave a space of at least 5 cm at the left side of the machine for ventilation D Connect the machine to a readily accessible manually operated water tap so that th...

Страница 16: ...machine is ready for use D Switch the machine on by turning the ON OFF switch 17 to ON A little red square appears on the switch The machine starts filling up with water On the display all fields ligh...

Страница 17: ...Only the dot on the display at the selected drink remains after which the drinks flows into the cup During the filling the cup on the display flashes and the tapping cycle is displayed by a circle bu...

Страница 18: ...ater 5 6 Setting key 5 7 Enter key blocked during normal use of the machine 5 8 Setting key The setting keys 5 6 and 5 8 have more than one function During normal use of the machine these keys are onl...

Страница 19: ...a jug or whole jug TIP If a thermometer appears on the display the temperature is temporarily too low caused by tapping too much water The machine is blocked until the temperature is right again D Pla...

Страница 20: ...e display 4 2 5 2 Litter bin is full Fig 5 Litter bin full When the litter bin is full the FreshOne automatically stops delivering coffee the counter has reached the set maximum number of measures Now...

Страница 21: ...e machine with a moist cloth D Put the litter bin back into the machine D Press key 19 1 to reset the litter bin full counter to zero D Close the door 3 with the key and place the drip tray back in fr...

Страница 22: ...2 The brewer room comes down slowly again resting position and the filter paper is pressed down to the brewer D Place a cup under the coffee outlet piece 24 8 D Tap a cup of coffee and check the pape...

Страница 23: ...2 D Tilt the brewer backwards and now carefully move the brewer up so that it gets loose from the machine D Pull the mixing basin 24 2 carefully off the brewer room 24 1 by taking the basin around th...

Страница 24: ...this back into the machine Make sure that the drive clutch 26 6 at the back side slides over the drive cam in the back wall Make sure that the fixing cam 26 4 at the bottom falls into the notch of the...

Страница 25: ...ey 5 6 or 5 8 cup mug half a jug or whole jug D Read the counter positions 6 1 2 Reading counter positions per drink D Select the desired drink with one of the selection buttons D Select with the sett...

Страница 26: ...125 g mild coffee ff mug 160 strong coffee 1 2 jug 500 g jug 1000 extra strong coffee cup 80 g mug OFF 1 2 jug OFF jug OFF hot water cup 140 mug 160 1 2 jug 500 jug 1000 Table 1 Settings of the amount...

Страница 27: ...ffee and the hot water and after that stops for a few seconds to enhance the extraction S1 adjustable between 0 and 10 sec Subsequently the piston moves down causing the coffee extract to be drawn thr...

Страница 28: ...oo high this can lead to over extraction which will give the coffee a bitter taste 6 2 5 Setting the hot water temperature D Press the programming key 19 4 to start the programming D Press three times...

Страница 29: ...rrect setting The default setting of the machine is position 3 The machine automatically records the number of liters of water after each descaling cycle When the settings are incorrect and or the des...

Страница 30: ...to descale within 10 seconds press the key 5 8 to stop the descaling programme D Press the setting key 5 6 Fig 20 Descaling programme The descaling symbol appears on the display The figure in the upp...

Страница 31: ...the plug back on the drain hose D Push the drain hose back again D Pull the extension piece from the hot water supply hose 25 and place the end of the hose into the locking spring 24 3 at the top of t...

Страница 32: ...perature at a lower value see 6 2 5 3 The descaling symbol appears on the display Set number of liters of the descaling signal has been reached Descale the machine see 7 1 4 A flashing cup and saucer...

Страница 33: ...Call in service 6 Cup or mug is only partly filled Motor runs but the brewer does not Call in service Hot water hose has been placed wrongly in the mixing basin Place the hot water hose correctly see...

Страница 34: ...tem Call in service Faulty reference of the boiling point Call in service Water in the boiler has boiled due to a failure in the temperature sensor Call in service Error 4 Heating element defect Call...

Страница 35: ...1 101 102 7 191 102 101 48 x 25 gr 6 x 1 kg 9 2 Accessories 9 2 1 Raising feet Set of extra feet to raise the apparatus 2 cm so that larger cups or cans can be placed under the drink outflow Fig 21 Ra...

Отзывы: