background image

Page 19

Installation Instructions

11

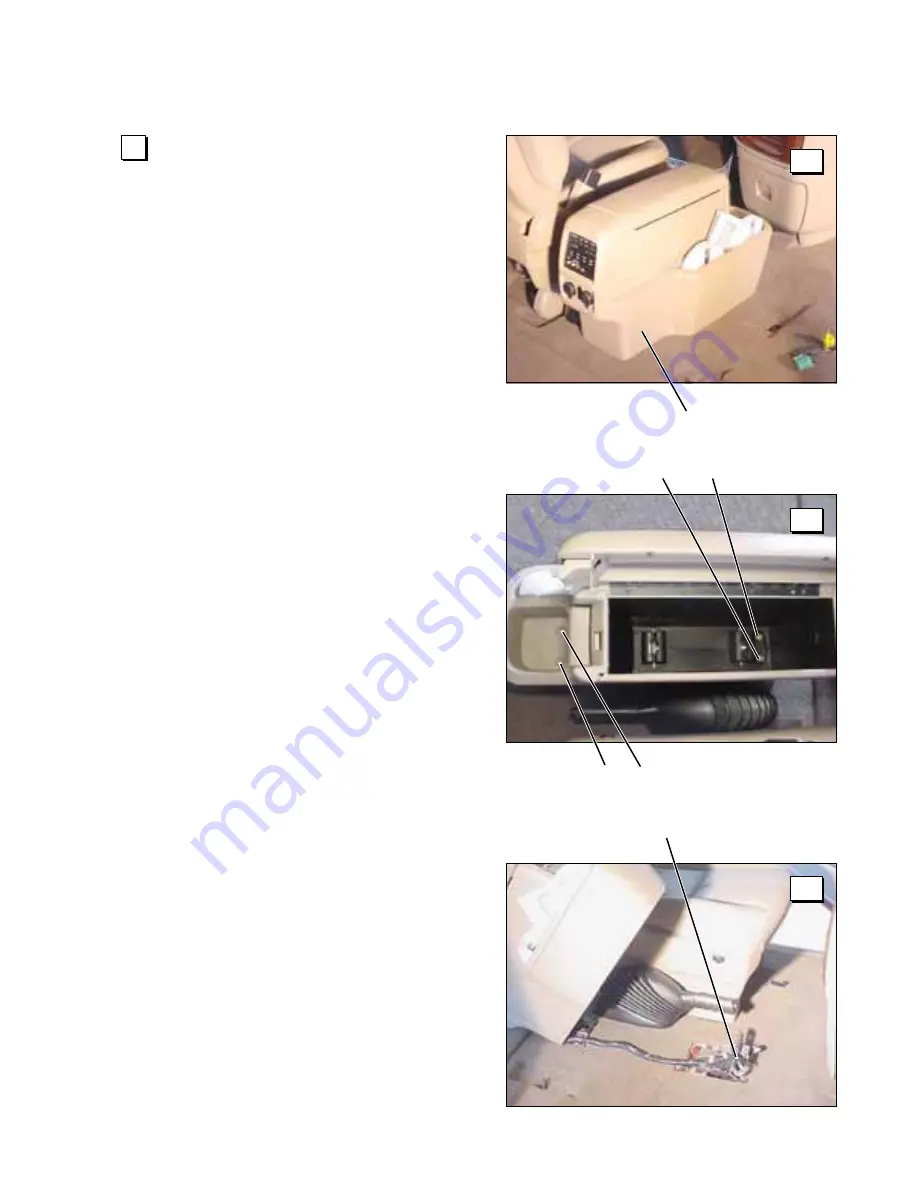
Remove Center Console (if equipped)

I

f the vehicle is equipped with a center

console it must be removed to allow space
for the Companion Seat.  If the vehicle
does not have a center console, omit Step
11 and continue installation with Step 12.

11a

11b

11c

O

pen the top of the center console.  There

are two screws inside the box that must be
removed.  If the console does not appear
as shown, you must remove the obstruction
(refer to Ford Manual).  Pull the handle at
the front of the console and pull the VCR
out of the console.  After removing all
obstructions from inside the console, use a
7MM wrench to remove the four screws
securing the console.

C

arefully

 tilt the console toward the rear of

the vehicle as shown.  Disconnect the three
OEM harness connectors.  Remove the
center console.

Center Console

Console Mounting Screws

Console Mounting Screws

OEM Harness Connectors

Содержание Companion Seat

Страница 1: ...WER 3EAT ASE FOR ORD 7INDSTAR WNERgS NSTALLATION ANUAL FOR 4 3EE INSIDE COVER FOR WARRANTY AND REGISTRATION INFORMATION OTE TO EALER 0ROVIDE THIS MANUAL TO THE CONSUMER 0ROVIDING CCESS TO THE 7ORLD NT...

Страница 2: ...XQ RUSRUDWLRQ 32 R LQDPDF 1 7 02 6 5 180 5 0 7 3803 2 1 5 3 7 17 NE RAUN 3ERIAL O 3ERIES O IDENTIFICATION TAG SAMPLE SHOWN BELOW IS POSTED ON THE SEAT BASE SECOND TAG IS POSTED AT RIGHT OTH TAGS PROVI...

Страница 3: ...minor per sonal injury or prop erty damage WARNING This symbol indicates important safety information regarding a potentially hazard ous situation that could result in serious bodily injury and or pr...

Страница 4: ...vehicle Lift feet when rotating seat Release the hand pendant toggle switch from the DEPLOY position once the seat is fully extended Release the hand pendant toggle switch from the STOW position once...

Страница 5: ...ating the Companion Seat Be certain the passenger door is fully open before operat ing the seat Visually inspect the seat before operation Do not operate the seat if you suspect damage wear or any abn...

Страница 6: ...Companion Seat is extended fully individuals with limited upper body strength could possibly fall out of the seat if the seat back is angled forward too much A passenger with limited upper body stren...

Страница 7: ...es seat operating instruc tions and manual operating instruc tions before attempt ing seat operation procedures Contact The Braun Corpora tion immediately if any of this informa tion is not under stoo...

Страница 8: ...ntil seat locks Push the yellow handled lever down to ensure the lever is engaged seat is locked Lower head and press switch to DEPLOY DOWN until the seat stops Photos 5a 5c Yellow handled Lever 1 2 3...

Страница 9: ...a 3b 4 Yellow handled Lever Lower head and press switch to STOW UP until the seat stops see Photos 1a 1d Lift yellow handled lever Manually rotate seat fully inward until seat locks Photo 3a Push the...

Страница 10: ...ment failure follow the Manual Operating Instructions provided below to manually extend and retract the Companion Seat A slotted shaft stud is located at the motor end of the electric actuator An acce...

Страница 11: ...ompanion Seat under carpet inside wall panel or other protected area clear of hot areas moving parts or other potential hazards WARNING Installation Service Safety Precautions WARNING WARNING WARNING...

Страница 12: ...inforcement 21390 17 2 Washer 7 16 SAE Flat 82046 000 18 3 Washer 7 16 Lock 13843 19 1 Washer 10 Flat Auto Black 11541 20 3 Nut 7 16 20 Hex 10457 21 1 Bolt 7 16 UNF x 1 1 4 HHCS 80042 000 22 3 Screw 8...

Страница 13: ...erty damage OEM original Passenger s Seat Front Inboard Outboard Rear Installation Instructions WARNING OEM Seat Mounting Studs Qty 4 Companion Seat Base Front OEM Seat Mounting Holes Qty 2 Rear OEM S...

Страница 14: ...any front or side air bag supplemental restraint system SRS components and before servicing replacing adjusting or striking components near the front or side air bag sensors such as doors instrument...

Страница 15: ...tal toward the rear of the vehicle to expose the OEM connectors Disconnect the yellow and the green connectors Remove the seat pedestal assembly from the vehicle 3 2b 2 Remove Passenger s Seat and Ped...

Страница 16: ...to remove plug Keep the plug Remove the belt receptacle mounting bolt using a T50 Torx wrench 4a Carefully disconnect the seat belt indicator harness connecting the receptacle assem bly to the seat as...

Страница 17: ...ee Photos 5b and 5c Note Disconnect power seat control wiring harness from the switch assembly on the passenger side guard of the seat 5a 5 Remove Power Seat Plastic Trim Guards Remove the two plastic...

Страница 18: ...6b Cable tie the motor harness together and to the bottom of the seat as shown Disconnect Power Seat Motors Disconnect the power harness to each of the three power seat motors mounted on the seat pede...

Страница 19: ...ower seat base is bolted to the seat back Remove OEM seat back mounting bolt using a 15MM wrench The passenger side of the seat assembly is shown in Photo 8a Keep the hardware Remove OEM seat back mou...

Страница 20: ...orque Specifications 17 foot pounds Note Be sure to set the slide position on the manual slide tracks before mounting the seat assembly to the Companion Seat base The front to back position of the sea...

Страница 21: ...de the box that must be removed If the console does not appear as shown you must remove the obstruction refer to Ford Manual Pull the handle at the front of the console and pull the VCR out of the con...

Страница 22: ...curely to plug the mounting holes The connectors bolts and the front carpet void will be covered by the Companion Seat base once it has been installed Note The rear carpet void will be fitted with a c...

Страница 23: ...Seat Mounting Location Route the extended harness toward the rear of the vehicle as shown 13b Carefully drill ream out the two front OEM seat mount ing holes to 1 2 diam eter Extended OEM Harness OEM...

Страница 24: ...ng the two OEM washer head nuts Apply Loctite or other thread locking compound to the mount ing studs Use an 18MM wrench to tighten the bolts securely Torque Specifications 41 foot pounds Installation...

Страница 25: ...wer cable 15 15a 15b 15c Remove the driver s side plastic sill plate The sill plate is secured with snap clip fasteners Route the power cable under the sill plate toward the fire wall Reposi tion and...

Страница 26: ...ect the fuse end of the wiring harness to the vehicle s Positive battery post Squeeze depress and lift the plastic battery post cover to access the battery post WARNING Route cable clear of exhaust sy...

Страница 27: ...rea around the harness to seal the opening used to access the engine compartment of the vehicle Reposition and secure the fresh air intake duct in the engine compartment 16 15g Secure Seat Belt Recept...

Страница 28: ...dification After Modification Driver s Side Guard 16b Seat Belt Receptacle Rotating Base Secure Seat Belt Receptacle to Compan ion Seat Base Continued Insert the 7 16 UNF x 1 1 4 bolt into the recepta...

Страница 29: ...As shown in Photo 18b Torx Seat Guard Mounting Screws Threaded Insert Fastener Snap clip type fasteners 18a 18b 19 Prepare Seat for Installation The manual slides have mounting studs at each end Usin...

Страница 30: ...retracted into vehicle and rotated to the forward facing position Be sure the harness is clear routed toward the rear of the vehicle and position the seat onto the Companion Seat base Note If the fou...

Страница 31: ...structions contained in this manual and posted on Warnings and Seat Operating Instructions decal 22616 Keep all OEM hardware for possible use in the future 22 The extension harness must be secured to...

Страница 32: ...er towels Do not use oily shop rags Wipe surface free of residue with dry portion of cleaning cloth Post Extend and Recline Warning Decal 21418 and Head Clearance Warning Decal 21419 as shown Post dec...

Страница 33: ...3 4 Tall WARNING 21417 Patent Pending Keep hands arms fingers and all body parts clear of moving seat parts Decal 21599 Actual Size 2 15 32 Wide x 1 5 16 Tall WARNING 21599 Patent Pending Keep hands...

Страница 34: ...Washer 3 8 Lock Auto Black 10069BK 35 2 Nut 3 8 16 Hex Auto Black 10059BK 36 1 Bearing 1 1 2 ID Peer Thrust 99236 000 37 1 Bracket Switch 05732 000 38 1 Switch Micro SPDT C H 14218 39 2 RMS 4 40 x 3 4...

Страница 35: ...edge Page s Date Document Output Type Negative Film Right Reading Emulsion side DOWN 23560F p 33 34 10 03 33A 34A Page 33A Page 34A Companion Seat Exploded View 2 6 44 43 3 6 4 15 11 7 5 13 10 8 60 6...

Страница 36: ...O 2 COND WIRE CODE BLACK 16 GA ORANGE 16 GA 2 1 COLOR NO 2 COND WIRE CODE BLACK 16 GA ORANGE 16 GA 3 2 1 COLOR NO 3 COND WIRE CODE BLACK 22 GA ORANGE 26 GA BLUE 26 GA 1 3 2 1 3 2 3 1 2 3 1 2 3 2 1 COL...

Страница 37: ...ION SEAT HOUSING ACTUATOR MOTOR BATTERY IN LINE FUSE 20 AMP CIRCUIT BOARD ROTATION MICROSWITCH P1 1 P1 2 P1 3 J1 1 J1 2 J1 3 P2 1 P2 2 P2 3 J2 1 J3 1 P3 1 J3 2 P3 2 J2 2 J2 3 BU OR BK 26 GA GN RD OR B...

Страница 38: ...or Header B 32 3 4 Seating Surface to Ground Extended Position C 19 3 4 Side of Van to Front Edge of Seat D 15 1 2 Overall Width Side to Side E 29 3 8 Overall Height of Seat Base F 5 1 4 Overall Depth...

Страница 39: ...Braun Dealers and Distributors Worldwide Providing Access to the World Providing Access to the World International Corporate Hdqrs P O Box 310 Winamac IN 46996 USA 1 800 THE LIFT 574 946 6153 FAX 574...

Страница 40: ...20 days of purchase This warranty also covers the cost of labor for the repair or replacement of most parts for one year when performed by an authorized Braun Representative A Braun labor schedule de...

Отзывы: