background image

– 12 –

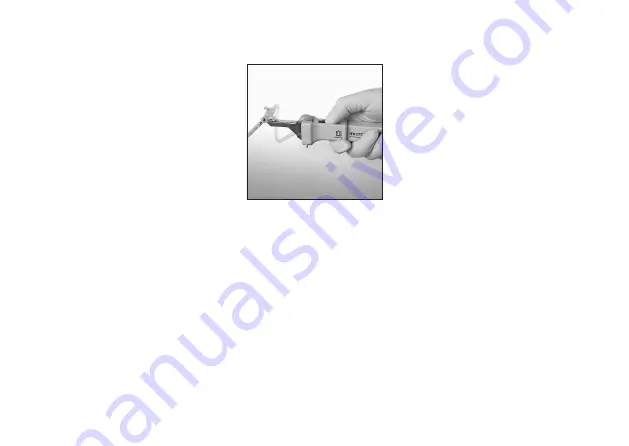
Auf "Ex" justierte Pipetten

Pipettes calibrated to deliver "Ex"

–  Gerät senkrecht halten, Pipetten-

spitze an die Wand eines schräg 
gehaltenen Gefäßes anlegen.

–  Belüftungsknopf drücken, bis die 

Flüssigkeit abgelaufen ist.

–  Sobald der Meniskus in der Pipet-

tenspitze zum Stillstand kommt, 
beginnt (sofern vorgesehen)  
die Wartezeit.

–  Danach Pipette an der Gefäßwand 

durch Hochziehen abstreifen. Dabei 
läuft ein Teil der Restflüssigkeit ab.

–  Hold the instrument upright, and place 

the pipette tip against the wall of a 
vessel (inclined position of the vessel).

–  Press the venting button until the 

liquid has run out.

–  As soon as the meniscus comes to a 

standstill in the pipette tip, the waiting 
time (if applicable) starts.

–  Then take the pipette out of the 

vessel by wiping it against the wall of 
the vessel. During this procedure the 
residue of liquid partly runs out.

Содержание Micro-classic

Страница 1: ...nungs und Sicherheitshinweise befolgen BRAND GMBH CO KG Otto Schott Str 25 97861 Wertheim Germany Tel 49 9342 808 0 Fax 49 9342 808 98000 E Mail info brand de Operating Manual Please read carefully before use and fol low all operating and safety instructions micro classic Pipettierhelfer Pipette Controller ...

Страница 2: ......
Страница 3: ...lauch auswechseln 16 Störung was tun 17 Zur Reparatur einsenden 19 Mängelhaftung 20 Bestelldaten 21 Inhalt Seite Safety Instructions 4 Components 6 Application 7 Operating Limitations 7 Before Pipetting 8 Correct Hand Position 8 Pipetting 8 Attaching the Pipette 8 Drawing up Liquid 9 Discharging Liquid 11 After Pipetting 13 Removing the Pipette 13 Releasing the Suction Tube 13 Cleaning Autoclaving...

Страница 4: ...ne the applicability of regulatory limitations prior to use 1 Every user must read and understand this operat ing manual before operation 2 Follow general instructions for hazard preven tion and safety instructions e g wear protective clothing eye protection and gloves 3 Observe all specifications provided by reagent manufacturers 4 Use the instrument only for pipetting liquids with strict regard ...

Страница 5: ...eren und das Kapitel Störung was tun befolgen s Seite 17 Ggf an den Hersteller wenden 5 Always use the instrument in such a way that nei ther the user nor any other person is endangered Avoid splashes Only use suitable vessels 6 Only fit empty pipettes to avoid the risk of con tamination and infection 7 Take care that the liquid does not penetrate into the instrument 8 Never use force on the instr...

Страница 6: ... 6 Einzelteile Components Adapter adapter Adapterhalter adapter support Federclip spring clip Saugschlauch suction tube Stellrad thumb wheel Belüftungsknopf venting button Handgriff Handle ...

Страница 7: ... Gerät dient als Hilfe zum Pipettieren und ver ringert die Infektionsgefahr beim Pipettieren von Flüssigkeiten mit Einmal Mikropipetten mit Ring marke Blutmischpipetten und anderen Pipetten mit einem Schaft Durchmesser 5 5 mm und einem Volumen bis 1 ml Bei richtiger Handhabung des Geräts kommt die pipettierte Flüssigkeit nur mit der Pipette in Kontakt This instrument provides for pipetting liquids...

Страница 8: ...ion Wear protective gloves Vor dem Pipettieren Before Pipetting Richtige Handhaltung Correct Hand Position Gerät wie auf der Abb dargestellt waagerecht in die Hand nehmen O Ring vom Belüftungsknopf nach hinten schieben Hold the instrument horizontally as illustrated Push back the O Ring from the venting button Pipettieren Pipetting Pipette aufstecken Attaching the Pipette ...

Страница 9: ...e colour code short end up to avoid glass breakage when fitting the pipette Carefully insert the pipette into the adapter until a slight resistance can be felt Never use force Risk of dam aging the adapter and pipette hence a risk of injury If the pipette breaks Remove glass splinters by means of forceps Check adapter for damages and if necessary replace adapter Instructions for repair page 16 Flü...

Страница 10: ...tellrad langsam in Richtung Belüf tungsknopf drehen bis die Flüssigkeit exakt die gewünschte Marke erreicht Immerse the pipette into the liquid Slowly turn the thumb wheel towards the ejector key until the liquid has exactly reached the appropriate mark Pipette aus der Flüssigkeit herausziehen Mit fusselfreiem Tuch oder Tupfer vorsichtig außen abwischen Dabei darf die Öffnung nicht berührt werden ...

Страница 11: ...orsichtig bis zur korrekten Füllhöhe aufziehen Diesen Vorgang mindestens 3 mal wiederholen Pipette an der Gefäßwand leicht abstreifen Immerse the pipette into the diluting agent Turn the thumb wheel towards the adapter until the liquid has been dis charged Rinse the pipette by drawing in and discharging the diluting agent Care fully draw in the diluting agent up to the correct level of the liquid ...

Страница 12: ...Danach Pipette an der Gefäßwand durch Hochziehen abstreifen Dabei läuft ein Teil der Restflüssigkeit ab Hold the instrument upright and place the pipette tip against the wall of a vessel inclined position of the vessel Press the venting button until the liquid has run out As soon as the meniscus comes to a standstill in the pipette tip the waiting time if applicable starts Then take the pipette ou...

Страница 13: ...apters anfassen Vorsichtig aus dem Adapter ziehen Einmal Mikropipetten vorschriftsmäßig entsorgen Grip the pipette just below the adapter Carefully pull it out of the adapter Dispose the micropipettes according to the relevant provisions Saugschlauch entspannen Releasing the Suction Tube Nach dem Pipettieren Saugschlauch stets entspannen Dazu O Ring über den Belüftungsknopf schieben After pipettin...

Страница 14: ...nd ggf erneuert werden Reparaturen durchführen Seite 16 Occasionally wipe the instrument with a damp cloth When properly used the instrument is maintenance free If liquid has contaminated adapter and suction tube these parts must immediately be cleaned or disin fected and if necessary be replaced Instructions for repair page 16 Adapter und Schlauch aus dem Gerät herauszie hen und in ein Reinigungs...

Страница 15: ...15 Minuten nach DIN EN 285 Die Wirksamkeit des Autoklavierens ist vom Anwender jeweils selbst zu prüfen Gerät zusammenbauen Reparaturen durch führen Seite 16 Funktionsfähigkeit aller Bedienungselemente überprüfen Reassemble instrument Instructions for repair page 16 Check correct function of all operating elements Lagerung Storage Gerät nur mit vollständig entspanntem Saugschlauch lagern Saugschla...

Страница 16: ...nclipsen Dabei sollte mit dem Zeigefinger der einen Hand ein Gegendruck auf den Boden des Federclips ausgeübt werden um eine Beschädigung des Adapterhalters zu vermeiden Pull off the adapter from the adapter support Upon pressing the venting button the suction tube can be pull out forward Insert the new suction tube with adapter between thumb wheel and roller while pressing the venting button Clip...

Страница 17: ...6 Gerät saugt nicht an Pipette tropft Adapter oder Saugschlauch beschädigt Adapter mit Saugschlauch erneuern Seite 16 Flüssigkeit im Adapter bzw Saugschlauch Stellrad zu schnell gedreht Adapter und Saugschlauch reinigen bzw desinfizieren ggf erneuern Seite 14 Pipette hält nicht im Adapter Adapter ist feucht oder fettig Adapter reinigen bzw desinfizieren und trocknen lassen ggf erneuern Seite 14 St...

Страница 18: ...nstrument does not not draw in liquid pipette drips Adapter or suction tube damaged Replace adapter and suction tube page 16 Liquid in the adapter and the suction tube The thumb wheel was turned too quickly Clean or disinfect adapter and or suction tube if necessary replace page 14 Pipette not held properly in the adapter Adapter is wet or greasy Clean or disinfect adapter and suction tube and all...

Страница 19: ... unter www brand de zum Download bereit und gemein sam mit dem Gerät an Hersteller oder Händler senden unter Angaben von Art der Störung dosiertem Medium Der Rücktransport geschieht auf Gefahr und Kosten des Einsenders Therefore Clean and decontaminate the instru ment carefully Complete the Declaration on Absence of Health Hazards ask your supplier or the manufacturer for the form The form can als...

Страница 20: ...übernehmen wir keine Haftung für entstandene Schäden wenn das Gerät weiter zerlegt wurde als in der Gebrauchsanlei tung beschrieben oder wenn fremde Zubehör bzw Ersatzteile eingebaut wurden We shall not be liable for the consequences of improper handling use servicing operation or unau thorized repairs of the instrument or the consequenc es of normal wear and tear especially of wearing parts such ...

Страница 21: ...ro classic komplett mit Saugschlauch Best Nr 259 00 Ersatz Adapter mit Saugschlauch Verpackungseinheit 3 Stück Best Nr 259 31 micro classic complete with suction tube Cat No 259 00 Spare adapter with suction tube pack of 3 Cat No 259 31 ...

Отзывы: