3.1
System Status Screens
When activating the BossPac WASP™ system for the first time the BossPac NEST receiver will
automatically detect all sensor pucks within the working radius (assuming battery modules are
attached to the sensors).
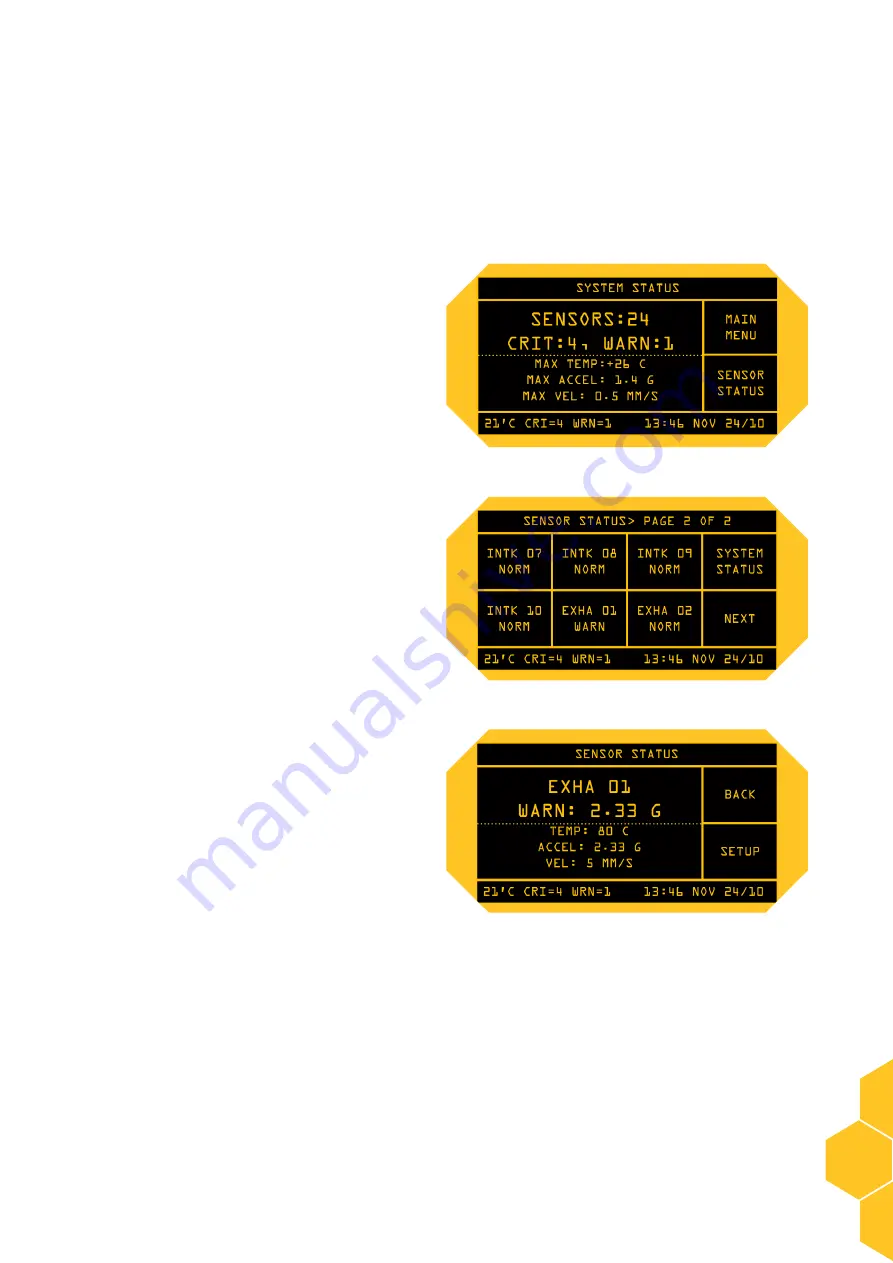
The default screen, when turning on the BossPac
NEST™ receiver or waking the screen from sleep
mode, is the SYSTEM STATUS screen. The SYSTEM
STATUS screen displays the number of sensors
attached to the system as well as any current crit-
ical or warning alarm. The screen will also cycle
through the critical screen and warning screen
when the top half of the screen is tapped. The max
values displayed are the current max values of the
entire sensor array.
Tapping on the
SENSOR STATUS
square will take
you to the sensor status grid screen. Further tapping
on a sensor square,
EXHA 01
for example, will take
you to a status screen for that individual sensor.
Tapping on
NEXT
will cycle through available status
grid pages, (all other sensors).
Each individual sensor status screen will display the
name of the sensor along with the current status.
Tapping on the bottom half of the screen will cycle
the screen through more status data and settings
of the sensor. Tapping on the top half of the screen
will cycle the screen through the available sensors.
(For example: Tap on right side of the top section
cycles to next listed sensor
EXHA 02.
Tap on left side
of the top section cycles to previous listed sensor
INTK 10
). To configure a sensor, or modify the
settings, tap on the
SETUP
section.
Instructions on configuring individual sensors are covered under Section 3.2.9
Note:
if no limits have been set, zeros will be displayed beside the parameter.
User Manual
www.bosspac.com
9
Содержание WASP NEST2
Страница 1: ...WASP NEST2 Smart Reciever And Gateway UserManual VERSION 4 14 2021 05 04 www bosspac com ...
Страница 25: ...User Manual www bosspac com 25 ...
Страница 26: ...2021 www bosspac com ...


