13
309150
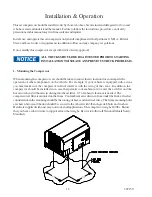
2. Installing the Wiring
This unit is shipped from the factory with all necessary internal wiring installed. The only remaining
wiring necessary is the wiring needed to interface your vehicle/power source with the Boss compressor.
The unit is shipped with a 4 pin connector, they need to be connected as follows:
1. Pin “A” and Pin “E” are to be connected directly to battery positive (Pin “A”) and battery
negative (Pin “E”).
2. Compressor Only: for normal compressor operation, supply 12VDC inputs to Pin “C”. This
will activate the system and pressure the tank to 150 PSI. The system will then unload until the
tank has dropped to 110 PSI, at which point it will automatically activate. The 12VDC output
signal from Pin “D” will be present only when the system is compressing.
3. Connecting the Hydraulic Hoses
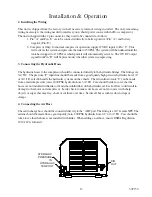
The hydraulic hoses to the compressor should be connected directly to the hydraulic fittings. The fittings are
3/4” JIC. The pressure “P” input line should be made from a good quality high pressure hydraulic hose 1/2”
or 3/4” I.D. rated to handle the hydraulic systems on the vehicle. The return line to tank “T” can be made
from a medium pressure (min. 1000 PSI) hydraulic hose 3/4” I.D. Care should be taken to see that the
hoses are not installed with kinks or bends that inhibit flow of the hydraulic oil. Lack of flow could result in
damage to the motor and compressor. Lastly check to make sure hoses are not in contact with sharp
objects or edges that may fray, chafe or cut them over time. Secure all hoses with tie down straps or
clamps.
4. Connecting the Air Hose
The air discharge hose should be connected directly to the “AIR” port. The fitting is a 3/4” female NPT. The
air line should be made from a good quality (min. 200 PSI) hydraulic hose 1/2” or 3/4” I.D. Care should be
taken to see that the hose is not installed with kinks. When adding an air hose, ensure OSHA Regulation
1910.169 is followed.
Installation & Operation
HYDRAULIC
PRESSURE
IN
HYDRAULIC
TANK OUT
AIR
OUT
Содержание 36 BHP PISTON
Страница 2: ...2 309150 ...
Страница 28: ...28 309150 ...
Страница 29: ...29 309150 WARRANTY SECTION ...
Страница 34: ...34 309150 ...
Страница 35: ...35 309150 PARTS AND ILLUSTRATION SECTION ...
Страница 37: ...37 309150 16 15 13 14 10 1 2 5 11 12 8 6 7 9 4 3 Frame System ...
Страница 43: ...43 309150 13 6 5 3 7 1 4 4 2 10 11 12 9 8 16 14 15 16 Cooler System ...
Страница 45: ...45 309150 3 1 10 7 2 4 6 5 13 12 11 9 8 Hydraulic Drive System ...
Страница 47: ...47 309150 2 3 4 6 5 1 7 Discharge System ...
Страница 49: ...49 309150 Canopy System 11 13 4 6 7 1 12 2 2 8 3 4 10 9 5 ...
Страница 51: ...51 309150 2J 2B 2C 2D 2J 2H 2E 1 2I 2G 2A 2F Decal System ...
Страница 52: ...52 309150 System Schematic ...


