


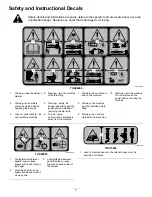


g186468
Figure 23
1.
Leg-assembly wheels
4.
Loosen the ratchet straps and stabilizer arms.
5.
Rotate the locking lever on the RT3 attachment
to the U
NLOCK
position (
).
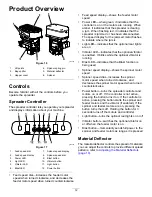
g031021
Figure 24
1.
Locking lever
6.
Tilt the spreader down to release the top pin of
the RT3 attachment (
).
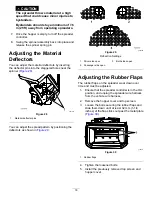
g186469
Figure 25
1.
RT3 hitch hook
3.
Step here
2.
Bottom pin
7.
Grip the spreader firmly and step on the leg
assembly to rotate it back until the bottom pin of
the RT3 attachment clears the hook on the RT3
hitch (
DANGER
The spreader is heavy and could cause
serious injury if dropped.
Ensure that your footing is stable, and
avoid lifting the spreader on slippery or
uneven surfaces.
8.
Pull the spreader back and lower it to the ground.
9.
Move the spreader to your storage area.
Loading the Spreader
Important:
Only use dry sand, salt, or a sand/salt
mixture in the spreader. Other materials could
cause damage to the machine.
1.
Ensure that the spreader is securely mounted to
your vehicle and is not over slippery or uneven
terrain.
2.
Remove the hopper cover and ensure that the
top screen is installed and closed.
3.
Determine the amount of material that you
can safely transport in your spreader; refer to
Specifications (page 13)
.
4.
Fill the hopper using the following methods:
•
If using bagged materials, place the bag on
the top screen bag splitter and work it back
and forth to split the bag. Continue to move
and shake the bag until it is empty.
Note:
Have 2 people lift bags weighing
more than 18 kg (40 lb).
Note:
Keep your hands and fingers clear of
the bag splitter when loading materials.
•
If using dry bulk materials, load the materials
into the hopper through the top screen to
break up any large, impassable chunks that
may clog the spreader.
16