background image

on the spreader hitch with the hole in the hitch
of your vehicle (

Figure 9

).

Note:

If the spreader contacts the bumper of

your vehicle, slide the spreader out and align the
first hole of the spreader hitch instead.
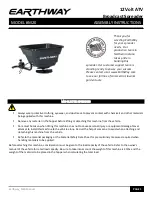
g232362

Figure 9

2.

Secure the spreader hitch to the vehicle hitch
using the clevis pin and cotter hairpin.

3.

Hook 1 end of the ratchet straps to the holes on
the back of the spreader frame (

Figure 6

).

4.

Slide the free ends of the ratchet straps between
the bumper and tailgate on your vehicle and
attach them to a solid point on the truck frame
rail.

Note:

You may have to drill a hole in the truck

frame rail to attach them.

5.

Plug the spreader harness into the vehicle wire
harness at the bumper.

Loading the Spreader

Important:

Only use dry salt in the spreader.

Other materials could cause damage to the
machine.

1.

Ensure that the spreader is securely mounted to
your vehicle and is not over slippery or uneven
terrain.

2.

Remove the hopper cover.

3.

Determine the amount of material that you
can safely transport in your spreader; refer to

Specifications (page 8)

.

4.

Fill the hopper.

Note:

Have 2 people lift bags weighing more

than 18 kg (40 lb).

5.

Install the hopper cover.

Operating the Spreader

DANGER

Hands, feet, and clothing can get caught in
the moving parts of the spreader and cause
serious bodily injury and loss of limbs.

Keep your hands, feet, and clothing away from
the moving spinner and attachment points.

CAUTION

The spreader throws material at a high speed
that could cause minor injuries to bystanders.

Bystanders should stay a minimum of 7.6 m
(25 ft) away from operating spreaders.

1.

Flip the O

N

/O

FF SWITCH

to the O

N

position.

Note:

Always check for bystanders before

starting the spreader.

2.

Use the speed dial to set your desired spinner
speed.

Note:

The spinner speed will determine how

quickly the material is spread as well as how far
it is thrown.

3.

While spreading, you can press the B

LAST

switch to momentarily increase the speed of the
spinner motor.

4.

Flip the O

N

/O

FF SWITCH

to the O

FF

position when

you are finished spreading to stop the spreader.

Freeing a Clog

The red LED on the spreader controller will illuminate
when debris gets wedged in the spreader and the
controller is overloaded.

1.

If the red LED illuminates, quickly pulse the
B

LAST

button.

2.

If the clog is not cleared automatically,
disconnect the spreader wire harness and
manually free the clog.

9


Содержание TGS 300

Страница 1: ...Form No MSC11329 Rev A Owner s Manual TGS 300 Tailgate Spreader Part No TGS11300 Serial No 400000000 and Up Register at www bossplow com Original Instructions EN MSC11329 A ...

Страница 2: ...ocation of the model and serial numbers on the product Write the numbers in the space provided g232361 Figure 1 1 Serial number location Model No Serial No This manual identifies potential hazards and has safety messages identified by the safety alert symbol Figure 2 which signals a hazard that may cause serious injury or death if you do not follow the recommended precautions g000502 Figure 2 1 Sa...

Страница 3: ...s follow the manufacturer s recommendations for proper parking procedures Always wear your seatbelt while operating a motor vehicle Do not exceed 22 5 km h 14 mph while spreading This spreader has an operating sound level below 70 dBA Never put any part of your body between the spreader and the vehicle Overloading the spreader could result in an accident or damage Never exceed the gross vehicle we...

Страница 4: ... all operators should be trained before operating the machine 5 Warning empty the hopper and disconnect the power before installing or removing the machine 8 Warning the machine must be installed before filling 3 Loss of control hazard do not overfill the machine 6 Thrown object hazard keep bystanders a safe distance away from the machine 9 Warning do not store materials in the machine decaltgs058...

Страница 5: ...sert the controller connectors through the firewall and into the vehicle cab and secure them with cable ties Note Route the connectors to the location that you want to install your controller 4 Connect the black ring connector to the negative battery terminal Figure 3 5 Connect the red ring connector to the positive battery terminal Figure 3 6 Wrap all of the excess wire and secure it in the engin...

Страница 6: ...move the mounting bracket from the controller Figure 5 g031015 Figure 5 1 Mounting bracket bolt 3 Sheet metal screw 2 Mounting bracket 2 Attach the mounting bracket to the vehicle using 2 sheet metal screws Figure 5 3 Attach the controller to the mounting bracket with the previously removed bolts Note Position the controller screen so that it is clearly visible to the driver 4 Connect the wire har...

Страница 7: ...djust the controls to provide different spread patterns refer to Adjusting the Material Deflectors page 10 Spreader Controller The spreader controller lets you operate your spreader and displays information about your machine g031017 Figure 7 1 Blast switch 4 Yellow LED 2 On Off switch 5 Red LED 3 Green LED 6 Speed dial On Off switch turns the spinner motor on or off Blast switch momentarily sends...

Страница 8: ...n Removing the Spreader 1 Ensure that the spreader controller is in the OFF position 2 Unplug the spreader wire harness from the vehicle wire harness and attach the weather caps to each end 3 Unhook the ratchet straps 4 Remove the cotter hairpin and clevis pin from the vehicle hitch 5 Slide the spreader out of the receiver hitch of your vehicle Figure 8 DANGER The spreader is heavy and could cause...

Страница 9: ...te Have 2 people lift bags weighing more than 18 kg 40 lb 5 Install the hopper cover Operating the Spreader DANGER Hands feet and clothing can get caught in the moving parts of the spreader and cause serious bodily injury and loss of limbs Keep your hands feet and clothing away from the moving spinner and attachment points CAUTION The spreader throws material at a high speed that could cause minor...

Страница 10: ...e Drop Gate 1 Remove the 2 front bolts Figure 10 g232357 Figure 10 1 Front bolts 3 Drop gate 2 Rear bolts 2 Loosen the 2 rear bolts and rotate the drop gate Figure 10 3 Install the 2 previously removed front bolts and tighten the 2 rear bolts You can adjust the spread pattern by rotating the drop gate as shown in Figure 11 g231780 Figure 11 1 Rotated clockwise 3 Default centered 2 Rotated counter ...

Страница 11: ...ch as curbs sidewalks and pipes can damage your spreader or vehicle Do not let the ice build up always start as soon as possible Always wear your seatbelt when spreading Always remember to spread at a safe speed Spreading faster can be hard on your vehicle as its load is greatly increased Never ride on or put body parts into the spreader while servicing or operating it 11 ...

Страница 12: ... harnesses 2 The controller is not plugged into the vehicle side harness 2 Plug in the controller The spinner motor does not work 3 The spinner motor is not connected to the spreader side harness 3 Contact your Authorized Service Dealer The red LED is lit on the controller 1 The spreader is jammed 1 Refer to the Freeing a Clog section 1 The connection between the auger and spinner and the motor sh...

Отзывы: