background image

INSTRUCTIONS

INSTRUCTIONS

10. CD Program Play

In CD mode, you can set the sequence of playing by the program function, the operation
is as follows:
When CD is playing, press ST/PROG button, then the display shows:

Input the number of the song you want to program by the remote control, program the
first song, input your desired song, for example, the sixth song, and press number button 
6 on the remote control. Program the second song, press


button move the cursor to 


 . Input your desired song, for example, the ninth song, press number button 9 on 

the remote control. Press     


button to program play.

Back to the normal mode, press the ST/PROG button, then press


button. 

Note: This function can only be worked by the remote control.

11. MP3 Program Play

In MP3 mode, you can set the sequence of playing by the program function, the 
operation is as follows:
When MP3 is playing, press ST/PROG button, then the display shows:

Then, input desired song by remote control.
For example: Program the first song, input 01, press


button move the cursor to the 

second lattice, input desired song, for example the third song. Program the second song, 
press


button, work with


button, move the cursor to 2


   . Input 01, press


button 

move the cursor to the second lattice, input desired song, for example, the sixth song
(press 6). Press


button to program play.

Back to the normal mode, press the ST/PROG button and then press


button. 

Note: This function can only be worked by the remote control.

PROG

TC

3  _  _  :  _  _
4  _  _  :  _  _

TC

7  _  _  :  _  _
8  _  _  :  _  _

5  _  _  :  _  _

6  _  _  :  _  _

TC

11  _  _  :  _  _
12  _  _  :  _  _

9    _  _  :  _  _

10  _  _  :  _  _

TC

15  _  _  :  _  _
16  _  _  :  _  _

13   _  _  :  _  _

14  _  _  :  _  _

PLAY


DELETE

1  _  _  :  _  _

2  _  _  :  _  _

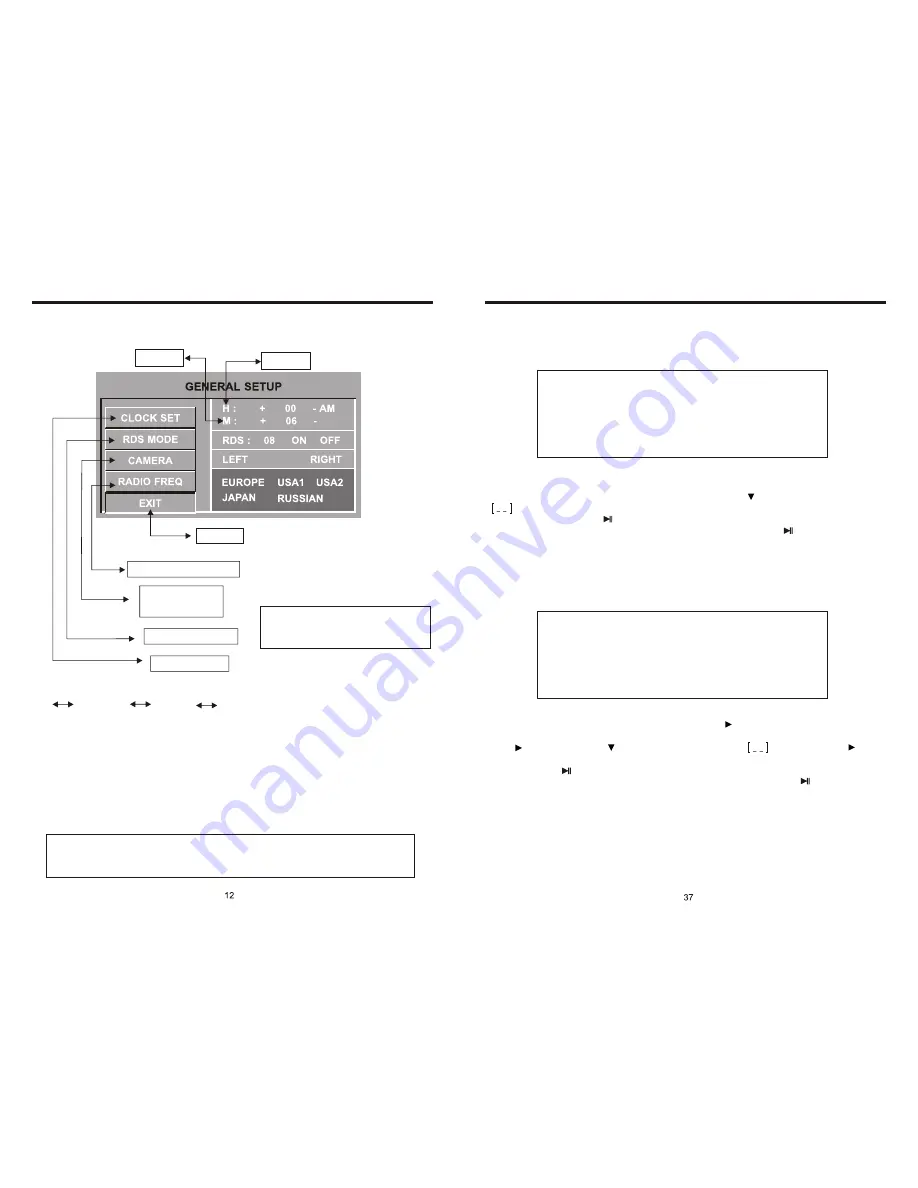
Time display: Touch main menu into adjust mode, press time setup button, the 
corresponding function will be display in yellow words.
(1)Press “+” on hour to add hour, press “-” to reduce hour;
(2)Press “+” on minute to add minute, press “-” to reduce minute.

NOTE:

 Touch the correspondence function, will be display in green background.

The unit include two times system: Europe time (24 hour setup), America time (12 
hour setup), when show the AM mark it indicate morning time, when appear the PM 
mark, it show the time of afternoon.

OSD SETUP (PIC 2)

Exit

Minute

Hour

Radio frequency setting

RDS on/off optional

Time setting

Note:

 Touch corresponding function, 

it will display in yellow words reminding, 
and blue back ground reminding.

Remark:

 This unit is with RDS function, it will automatically adjust the time when you 

activate RDS function or have received RDS radio channels. At no received RDS radio 
channels or AM state, you should adjust the time.

Note:

 There are 3 buttons automatically changed according to your setting change in 

radio state when you activate or exit RDS; Changes are as following:
PTY        LOUD;    TA         EQ;     AF         ST

TIME DISPLAY AND ADJUST

Back-up Camera 
left/right selection

Содержание BV9995B

Страница 1: ......

Страница 2: ...y Tone Other Play Mode Trouble Shooting Wiring Diagram Specifications Accessory Panel Button Control Instruction Outlook And Basic Function BLUETOOTH Touch Operation BLUETOOTH Operation Setting Up 3 3 4 5 6 7 8 9 11 12 13 14 16 17 18 20 22 23 33 36 38 39 40 41 42 43 44 45 46 47 Bluetooth Enabled In Dash Receiver With Motorized 7 Widescreen TFT Monitor DVD MP3 CD Flip Out Touch Screen INSTRUCTIONS ...

Страница 3: ...ase do not touch LCD display with any hard object so that you prevent it from getting scratched or damaged 5 To avoid an accident caused by watching the LCD screen This unit has a vehicle lock out wire so that you will not be allowed to watch a video while driving down the road 6 This unit is meant for a 12V power and negative ground system from a vehicle NOTE We keep improving this product all th...

Страница 4: ... with ISO standard connector please follow below instruction Yellow 12 V Constant Black Ground wire Blue Power Antenna Remote Amp Turn On Orange Back Up Camera Trigger Pink Parking Brake White White black Left front speaker Purple Purple black Right rear speaker Green Green Left rear speaker Red ACC ON 12V Grey Grey black Right front speaker Note The PARKING BRAKE wire must be connected to the par...

Страница 5: ...dio station Can not load disc Can not play disc Can not switch language subtitle No image PROBLEM Can not power on CAUSE Check whether power fuse blew or not Some factor cause MPU wrong operation No enough power supply from battery Disc is scratched Put wrong side of disc into unit Lens has dirty There is only one language subtitle in disc Video line between unit and TV is not properly connected S...

Страница 6: ...lly activated 2 After 5 seconds you choose desired mode do not adjust volume button The mode will automatically take you back to status before adjustment 5 RESET 1 If unit is not working correctly you should press the RES button This will reset the radio and should start working correctly afterwards 2 After reset all settings will resume back to the factory default settings VOL BAS TRE L R F R INS...

Страница 7: ...ion from the cell phone is avoided 2 Bluetooth match conditions You can shortly touch the Bluetooth function key under the main menu to directly access the Blueetooth interface With a cell phone that supports the function of Blueetooth wireless connection you can establish a connection between your cell phone and the automobile loaded unit under the Bluetooth mode to achieve date exchange and sync...

Страница 8: ...and free mode the speaker will beep and the hand free mode will be switched to the cell phone mode Bluetooth hand free cell phone switching If you touch the Voice dial button at the lower left corner of the screen under the Bluetooth hand free mode and the cell phone mode you will hear the keying tone and you can go ahead with the voice dialing function according to the cell phone instructions Eg ...

Страница 9: ...e displayed 6 Number Button 1 INT Intro Scan In radio mode press this button to hear radio preset In disc playback mode press this button to start or stip the intro scan function 5 Number Button 2 RPT Repeat Playback In radio mode press this button to hear radio preset In disc playback mode press this button to repeat the current track indefinitely 4 Number Button 3 RDM Random playback In radio mo...

Страница 10: ...play 19 TFT Display screen extend Retreat Press this button to extend the TFT screen from the device or retreat it back The maximum angle of extension is 104 degree Attention Under the disc playing mode there is no image display at the moment of screen extension after the button is pushed It will become normal in 3 seconds 18 UP Adjustment TFT Screen Hang free After the display screen is extended ...

Страница 11: ... only is used with the remote control in CD MP3 USB SD mode Once you have one of these settings on You will no longer have Bass Treble adjustments until this feature is set to off MAIN MENU TOUCH OPERATION PIC 1 RADIO AUX INPUT DVD BLUETOOTH USB SD GPS POWER OSD SET TV CDC This unit without CDC TV GPS function ...

Страница 12: ...nction can only be worked by the remote control PROG TC 3 _ _ _ _ 4 _ _ _ _ TC 7 _ _ _ _ 8 _ _ _ _ 5 _ _ _ _ 6 _ _ _ _ TC 11 _ _ _ _ 12 _ _ _ _ 9 _ _ _ _ 10 _ _ _ _ TC 15 _ _ _ _ 16 _ _ _ _ 13 _ _ _ _ 14 _ _ _ _ PLAY DELETE 1 _ _ _ _ 2 _ _ _ _ PROG TC 3 _ _ _ _ 4 _ _ _ _ TC 7 _ _ _ _ 8 _ _ _ _ 5 _ _ _ _ 6 _ _ _ _ TC 11 _ _ _ _ 12 _ _ _ _ 9 _ _ _ _ 10 _ _ _ _ TC 15 _ _ _ _ 16 _ _ _ _ 13 _ _ _ _ 14 ...

Страница 13: ... 6 OSD In playing mode short press OSD on remote control to show all information of present dis 7 Randomly Play In CD mode press LOC RDM button on remote control to instantly play each song Press again to back to the normal play 8 EQ Mode 1 This function can only be worked by remote control 2 When playing CD MP3 press the ZOOM button on the remote control you can choose the sound mode 3 When enter...

Страница 14: ...ong press number button 8 on the remote control Press button to program play Back to the normal mode press the ST PROG button then press button Note This function can only be worked by the remote control REMOTE CONTROL FUNCTION 4 SOURCE Button Press this button to choose audio sources 5 EQ Button Press this button to choose POP ROCK EQ off 6 SEEK SEEK Button Press this button to manual turning spe...

Страница 15: ...ers for example the 19th song press 1 9 button Centesimal numbers for example the 120th song press 1 2 0 button 16 AMS RPT Button In radio mode press this button to browse stored stations In audio mode press this button to play repeatedly 17 TITLE Button In DVD mode press this button to play back to the top menu of disc 18 AUDIO Button In DVD mode press this button to switch language of dialogue I...

Страница 16: ...utton a bit longer to operate 4 Previous Next Song Play In playing mode press SEEK SEEK on remote control or touch button on display to choose previous next song 5 Switch System In playing mode short press the BAND P N button on remote control to select PAL AUTO NTSC TV system Note This function can only be worked by the remote control 6 Slow Play Press SLOW button on remote control to slow play T...

Страница 17: ...SETUP FULL 6 8 4 8 2 8 OFF 1 Press or button 2 Press button then to enter Touch this area to enter exit main menu DISC PLAY TOUCH OPERATION PIC 4 Touch option next song previous songs adjust monitor angles Pls refer to Pic 5 when touch SET button There is a yellow remind when touch any button You can select X X X X X to speed up when you press this button You can select X X X X X to backward when ...

Страница 18: ... 2 0 8 6 4 2 0 DVD MODE PIC 5 AUDIO SETTING ON TOUCH SCREEN Bass choosing when touched the button will be yellow touch this button to exit touch it again to resume Loud choosing this function is defined open when it is touched at the first time the loud function will be closed at the same time yellow light disappear Audio selection VOL BAS TRE BAL FAD When using this function the position bar will...

Страница 19: ...HARPNESS VIDEO SETUP VIDEO SETUP VIDEO SETUP VIDEO SETUP VIDEO SETUP VIDEO SETUP 12 10 8 6 4 2 0 12 10 8 6 4 2 0 6 4 2 0 4 6 2 1 Press or button 2 Press button then to enter VIDEO SETTING ON TOUCH SCREEN Image mode You can choose the area in the broken line on the panel standard defined soft according what you need to choose the blue back light will disappear You can choose Brightness Contrast Col...

Страница 20: ...is on it means there is strong RDS signals output Short press on this button to decrease radio frequency longer press on this button to seek radio channels frequency decreased direction Short press on this button to increase radio frequency longer press on this button to seek radio channels frequency increased direction Touch this area to enter exit main menu Press this button each time it will au...

Страница 21: ...ing mode 5 POP M RDS Channel Mark Indicate RDS channel name 1 RDS Tracking System Press AF button in FM mode and then press last 2 minutes RDS will auto search channel up and down it will stop searching when RDS channel be founded but AF will keep remaining on the screen and waits for the next traffic emergency report 2 RDS Tracking on Playing Mode In playing mode AF tracking system keeps on openi...

Страница 22: ...requency Search Station Press SEEK SEEK button on remote control or touch button on display shortly every time to search station in up down direction When get one station it will auto stop searching 3 Browse Auto Search and Store Station 1 In radio mode press AMS RPT button on remote control or APS button on display shortly to browse preset station on 1 6 2 In radio mode press AMS RPT button on re...

Страница 23: ... control or touch button on display unit will play from the first song 3 Fast Forward Fast Backward Play In playing mode press SEEK button on remote control or touch button on display to speed play When you need quick back press SEEK button on remote control or touch button on display to quick back play Note Hold above button a bit longer to operate 4 Previous Next Song Play In playing mode press ...

Страница 24: ...ointed language 4 About the SETUP please read the follow Press SETUP on the remote control it will appear the following touch menu Press button on pedestal to eject disc PROG TC 1 0 1 0 3 2 0 1 0 6 3 _ _ _ _ 4 _ _ _ _ TC 7 _ _ _ _ 8 _ _ _ _ 5 _ _ _ _ 6 _ _ _ _ TC 11 _ _ _ _ 12 _ _ _ _ 9 _ _ _ _ 10 _ _ _ _ TC 15 _ _ _ _ 16 _ _ _ _ 13 _ _ _ _ 14 _ _ _ _ PLAY DELETE 8 OSD In playing mode short press ...

Отзывы: