14
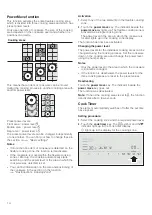
PowerMove function
This function activates the entire flexible cooking zone,
which is divided into three cooking areas and which has
preset power levels.
Only use one item of cookware. The size of the cooking
area depends on the cookware used and whether it is
positioned correctly.
This means that an item of cookware can be moved
during the cooking process to another cooking area with
another power level:
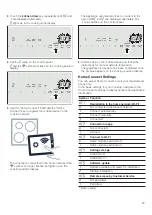
Preset power levels:
Front area = power level
É
Middle area = power level
Rear area = power level
³
.
The preset power levels can be changed independently
of one another. You can find out how to change these in
the section on
a
"Basic settings"
Notes
ʑ
If more than one item of cookware is detected on the
flexible cooking zone, the function is deactivated.
ʑ
If the cookware is moved within the flexible cooking
zone or lifted up, the cooktop automatically starts
searching and the power level of the area in which the
cookware was detected is set.
ʑ
You can find information on the size and positioning of
the cookware in the section on the function.
a
"FlexInduction
®
Cooking Zone"
Activation
1.
Select one of the two elements in the flexible cooking
zone.
2.
Touch the
power move
key. The indicator beside the
power move
key lights up. The flexible cooking zone is
activated as a single cooking zone.
The power level in the area in which the cookware is
located lights up in the cooking zone display.
The function has now been activated.
Changing the power level
The power levels for the individual cooking areas can be
changed during the cooking process. Set the cookware
down on the cooking area and change the power level
using the number keys.
Notes
ʑ
Only the power level in the area in which the cookware
is located is changed.
ʑ
If the function is deactivated, the power levels for the
three cooking areas are reset to the preset values.
Deactivating
Touch the
power move
key. The indicator beside the
power move
key goes out.
The function was deactivated.
Note:
If one of the cooking areas is set to
¯
, the function
deactivates after a few seconds.
Cook Timer
The element automatically switches off after the set time
has elapsed.
Setting procedure:
1.
Select the cooking zone and the required power level.
2.
Touch the
cook timer
key. The
¯¯
symbol and the
9
indicator light up in the cook timer display.
\
lights up in the display for the cooking zone.
Cooking areas
VSHHG
ERRVW
NLWFKHQ
WLPHU
FRRN
WLPHU
FRXQWXS
WLPHU
DXWR
FKHI
SRZHU
PRYH
IOH[
MRLQVSOLW
Содержание NITP669SUC
Страница 1: ...Use and Care Manual Cooktop NITP669SUC NITP669UC ...
Страница 77: ......
Страница 78: ......
Страница 79: ......


