background image

9

IMPORTANT SAFETY INSTRUCTIONS

READ AND SAVE THESE INSTRUCTIONS

4

IMPORTANT: THE APPLIANCE MUST BE INSTALLED BY 

A QUALIFIED INSTALLER.  
INSTALLER: LEAVE THESE INSTRUCTIONS WITH THE 

APPLIANCE AFTER INSTALLATION IS COMPLETE. 

IMPORTANT: SAVE FOR THE LOCAL INSPECTOR’S 

USE.
OWNER: PLEASE RETAIN THESE INSTRUCTIONS FOR 

FUTURE REFERENCE.

WARNING

If the information in this manual is not followed exactly, 

fire or shock may result causing property damage or 

personal injury.

WARNING

Do not repair, replace or remove any part of the 

appliance unless specifically recommended in the 

manuals. Improper installation, service or maintenance 

can cause injury or property damage. Refer to this 

manual for guidance. All other servicing should be done 

by an authorized servicer.

WARNING

Disconnect electrical and gas supply before servicing.

High Altitude Installation

This appliance has been tested for operation up to an 

altitude of 10,100 ft (3,078 m) elevation above sea level.
If desired, for altitudes above 2,000 ft (610 m) elevation 

above sea level, adjustments may be made. Burners 

should be checked at the lowest setting, if the flame is 

not stable the simmer should be increased until the 

flame is stable. This can be done by adjusting the 

bypass screw in the valve. If flame performance is 

satisfactory, adjustment will not be required. It is required 

that a Certified Professional make the high altitude 

adjustments during installation.

Appliance Handling Safety

Safety Codes and Standards

This appliance complies with the following Standard:

ANSI Z21.1 / CSA 1.1 Household Cooking Gas 

Appliances

It is the responsibility of the owner and the installer to 

determine if additional requirements and/or standards 

apply to specific installations.
Installation must conform with local codes or, in the 

absence of local codes, with the National Fuel Gas 

Code, ANSI Z223.1/NFPA 54 or, in Canada, the Natural 

Gas and Propane Installation Code, CSA B149.1.
The appliance must be electrically grounded in 

accordance with local codes or, in the absence of local 

codes, with the National Electrical Code, NFPA 70 latest 

edition or, in Canada, the Canadian Electric Code, 

CSA C22.1-02.

Electric Safety

WARNING

Before you plug in an electrical cord or turn on power 

supply, make sure all controls are in the OFF position.

For appliances equipped with a cord and plug, do not 

cut or remove the ground prong. It must be plugged into 

a matching grounding type receptacle to avoid electrical 

shock. If there is any doubt as to whether the wall 

receptacle is properly grounded, the customer should 

have it checked by a qualified electrician.
Do not use an extension cord.
Do not use an adapter.
If required by the National Electrical Code (or Canadian 

Electrical Code), this appliance must be installed on a 

separate branch circuit.
The circuit breaker should have a contact separation of 

at least 3 mm on all poles.
Be sure your appliance is properly installed and 

grounded by a qualified technician. Installation, electrical 

connections and grounding must comply with all 

applicable codes.
Before installing, turn power OFF at the service panel. 

Lock service panel to prevent power from being turned 

ON accidentally.
Installer – show the owner the location of the circuit 

breaker or fuse. Mark it for easy reference.

Gas Safety

Install a gas shutoff valve near the appliance. It must be 

easily accessible in an emergency.
Leak testing must be conducted by the installer 

according to the instructions in this manual.
The appliance and its individual shutoff valve must be 

disconnected from the gas supply piping system during 

any pressure testing at pressures in excess of ½ psi

(3.5 kPa).
The appliance must be isolated from the gas supply 

piping system by closing its individual manual shutoff 

Hidden surfaces may have sharp edges. 

Use caution when reaching behind or 

under appliance.

Содержание NGM8657UC

Страница 1: ...Installation Manual Gas Cooktop NGM8657UC ...

Страница 2: ...t Gas Supply 9 Connect Electrical Supply 10 Burner Cap and Burner Base Placement 10 Install Burner Grates 10 Check the Installation 11 Conversion to LP Gas 11 Converting the Pressure Regulator 11 Replacing the Nozzles 12 Adjusting the Gas Valves 12 Customer Service 13 9 Safety DefinitionsSafetyDefinitions 9 WARNING This indicates that death or serious injuries may occur as a result of non observan...

Страница 3: ...WKH JDV VXSSOLHU V LQVWUXFWLRQV I RX FDQQRW UHDFK RXU JDV VXSSOLHU FDOO WKH ILUH GHSDUWPHQW QVWDOODWLRQ DQG VHUYLFH PXVW EH SHUIRUPHG E D TXDOLILHG LQVWDOOHU VHUYLFH DJHQF RU WKH JDV VXSSOLHU 51 1 I WKH LQIRUPDWLRQ LQ WKHVH LQVWUXFWLRQV LV QRW IROORZHG H DFWO D ILUH RU H SORVLRQ PD UHVXOW FDXVLQJ SURSHUW GDPDJH SHUVRQDO LQMXU RU GHDWK 1HYHU 2SHUDWH WKH 7RS 6XUIDFH RRNLQJ 6HFWLRQ 51 1 RI WKLV SSOLD...

Страница 4: ...National Fuel Gas Code ANSI Z223 1 NFPA 54 or in Canada the Natural Gas and Propane Installation Code CSA B149 1 The appliance must be electrically grounded in accordance with local codes or in the absence of local codes with the National Electrical Code NFPA 70 latest edition or in Canada the Canadian Electric Code CSA C22 1 02 Electric Safety WARNING Before you plug in an electrical cord or turn...

Страница 5: ...es Installer show the owner where the gas shut off valve is located Related Equipment Safety The appliance should only be used if installed by a qualified technician in accordance with these installation instructions The manufacturer is not responsible for any damage resulting from incorrect installation Remove all tape and packaging before using the appliance Destroy the packaging after unpacking...

Страница 6: ... VAC connection Plan the installation so that the power connection is accessible from the front of the cabinet Gas Requirements The cooktop is shipped from the factory for use with natural gas For use with LP conversion a certified technician or installer must do the conversion Supply Pressure Natural Gas 7 inches water column 17 4 Millibars Propane Gas 11 inches water column 27 4 Millibars The pr...

Страница 7: ... has been made Note All measurements given must be precisely followed If nonstandard cabinets are used make sure they are installed with minimum dimensions shown in the following image for installation in a kitchen island Ventilation Requirements We strongly recommend the installation of ventilation with the appliance The appliance must be installed according to the ventilation instructions 9 CAUT...

Страница 8: ...mable intermediate floor e g metal or plywood 3 8 10 mm from the base of the cooktop This will prevent access to the base of the cooktop The distance from the intermediate floor to the power supply connection for the appliance must be at least 3 8 10 mm Install the Cooktop 9 WARNING Before you plug in an electrical cord or turn on power supply make sure all controls are in the OFF position 9 CAUTI...

Страница 9: ...gulator Always use a new flex line Checking Gas Line for Leaks Check supply line connections for leaks using a soap solution or non corrosive leak detection fluid Do not use a flame of any sort 1 Turn on gas 2 Apply a soap solution or non corrosive leak detection fluid to all joints and fittings in the gas connection between the shut off valve and the cooktop Include gas fittings and joints in the...

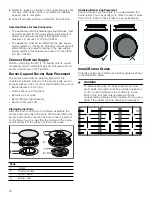
Страница 10: ...ner parts are not properly placed one or more of the following may occur Burner flames are too high Flames shoot out of burners Burners do not ignite Burner flames light unevenly Burner emits gas odor Placing Burner Parts After electrical connection is complete assemble the burner parts correctly and evenly When assembling the burner parts make sure that the burner head is placed on the base in su...

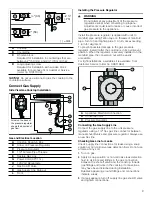
Страница 11: ...Converting the Pressure Regulator Locate the pressure regulator on the bottom right end of the cooktop Note The arrow on the back of the regulator must point in the direction of the gas flow to the cooktop 1 Remove the hexagon shaped cap from the regulator making sure not to dislodge the gasket on the cap or the spring inside the regulator 2 Grasp the plastic button stem firmly and pull it forcefu...

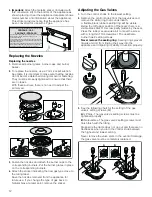
Страница 12: ...2 Remove the control knobs from the gas valves and remove the white ring that is underneath A flexible black rubber sealing ring will be visible Below the left upper position of that seal there is a visible black Star T10 screw partly hidden by the seal Press the rubber seal aside a bit to meet the screw with a long thin T10 screwdriver The dual flame burner has 2 setting screws Never remove the s...

Страница 13: ... number for your appliance available You can find this information on the rating label in the Appliance Document List on the underside of the appliance Gas Pressure wc BTU h kW M valve adjustment screw setting Natural gas 7 77 3400 1 B Propane 11 54 3400 1 A Natural gas 7 102 6000 1 76 B Propane 11 71 6000 1 76 A Natural gas 7 125 9010 2 64 B Propane 11 88 9010 2 64 A Natural gas 7 1 161 17000 4 9...

Отзывы: