background image

2 4  |


Bosch Climate 5000 AA Series Inverter Multi Split-Type Air Conditioner/ Heat Pump


Installation Manual

01.2017 

|

 Bosch Thermotechnology Corp.

Data subject to change

12     Features and operation

12.1     Protection of the air conditioner

Compressor protection

The compressor cannot restart for 3 minutes after it stops.

Anti-cold air

The unit is designed not to blow cold air on HEAT mode, when the indoor heat 
exchanger is in one of the following three situations and the set temperature has not 
been reached.

A) When heating has just started.

B) During defrosting.

C) Low temperature heating.

The indoor or outdoor fan will stop running when defrosting.

Defrosting

Frost may be generated on the outdoor unit during a heat cycle when outdoor 
temperature is low and humidity is high resulting in lower heating effi  ciency in the air 
conditioner.

Under these conditions, the air conditioner will stop heating operations and start 
defrosting automatically.

The time to defrost may vary from 4 to 10 minutes, depending the outdoor 
temperature and the amount of frost buildup on the outdoor unit.

Auto-Restart

In case of power failure, the system will immediately stop. When power returns, the 
Operation light on the indoor unit will fl ash. To restart the unit, press the ON/OFF 
button on the remote control. The unit will restart with the same settings as before it 
lost power.

12.2     Operation

White mist emerging from the indoor unit

A white mist may be generated due to a large temperature diff erence between air 
inlet and air outlet on COOL mode in places with high relative humidity. 

A white mist may be generated due to moisture created in the defrosting process 
when the air conditioner restarts in HEAT mode operation after defrosting.

Noise coming from the air conditioner

You may hear a low hissing sound when the compressor is running or has just 
stopped running. This sound is the sound of the refrigerant fl owing or coming to a 
stop. 

You may also hear a low "squeaking" sound when the compressor is running or has 
just stopped running. This is caused by tempera heat expansion and cold contraction 
of the plastic parts in the unit when the temperature is changing. 

A noise may be heard due to the louver restoring itself to its original position when 
power is fi rst turned on.

Dust blowing out from the indoor unit.

This is happens when the air conditioner has not been used for a long time or during 
its fi rst use.

The air conditioner turns to FAN ONLY mode from COOL or HEAT mode.

When the indoor temperature reaches the set temperature setting, the compressor 
will stop automatically, and the air conditioner turns to FAN only mode. The 
compressor will start again when the indoor temperature rises on COOL mode or 
falls on HEAT mode to the set point. Droplets of water may form on the surface of 
the indoor unit when cooling occurs in relatively high humidity (generally higher 
than 80% relative humidity). Adjust the horizontal louver to the maximum air outlet 
position and select HIGH fan speed.

Operation mode selection

While two or more indoor units are simultaneously operating, make sure the modes 
do not confl ict with each other. The heat mode claims precedence over all other 
modes. If the unit initially started to operate in HEAT mode, the other units can 
operate in HEAT mode only. For example: If the unit initially started operates under 
COOL (or FAN) mode, the other units can operate under any mode except HEAT. If 
one of the unit selects HEAT mode, the other operating units will stop operation and 
display ”--” (for units with display window only) or the auto and operation indication 
light will fl ash rapidly, the defrost indication light will turn off , and the timer indication 
light will remain on (for units without a display window). Alternatively, the defrost 
and alarm indication light (if applicable) will light up, or the operation indication light 
will fl ash rapidly, and the timer indication light will turn off  ( for the fl oor and standing 
type).

Optimal operation

To achieve optimal performance, please note the following:


Adjust the direction of the air flow so that it is not blowing directly on 
people. 


Adjust the temperature to achieve the highest possible level of comfort. Do 
not adjust the unit to excessive temperature levels. 


Close doors and windows in COOL mode or HEAT mode. 


Use the TIMER ON button on the remote controller to select a time you want 
to start your air conditioner. 


Do not place any object near the air inlet or air outlet, as the efficiency of the 
air conditioner may be reduced and the air conditioner may stop running. 


Clean the air filter periodically, otherwise cooling or heating performance 
may be reduced. 


Do not operate unit with horizontal louver in closed position.

Содержание Climate 5000 AA Series

Страница 1: ...Bosch Inverter One Two One Three One Four One Five Split Type Air Conditioner Heat Pump Climate 5000 AA Series Installation Manual ...

Страница 2: ...2 Bosch Climate 5000 AA Series Inverter Multi Split Type Air Conditioner Heat Pump Installation Manual 01 2017 Bosch Thermotechnology Corp Data subject to change ...

Страница 3: ...allation 9 7 Refrigerant piping connection 12 7 1 Refrigerant Piping Connection Instructions 12 8 Wiring 15 8 1 Outdoor unit wiring 15 8 2 Wiring Diagrams 16 9 Air evacuation 19 9 1 Evacuation instructions 19 9 3 Safety And Leakage Check 21 10 Test run 22 10 1 Before Test Run 22 10 2 Test run instructions 22 11 Automatic Wiring Piping Correction Function 23 11 1 How To Activate This Function 23 12...

Страница 4: ...designed air conditioning units is highly recommended WARNING Only trained and certified technicians should install repair and service this air conditioning unit Improper installation may result in electrical shock short circuit leaks fire or other damage to the equipment and personal property WARNING INSTALLATION REQUIREMENTS Strictly follow the installation instructions set forth in this manual I...

Страница 5: ...de Φ6 35 1 4 in Parts not included Piping kits are available as an accessory Φ9 52 3 8 in Gas side Φ9 52 3 8 in Φ12 7 1 2 in Φ 16 5 8 in Multi zone installation manual 1 Transfer connector NOTE Pipe sizes may vary between air handler equipment and condensing section connections To meet different pipe size requirements it may be necessary to install an adapter transfer connector on the outdoor unit ...

Страница 6: ...ion Manual 01 2017 Bosch Thermotechnology Corp Data subject to change 3 Installation Overview Order L N 1 2 3 MC MC 4 5 Install the outdoor unit Page 9 Evacuate the refrigeration system Page 20 Connect the wires Page 14 Connect the refrigerant pipes Page 12 Perform a test run Page 22 Figure 1 ...

Страница 7: ...e than 23 6in More than 11 8in More than 23 6in More than 5 9in More than 78 7in Figure 2 NOTICE This illustration is for demonstration purposes only The actual shape of your air condtioner may be slightly different Copper lines must be independently insulated CAUTION To prevent wall damage use a stud finder to locate studs A minimum pipe run of 10ft is recommended to minimize vibration excessive ...

Страница 8: ... 6 ft 45 m 196 8 ft 60 m 246 ft 75 m Max equivalent length for one indoor unit 82 ft 25 m 98 4 ft 30 m 114 8 ft 35 m 114 8 ft 35 m Max height different between indoor and outdoor unit OU higher than IU 49 ft 15 m 49 ft 15 m 49 ft 15 m 49 ft 15 m OU lower than IU 49 ft 15 m 49 ft 15 m 49 ft 15 m 49 ft 15 m Max height different between indoor units 32 8 ft 10 m 32 8 ft 10 m 32 8 ft 10 m 32 8 ft 10 m T...

Страница 9: ...must be free of combustible gases and chemicals The pipe length between the outdoor and indoor unit may not exceed the maximum allowable pipe length If possible DO NOT install the unit where it is exposed to direct sunlight If possible make sure the unit is located far away from your neighbors property so that the noise from the unit will not disturb them If the location is exposed to strong winds...

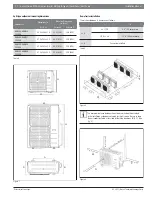
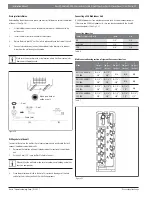
Страница 10: ...6 3x52 5 25 0 634 15 9 404 Table 4 A B D W H W H Figure 7 Row of series installation The relations between H A and L are as follows L A L H L 1 2H 9 8 25 cm or more 1 2H L H 11 8 30 cm or more L H Can not be installed Table 5 L H 118 300 cm or more A 23 6 60 cm or more 59 150 cm or more 9 8 25 cm or more 9 8 25 cm or more Figure 8 The minimum distance between the outdoor unit and walls described i...

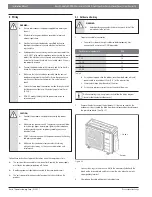
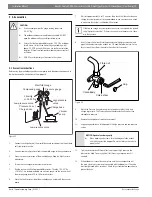
Страница 11: ...nnect the indoor and outdoor units 1 Determine the location of the wall hole based on the location of the outdoor unit 2 Using a 65 mm 2 5 core drill drill a hole in the wall When drilling the wall hole make sure to avoid wires plumbing and other sensitive components 3 Place the protective wall cuff in the hole This protects the edges of the hole and helps seal it when you finish the installation pr...

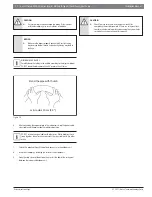
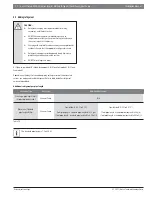
Страница 12: ...completing the installation work 7 1 Refrigerant Piping Connection Instructions NOTICE The branching pipe must be installed horizontally An angle of more than 10 may cause malfunction DO NOT install the connecting pipe until both indoor and outdoor units have been installed Insulate both the gas and liquid piping to prevent water leakage Step 1 Cut pipes When preparing refrigerant pipes take extra...

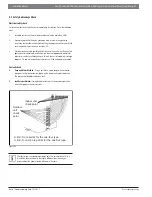
Страница 13: ...lare the pipe in accordance with the dimensions shown in table 8 Piping extension beyond flare form Outer diameter of tubein mm Tightening Torque lb ft N m Max Tightening Torque lb ft N m Fig 15 A in mm Min Max 1 4 6 4 11 0 15 0 11 8 16 0 0 0275 0 7 0 05 1 3 3 8 9 5 18 4 25 0 19 2 26 0 0 04 1 0 0 063 1 6 1 2 12 7 25 8 35 0 26 6 36 0 0 04 1 0 0 07 1 8 5 8 15 9 33 2 45 0 34 7 47 0 0 078 2 0 0 086 2 ...

Страница 14: ...adius 10cm 3 9 Figure 18 6 After connecting the copper pipes to the indoor unit wrap the power cable signal cable and the piping together with binding tape DO NOT intertwine signal cable with other wires While bundling these items together do not intertwine or cross the signal cable with any other wiring 7 Thread this pipeline through the wall and connect it to the outdoor unit 8 Insulate all the ...

Страница 15: ...ock DO NOT connect the unit with the power source until all wiring and piping is completed Make sure that you do not cross your electrical wiring with your signal wiring as this can cause distortion and interference Follow these instructions to prevent distortion when the compressor starts The unit must be connected to the main outlet Normally the power supply must have a low output impedance of 3...

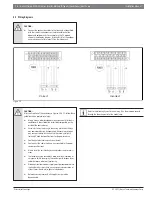
Страница 16: ...rol cover Screws fastening the wiring in the casing of electrical fittings may come loose during transporation Because loose screws may cause wire burn out check that the screws are tightly fastened Check the specifications for the power source Confirm that electrical capacity is sufficient Confirm that the cable thickness is as specified in the power source specifications Always install an earth ...

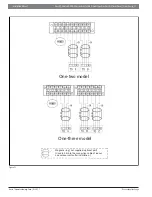
Страница 17: ...t Type Ductless Air Conditioner Heat Pump 17 Bosch Thermotechnology Corp 01 2017 Data subject to change One two model Magnetic ring not supplied optional part Used to hitch to the connective cable of indoor and outdoor units after installation One three model Figure 21 ...

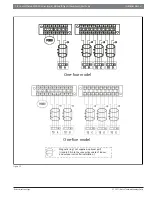
Страница 18: ...onditioner Heat Pump Installation Manual 01 2017 Bosch Thermotechnology Corp Data subject to change Magnetic ring not supplied optional part Used to hitch to the connective cable of indoor and outdoor units after installation One four model One five model Figure 22 ...

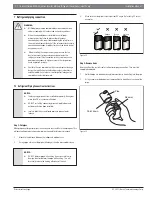
Страница 19: ... run the vacuum until the micron gauge reads 350 to 500 microns or less 6 Close the Low Pressure side of the manifold gauge and turn off the vacuum pump 7 Wait for approximately 10 to 15 minutes then check that there has been no change in system pressure It is recommended to use a micron gauge check to make sure the system is still below 500 microns If there is no change in system pressure unscrew ...

Страница 20: ... charging the system DO NOT mix refrigerants types N 2 one twin models N 3 one three models N 4 one four models N 5 one five models Depending on the length of connective piping or the pressure of the evacuated system you made need to add refrigerant Refer to table below for refrigerant amounts to be added Additional refrigerant per pipe length ConnectivePipe AirPurging Additional Refrigerant Pre ch...

Страница 21: ...ter completed installation use the electroprobe and multimeter to perform an electrical leakage check Turn off the unit immediately if leakage happens Try and evaluate different solutions until the unit operates properly Gas leak check 1 Soap and Water Method Using a soft brush apply soapy water or liquid detergent to all pipe connection points on the indoor unit and outdoor unit The presence of bub...

Страница 22: ...l injury 10 2 Test run instructions 1 Open both the liquid and gas stop valves 2 Turn on the main power switch and allow the unit to warm up 3 Set the air conditioner to COOL mode 4 For the Indoor Unit a Ensure the remote control and its buttons work properly b Ensure the louvers move properly and can be changed using the remote control c Double check to see if the room temperature is registered c...

Страница 23: ...ror is corrected and all wiring piping is properly connected Correct wiring Terminal block Liquid Gas pipe Outdoor unit Indoor unit B Indoor unit A B A B A Incorrect wiring Terminal block Liquid Gas pipe Outdoor unit Indoor unit B Indoor unit A B A B A Incorrect wiring Terminal block Liquid Gas pipe Outdoor unit Indoor unit B Indoor unit A B A B A Check switch LED display Figure 26 11 1 How To Act...

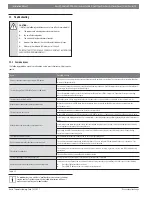
Страница 24: ...er is first turned on Dust blowing out from the indoor unit This is happens when the air conditioner has not been used for a long time or during its first use The air conditioner turns to FAN ONLY mode from COOL or HEAT mode When the indoor temperature reaches the set temperature setting the compressor will stop automatically and the air conditioner turns to FAN only mode The compressor will start a...

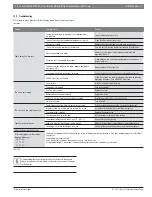
Страница 25: ...s noises A rushing air sound may occur when the louver resets its position A squeaking sound may occur after running the unit in HEAT mode due to expansion contraction of the unit s plastic parts Both the indoor unit and outdoor unit make noises Low hissing sound during operation This is normal and is caused by refrigerant gas flowing through both indoor and outdoor units Low hissing sound when the...

Страница 26: ...d off Turn on the power The fuse is burned out Replace the fuse Remote control batteries are dead Replace batteries The Unit s 3 minute protection has been activated Wait three minutes after restarting the unit Timer is activated Turn timer off The unit starts and stops frequently There s too much or too little refrigerant in the system Check for leaks and recharge the system with refrigerant Incomp...

Страница 27: ...the disposal of recyclable products Refrigerant At the end of the service life of this appliance and prior to it s environmental disposal a person qualified to work with refrigerant circuits must recover the refrigerant from within the sealed system WARNING Improper disposal of this appliance endangers your health and is bad for the environment Hazardous substances may leak into the ground water an...

Страница 28: ...28 Bosch Climate 5000 AA Series Inverter Multi Split Type Air Conditioner Heat Pump Installation Manual 01 2017 Bosch Thermotechnology Corp Data subject to change ...

Страница 29: ...Installation Manual Bosch Climate 5000 AA Series Inverter Multi Split Type Ductless Air Conditioner Heat Pump 29 Bosch Thermotechnology Corp 01 2017 Data subject to change ...

Страница 30: ...30 Bosch Climate 5000 AA Series Inverter Multi Split Type Air Conditioner Heat Pump Installation Manual 01 2017 Bosch Thermotechnology Corp Data subject to change ...

Страница 31: ...Installation Manual Bosch Climate 5000 AA Series Inverter Multi Split Type Ductless Air Conditioner Heat Pump 31 Bosch Thermotechnology Corp 01 2017 Data subject to change ...

Страница 32: ...United States and Canada Bosch Thermotechnology Corp 50 Wentworth Avenue Londonderry NH 03053 Tel 866 642 3198 Fax 954 776 5529 www boschheatingandcooling com BTC 770001104 C 01 2017 ...

Отзывы: