Installation & Operation Manual
Bosch ZS Series Zone Sensors R1
| 9
Bosch Thermotechnology Corp.
|
02 .2018
Data subject to change
6 Addressing Sensors
When multiple ZS Series Zone Sensors (up to 5 max) are connected to the DDC
controller, each sensor on the Rnet must have a unique address associated with
it, and the addresses have to be sequential. If the sensors are not addressed
sequentially the DDC Controller reads any gaps as faulty sensors and a sensor wiring
alarm is generated.
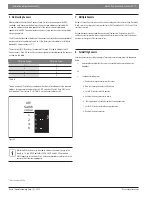
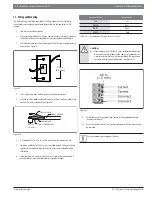
The DIP switches located at the back of the sensor (next to the Rnet connector block)
may be used to set an address from 1 to 5 (the factory default address for all Bosch
branded ZS Series sensors is “1”).
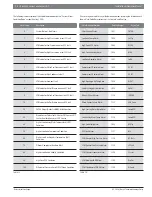
There are four (4) DIP switches (numbered 1 through 4) used to address the ZS
Series sensors. Each DIP switch has a value assigned to it for addressing the sensors
as shown in the table
DIP Switch Number
DIP Switch Value
1
1
2
2
3
4
4
8
Table 9
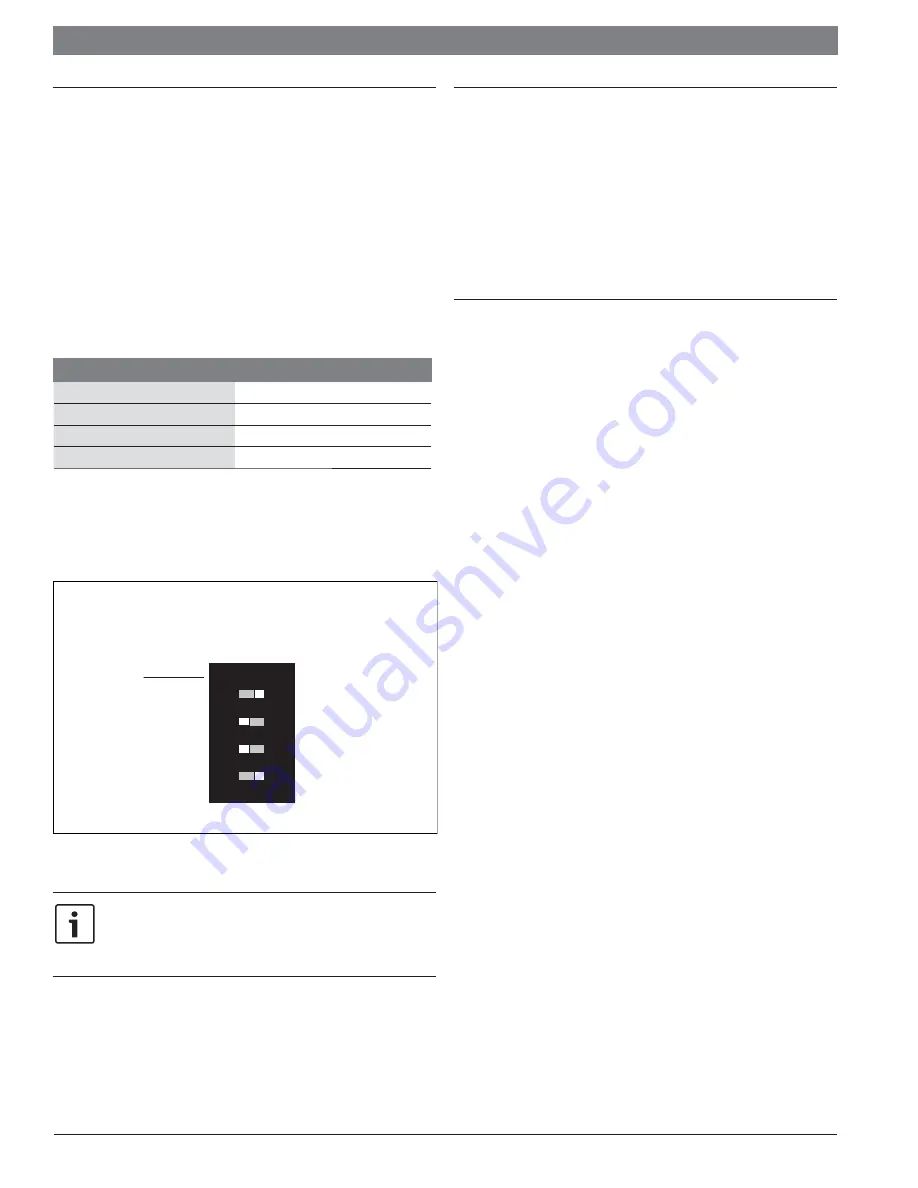
Turn on as many DIP switches as needed so that their total value equals the required
address. In the example shown in Figure 3, DIP switches #1 and #4 are ON (to the
right position). Their values (1 + 8) total 9, so the sensor's address is 9.
Figure 3
DIP
Switch
value
1
ON
2
4
8
12
3
4
While the DIP switches may be used to address the sensor for any value
from 0 to 14, the DDC Control Air 5600, 5830, and 6120 controllers
ONLY recognize values from 1 to 5, and any other address will result in the
sensor(s) not functioning properly.
* To be released in 2018
7 Multiple Sensors
Multiple ZS Series Zone Sensors on an Rnet must be confi gured in the software (using *Control Air
M or M+ interface or legacy BACview) in order for the DDC Control Air 5600, 5830, and 6120 to
function as required.
Any combination of sensing capabilities may be used (Temperature, Relative Humidity, CO2 ),
and the eff ective temperature value used to control the unit may be confi gured as the minimum,
maximum, or average of all the individual values.
8 Formatting Sensors
Formatting a sensor clears its fl ash memory. To format a sensor perform one of the two options
below:
1.
Download the controller that the sensor is connected to with new software using
Apploader.
OR
2.
Perform the following steps:
a. Remove the wiring connector from the sensor
b. Note the current position of the DIP switches
c. Set all DIP switches to the ON position
d. Reattach the wiring connector to format
e. After approximately 3 seconds, remove the wiring connector
f. Set the DIP switches back to their original position
g. Reattach the wiring connector


