background image

10

NOTE: It may be necessary to expand the drain 
hole for installation lange fastening disposer. 
Equipment for extending the drainage hole is 
purchased separately. 

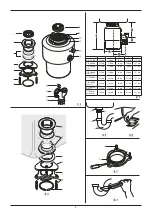
3. DISASSEMBLY OF THE ASSEMBLY UNIT


• Turn over the assembly (Fig.4.1) and loosen the 
three ixing screws (1) The access to the ring (2). 
• Disconnect the retaining ring from the lange 
with a screwdriver. Now the assembly unit can be 
disassembled. 

4. ATTACHING THE FIXING ASSEMBLY TO WASH-
ING Fig.5.1.


1. Install one or two rubber gaskets (2) under the 
washing lange (1). Make sure that The drainage 
hole is not clogged, and set to lange washer / 
gasket. In order to The lange of the sink became in 
place, you need to crush it with a heavy load. (To 
avoid scratches, use a towel as a lining.) 
2. Put the second rubber part on the bottom of 
the kitchen sink a gasket (2), a cardboard gasket 
(optional) (3) and a metal support ring (4) (lat side 
up). 
3. While holding the second rubber gasket, 
cardboard padding (optional) and a metal support 
ring, put the mounting ring (5) on the lange of the 
sink so that it aligned with the support ring. 
4. Pressing tightly to the bottom of the sink 
rubber gasket, cardboard gasket, support ring and 
mounting ring, slide the snap ring (7) onto the 
lange of the sink so that it snaps into the lange 
groove. 
5. Tighten the three ixing screws (6) to The ixing 
assembly was tight and evenly pressed to the sink. 

5. CLEANING THE DRAIN PIPE 

If you do not clean the drain pipe, it can clog. 
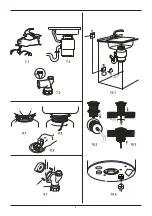
1. Remove the water trap. (Fig.6.1) 
2. Using a cleaner, remove all solid precipitation in 
the horizontal part of the drainage pipes, moving 
with side of the siphon towards the main pipe. 
IF THE DISHWASHER WILL NOT BE CONNECTED TO 
THE DISPOSER, GO TO PART 7 OF THIS INSTRUCTION 

6. CONNECTING THE DISHWASHER MACHINES 
AND TRANSFER CONNECTION


If the sink is full of liquid it can be discharged into 
the disposer through the inlet in its upper parts. 
(Fig. 7.2)
On all models inside the intake pipe there is 
partition. The partition must be removed (Fig. 7.1).

REMOVING THE PLATE / PARTITION

1. Place the disposer on one side and place it 
screwdriver into the connection for the dishwasher, 
pushing it until it will not rest against the partition 

in the end of the branch pipe.
2. With several blows of the hammer, knock out the 
septum in the branch pipe (Fig. 7.1).
3. Remove the embossed partition from the disposer 
bowl. If necessary to connect the dishwasher, then 
it should be connected to the inlet of the overlow 
outlet pipes To connect to the overlow inlet, 
remove the exhaust pipe cover by unscrewing the 
cover (Fig. 7.3).

7. CONNECTING THE DISPOSER TO THE FIXING 
UNIT ATTENTION! 

To avoid injury, follow the so that during the 
removal and installation of a part Your body was 
not under the disposer; during the installation it is 
possible to drop it.
Remove any objects from the grinding chamber 
product before installing it on the sink. 
1. Install the product in such a way that provide 
easy access to the restart button engine located in 
the lower part of the body. Do not block this place 
with any objects. 
2. Place the disposer with three mounting loops 
(1) into the sliding position by mounting rails (2). 
(Fig.8.1) 
3. Lift the disposer, insert the top end (installation 
gasket) in the mounting and turn the setting ring to 
the right (with a wrench or adjustable pliers) until 
the mounting loops are ixed (3) with respect to the 
mounting rails (Fig. 8.2). 
Make sure that all three mounting loops are locked. 
Disposer is installed. 
4. Run water into the sink, then check the 
connections for leaks. 
5. Insert the noise absorbing screen into the drain 
hole lat side up. (Fig.8.3) 

8. CONNECTING THE OUTLET PIPE


To the DRAIN PIPE ATTENTION! 
• It is recommended to wear protective goggles 
when installing the disposer. 
• For all models, the drain pipe is connected using a 
screw connection (Fig. 9.2). 
• Use a sanitary sealant only for connecting the 
lange of the sink with the disposer. 
Do not use sealants for threaded pipe connections 
or anaerobic screwed sealants. They can damage 
the product. 
• Regularly check the disposer and ittings for 
water leaks, since leaks water can cause damage to 
property. 
The manufacturer is not responsible for damage to 
property as a result of water leaks. 

INSTALLING THE DRAINAGE SYSTEM 

Содержание 91275752

Страница 1: ...TITAN 4000 Plus 91275776 TITAN 4000 Control 93410242 TITAN 5000 91275783 TITAN MAX Power 91275790 TITAN 5000 Control 93410259 TITAN MAX FullControl 93410266 DE Hausm ll zerkleinerer 5 EN Waste dispose...

Страница 2: ...TAN 4000 357 170 68 160 127 TITAN 4000 Plus 357 170 68 160 127 TITAN 4000 Control 357 170 68 160 127 TITAN 5000 Power 336 149 68 211 127 TITAN 5000 Control 336 149 68 211 127 TITAN MAX 336 149 68 211...

Страница 3: ...3 25...

Страница 4: ...4...

Страница 5: ...Waschlansch nach oben durch Ablauloch der Sp le und entfernen Sie es Abb 3 2 REINIGEN SIE DEN WASCHFAN VERPACKUNGS ORT Aus dem Dichtstof oder dem M ll HINWEIS Es kann notwendig sein die Ablaufboh run...

Страница 6: ...audichtung in der Halterung und drehen Sie den Einstellring nach rechts mit einem Schraubenschl ssel oder einstellbar Zange bis die Montageschlaufen 3 gegen ber den Montage schienen ixiert sind Abb 8...

Страница 7: ...e instruc tions operation and safety contained in paragraph 10 of this manual In conclusion install the plug in the sink in the Closed position Fill the sink with wa ter Remove the plug and check the...

Страница 8: ...Ar tischocken etc um ein m gliches Verstopfen des Rohres zu vermeiden Nur Lebensmittel mahlen Verwenden Sie dieses Ger t nicht zum Schleifen von harten Materialien wie Glas und Glas Metall Gie en Sie...

Страница 9: ...gasket protective relector 10 Eyelets 11 Lower mounting ring 12 Drain the dishwasher 13 Outlet opening Drainage system 14 Mounting Screws 15 Rubber gasket 16 Flange 17 Drain pipe with a knee 2 DISCON...

Страница 10: ...PARTITION 1 Place the disposer on one side and place it screwdriver into the connection for the dishwasher pushing it until it will not rest against the partition in the end of the branch pipe 2 With...

Страница 11: ...the other end to A hole in the table top and a nut located under the countertop Fig 10 2 3 Place the push button housing in the hole and tighten the nut underneath countertop enough arm efort Do not...

Страница 12: ...chokes etc in order to avoid possible clogging of the pipe Grind only food Do not use this appliance to grind hard materials such as glass and metal Never pour fat oil or fat in shell as this will lea...

Страница 13: ...et retirez le Fig 3 2 NETTOYER LE LIEU D ENVELOPPEMENT DU VENTILATEUR DE LAVAGE DU SCELLANT OU DES ORDURES NOTE Il peut tre n cessaire d largir le trou de drainage pour bride d installation broyeur de...

Страница 14: ...ol sont quip s d un commutateur de montage mural sans il 6 RACCORDEMENT DU LAVE VAISSELLE MACHINES ET RACCORDEMENT DE TRANSFERT Si l vier est rempli de liquide il peut tre d charg dans le broyeur par...

Страница 15: ...and should not play with a disposer To reduce the risk of injury It is necessary to keep a watchful eye on children use of the product If the wedging in the disposer is eliminated turn of the applian...

Страница 16: ...ambredebroyageetprot ger r lecteur provoquant une odeur d sagr able Pour nettoyage de la chambre de broyage et du r lecteur 1 teignez l QUIPEMENT et d branchez le du secteur 2 travers le trou de vidan...

Страница 17: ...Kiu Fu Commercial BLDG 300 Lockhart Road Wan Chai Hong Kong 85 258 194 891 125222 18 7 499 700 10 34 9 5 2 38 25 1 1 1 1 2 3 2 4 5 6 7 8 9 10 11 12 13 14 15 16 17 2 1 4 3 1 80 2 3 3 2 3 4 1 1 2 4 5 1...

Страница 18: ...7 2 7 1 1 2 7 1 3 7 3 7 1 2 1 2 8 1 3 3 8 2 4 5 8 3 8 9 2 1 2 1 4 9 1 9 BORT GLOBAL LIMITED Flat Rm A 20 F Kiu Fu Commercial BLDG 300 Lockhart Road Wan Chai Hong Kong 85 258 194 891 125222 18 7 499 70...

Страница 19: ...19 1 25 2 10 2 3 10 3 4 10 4 10 10 8 3 11 2 11 4 1 11 1 BORT GLOBAL LIMITED Flat Rm A 20 F Kiu Fu Commercial BLDG 300 Lockhart Road Wan Chai Hong Kong 85 258 194 891 125222 18 7 499 700 10 34...

Страница 20: ...300 Lockhart Road Wan Chai Hong Kong 85 258 194 891 125222 18 7 499 700 10 34 2 11 2 3 15 6 15 1 2 3 4 60 1 2 11 5 3 3 5 11 6 BORT GLOBAL LIMITED Flat Rm A 20 F Kiu Fu Commercial BLDG 300 Lockhart Roa...

Страница 21: ...0 780 2600 2800 3200 3500 3 2 4 2 5 2 1000 1200 1400 3 5 35 6 35 6 8 7 26 7 30 25 15 220 50 BORT GLOBAL LIMITED Flat Rm A 20 F Kiu Fu Commercial BLDG 300 Lockhart Road Wan Chai Hong Kong 85 258 194 89...

Страница 22: ...22 RU FR DE GB Garantiebedingungen Warranty terms Conditions de garantie...

Страница 23: ...Heizspiralen Scheiben Rollen St cke Sperrkn pfe u auf Teile Zahnr der Wellen Lager St cke Rollen u die dem Verschlei infolge der Qua lit t des Schmiermittels ausgesetzt sind sowie auf ersetzbares Zube...

Страница 24: ...rms bus bars gears bearings hubs coil heat ers pulleys rollers rods lock buttons etc components gears shafts bearings rods rollers etc subject to deterioration due to lubrication wear out as well as r...

Страница 25: ...aines r sistances poulies tourets tiges boutons d arr t et ainsi de suite les pi ces roues endent es arbres paliers tiges tourets et ainsi de suite soumises l usure cause de l puisement du lubriiant a...

Страница 26: ...26 RU 1 BORT GLOBAL LIMITED 2 2 40 15 10 15 5 3 13109 97 SDS 4 5 BORT GLOBAL LIMITED BORT GLOBAL LIMITED 6 8...

Страница 27: ...6 45 39 3 112 8 023 274 34 04 8 023 274 90 33 105 8 022 225 70 24 8 025 951 10 16 7 8 029 658 95 29 8 47 8 029 637 24 68 55 8 029 560 87 07 8 029 658 15 36 41 7 8 044 560 0789 9 8 016 245 26 00 8 044...

Страница 28: ...28 BORT GLOBAL LIMITED BORT GLOBAL LIMITED 2 Bort 5 SDS BORT GLOBAL LIMITED FLAT RM A 20 F KIU FU COMMERCIAL BLDG 300 LOCKHART ROAD WAN CHAI HONG KONG...

Страница 29: ...29...

Страница 30: ...nature Unterschrift Signature Article Artikel Article GUARANTEE CERTIFICATE BORT GLOBAL LIMITED FLAT RM A 20 F KIU FU COMMERCIAL BLDG 300 LOCKHART ROAD WAN CHAI HONG KONG Made in China GUARANTEE CERTI...

Страница 31: ...Serial Type of repair Repair start date Repair comletion date 3 Model Coupon 3 Serial Type of repair Repair start date Repair comletion date 1 Model Coupon 1 Serial Type of repair Repair start date Re...

Страница 32: ...32...

Страница 33: ...33 bort global com...

Страница 34: ...34 21 PAP BORT GLOBAL LIMITED FLAT RM A 20 F KIU FU COMMERCIAL BLDG 300 LOCKHART ROAD WAN CHAI HONG KONG Made in China RU FR DE GB nderungen vorbehalten Subject to change Sous r serve de modiications...

Отзывы: