EN
WWW.BORMANNTOOLS.COM
3
I. General Safety
1. Learn the machines applications, limitations and the specific potential hazards. Read and become familiar with the entire operating manual.
2. Use a face or dust mask if the operation is particularly dusty.
3. Check for damage before using the machine, check for alignment of moving parts, breakage of parts, and any other condition that may affect the machines
operation. Damage should be properly repaired or the part replaced. If in doubt, DO NOT use the machine. Consult your local dealer.
4. Disconnect the machine from the power supply before servicing and when changing accessories.
5. Wear safety goggles, manufactured to the latest European Safety Standards. Everyday eyeglasses do not have impact resistant lenses, and are not safety
glasses.
6. Keep work area clean. Cluttered areas and benches invite accidents.
7. Ensure that adequate lighting is available. Ensure that lighting is placed so that you will not be working in your own shadow.
8. Keep children away. All visitors should be kept a safe distance from the work area, especially when the machine is being used.
9. Maintain machine in top condition. Keep tools/machines clean for the best and safest performance. Follow maintenance instructions.
10. Handle with extreme care and do not carry the tool/machine by its electric cable, or pull on the cable to disconnect it from the power supply.
11. Ensure the switch is off before plugging in to mains. Avoid accidental starting.
12. Concentrate on the job in hand, no matter how trivial it may seem. Be aware that accidents are caused by carelessness due to familiarity.
13. Keep your proper footing and balance at all times - don’t overreach. For best footing, wear rubber soled footwear. Keep floor clear of oil, scrap wood, etc.
14. Dress properly. Loose clothing or jewellery may get caught in moving parts. Wear protective hair covering to contain long hair.
15. Guard against electric shock. Avoid contact with earthed surfaces, pipes, radiators etc.
16. Never operate the machine while under the influence of drugs, alcohol or any medication.
17. Never leave the machine running unattended. Turn power off. Do not leave the machine until it comes to a complete stop.
18. Never force the machine, it will do a better and safer job at the rate for which it was designed.
19. Never use power tools in damp or wet locations or expose them to rain. Do not use in an explosive atmosphere (around paint, flammable liquids etc.). Avoid
dangerous environments.
20. If the tool begins to make an abnormal noise, or produce excessive vibrations, smoke or burning odour, turn the tool off immediately and do not operate,
until repaired.
II. Specific precautions for belt/disc sanders
III. Αssembly
1. Wear ear protectors/defenders when using this machine.
2. Wear a dust mask when using this machine. Be aware that harmful or toxic dusts could be produced when sanding some woods.
3. Use the table to support the workpiece.
4. Check to ensure the table and attachments are secure before starting.
5. Maintain a clearance of 2-3mm between table and sanding disc.
6. Hold the workpiece firmly so that it cannot be torn from your hands.
7. Feed the workpiece against the direction of rotation of the disc. i.e the LEFT side of the disc.
8. Keep the mains cable well away from the machine and ensure an adequate electrical supply is close at hand so that the operation is not restricted by the
length of the cable.
9. Use a dust extraction device, properly connected to the dust extraction port.
10. Ensure that nails or foreign objects have been removed from a workpiece beforehand. Nails etc. will destroy the belt or disc.
11.Allow the ventilation slots in the motor to become blocked.
12.Don't carry sand pieces which cannot be held firmly by hand.
CAUTION
: T
he sander must be assembled before use. Do not plug the unit
into power source until the unit has been completely assembled.
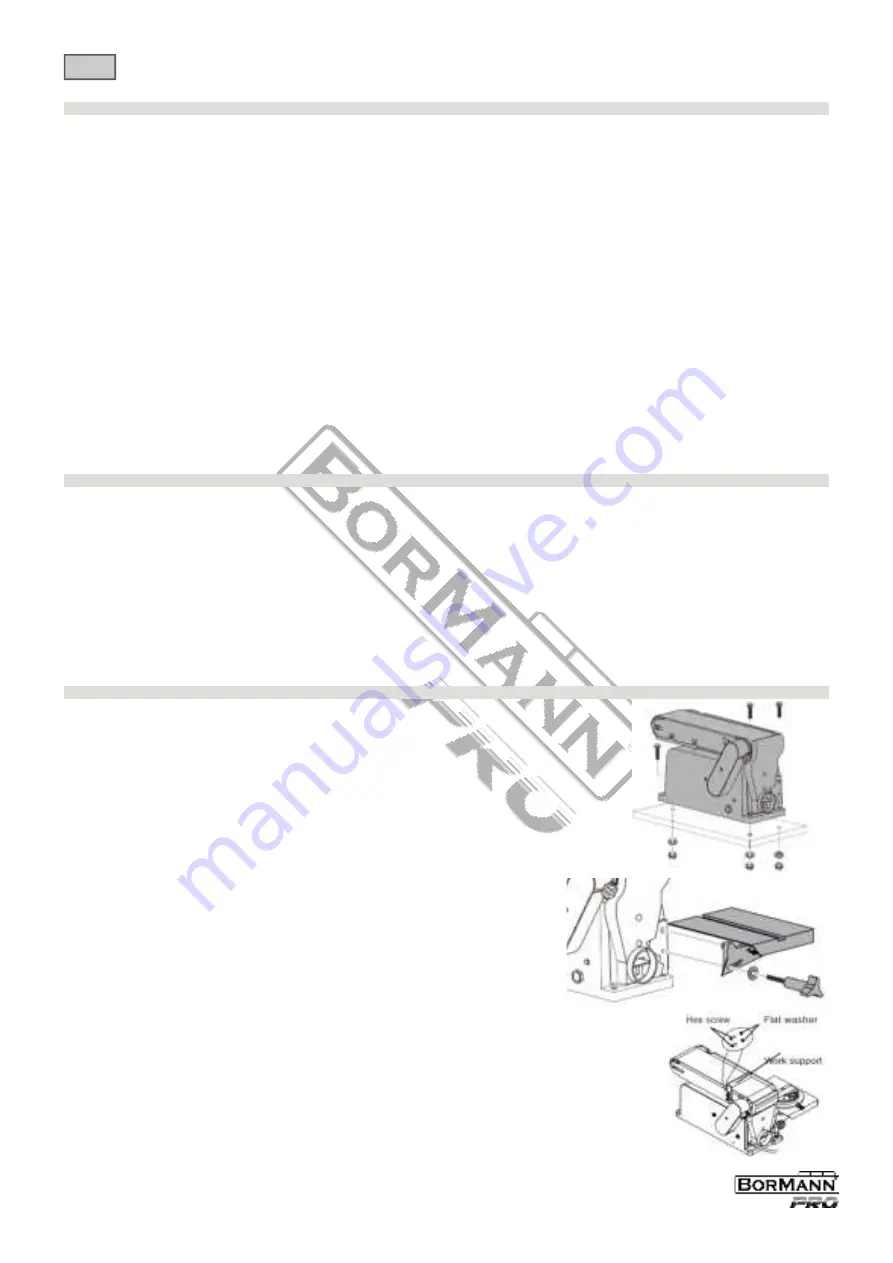
MOUNTING THE SANDER TO A WORKBENCH
Before attempting to use this sander, it should be properly mounted to a work
-
bench or stand
1.Position the sander on the workbench where you intend to use it.
2. Mark the workbench through the mounting holes located in the sander base.
Drill holes in the workbench at the marks.
3. Use long bolts, spring washers and nuts (not supplied), to secure the sander
to the workbench as shown.
MOUNTING THE TILTING WORK TABLE ASSEMBLY
1. Position table-support bracket so that the "pivot pin" fits into the correspond
-
ing hole on the sander frame and the radius slot aligns with the threaded hole
in the frame.
2. Place washer on threaded shaft of knob, insert through radius slot, and tight
-
en into threaded hole.
3. Adjust table to angle desired for sanding task.
4. To avoid trapping the workpiece or your fingers between the table and disc,
adjust the position of the table on it’s mounting bracket to maintain a gap of no
more than 2 mm.
INSTALLING THE BACKSTOP
Locate work support and hex screw and washer . Hold work support in position
and fasten as shown. Do not overtighten.
Содержание Pro BBS1560
Страница 1: ...Art Nr WWW BORMANNTOOLS COM EN EL USER S MANUAL O BBS1560 v2 1 043218...
Страница 9: ...WWW BORMANNTOOLS COM 9 EL IV V ANTIKATA 1 2 3 4 5 6 7 1 Allen 6 mm 2 3 4 5 6 7 8 9 Allen 6 mm 10...
Страница 10: ...WWW BORMANNTOOLS COM 10 EL 1 Allen 2 ON 3 4 VI ON OFF ON OFF 1 I 2 0 1 Allen 6 mm 2 Allen...
Страница 11: ...WWW BORMANNTOOLS COM 11 EL 60...
Страница 12: ...WWW BORMANNTOOLS COM 12 EL VII 1 2 3 4 VIII 2012 19...
Страница 13: ......


