D
ELUXE
W
ALL
F
URNACE
Page 17
Unit Commissioning
S
ETTING
G
AS
P
RESSURES
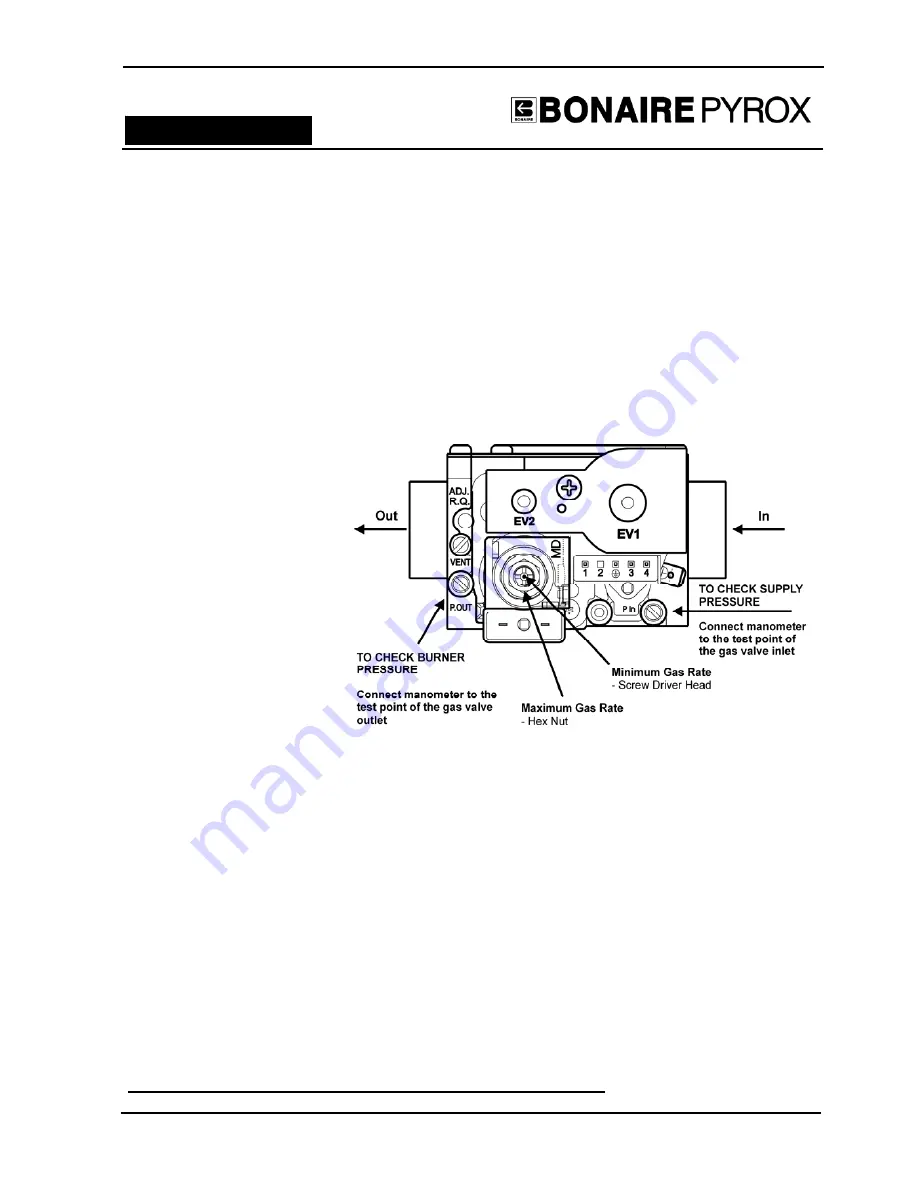
Checking the Dynamic Gas Pressure
To check dynamic gas pressure
1. Loosen the test point screw “P IN”
2. Fit the manometer tube and check the reading against the stated supply pressure on the
customer’s supply regulator.
3. If the correct supply pressure is not available, contact the local gas authority to obtain the
correct pressure.
4. Remove the manometer tube. Tighten the test point screw and check for leaks.
Burner Pressure - Modulating
Setting the burner pressure is
done in 2 parts. The high
pressure must always be set
before the low pressure can
be correctly established.
Loosen the test point screw “P
OUT” and connect the
manometer.
When adjusting either
maximum or minimum gas
rate, ensure the adjuster not
being set is secured e.g. when
adjusting the maximum gas
rate, use a screwdriver to hold
the minimum gas rate adjuster
from moving.
Setting the Maximum Burner Pressure
1. To adjust the maximum burner pressure, set unit to high fan/gas using the mode key, use a
spanner on the hexagon nut and adjust in small increments.
2. Screw the adjuster clockwise to increase pressure, anti-clockwise to decrease burner
pressure.
3. If the heater has been running for a while, the thermistor may be turning down the gas
rate. To check the full gas rate, press down the pin in the middle of the minimum gas rate
screw head. You will need something the diameter of a 1/8” rivet shank.
See Technical Specification section for burner pressures
Setting the Low Burner Pressure
1. To check and or set the minimum gas rate, remove one of the black low voltage leads to
the gas valve.
2. Adjust the gas rate in small increments to the specifications using a Phillips head
screw driver.
3. Replace the black low voltage lead removed to the gas valve.
RETIGHTEN TEST POINT SCREW AND CHECK FOR GAS LEAKS
Содержание WFBL26
Страница 9: ...DELUXE WALL FURNACE Page 9 Gas Electrical ...
Страница 13: ...DELUXE WALL FURNACE Page 13 Unit Installation ...
Страница 15: ...DELUXE WALL FURNACE Page 15 Unit Installation ...


