background image

54 


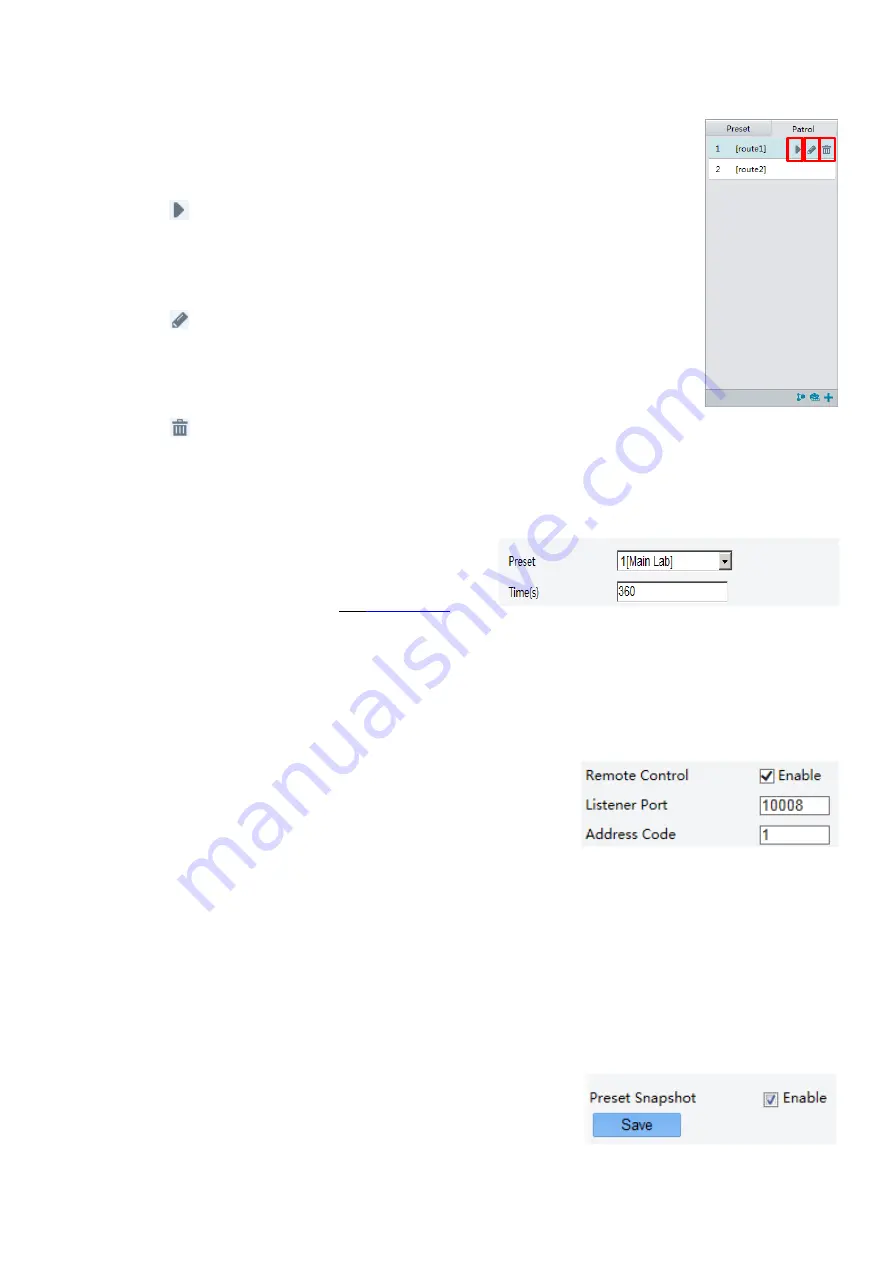
Click Submit. Start a patrol route 

After you have added a patrol route, select the patrol route to start patrol. 

1.


On the 

Live View 

page, click 

Patrol 

on the control panel. 


2.


Click 

for the patrol route you want to start. 


Edit a patrol route 

1.


On the Live View page, click Patrol on the control panel. 

2.


Click 

for the patrol route you want to edit and modify the settings as required. 


Delete a patrol route 

1.


On the Live View page, click Patrol on the control panel. 

2.


Click 

for the patrol route you want to delete and then confirm the delete. 


Setting Home Position 

PTZ camera will return to home position if no operation is made within a specified period. 

1.


Click 

Setup 

PTZ 

Home Position


2.


Select the desired preset as the home position and 
set the time. To add a preset, see Add a preset. 

3.


Click 

Save


Remote Control PTZ 

When the third-party platform is used and the PTZ protocol does not match that, you can set the remote control 
function to control the PTZ. 

1.


Click 

Setup 

PTZ 

Remote Control

2.


Under 

Remote Control

, select 

Enable 

and set the listener port 

and address code. 

3.


Click 

Save.


NOTE:


The listener port is the local port number of the camera and cannot be set as an occupied port. Please keep 
the default port number for general conditions. 


The camera can read the address code in the instruction. If it is the same as the address code on the Web, 

the camera can parse the instruction.


Preset Snapshot 


When an alarm is triggered to the preset, the camera can snapshot and upload images to the FTP server.  
Please complete FTP settings and snapshot alarm settings before you enable this function. 


1.


Click 

Setup 

PTZ 

Patrol

2.


Select 

Enable

3.


Click 

Save


Содержание SD500 Series

Страница 1: ...1 SD500 SERIES IP SPEED DOME CAMERA HD 4K STARLIGHT USER MANUAL VERSION SD5IP M 11142018 2018 Bolin Technology ...

Страница 2: ...15 PART TWO NETWORK CAMERA USER MANUAL 16 NETWORK CONNECTION 16 LOGIN 16 LOGGING IN TO THE WEB INTERFACE 18 INTRODUCTION TO THE WEB INTERFACE 19 INITIAL CONFIGURATION 19 CONFIGURING PARAMETERS 20 LOCAL PARAMETERS 20 NETWORK CONFIGURATION 21 TCP IP 21 PPPOE 22 DHCP 22 PORT 22 IMAGE CONFIGURATION 24 IMAGE ADJUSTMENT 24 AUDIO AND VIDEO CONFIGURATION 32 VIDEO CONFIGURATION 32 VIDEO FORMAT 33 VIDEO COM...

Страница 3: ... COLLECTING DIAGNOSTIC INFORMATION 47 DIGITAL ZOOM FOCUS CONFIGURATION 47 LIVE VIEW 48 LIVE VIEW TOOLBAR 49 VIEWING CERTAIN AREA OF IMAGES 50 USING 3D POSITIONING 50 VIDEO PLAYBACK AND DOWNLOAD WITH EDGE STORAGE 50 PTZ CONTROL 51 SETTING PATROL BY PRESETS 52 APPENDIX A GLOSSARY 55 SPECIFICATIONS 56 HD MODELS 56 STARLIGHT MODELS 57 4K MODELS 58 DIMENSIONS 59 MODEL BL PP80 80W POE POWER INJECTOR 61 ...

Страница 4: ...ware may contain h 264 AVC video technology the use of which requires the following notice from MPEG LA L L C THIS SOFTWARE IS LICENSED UNDER THE AVC PATENT PORTFOLIO LICENSE FOR THE PERSONAL AND NON COMMERCIAL USE OF A CONSUMER TO I ENCODE VIDEO IN COMPLIANCE WITH THE AVC STANDARD AVC VIDEO AND OR II DECODE AVC VIDEO THAT WAS ENCODED BY A CONSUMER ENGAGED IN A PERSONAL AND NON COMMERCIAL ACTIVITY...

Страница 5: ... formal guarantee of any kind expressed or implied We shall not be held responsible for any technical or typographical errors in this manual The contents of this manual are subject to change without prior notice Update will be added to the new version of this manual Use of this manual and the subsequent result shall be entirely on the user s own responsibility In no event shall we be liable to you...

Страница 6: ...n oil free brush or a rubber dust blowing ball If there is grease or a dust stain on the front glass surface clean the glass surface gently from the center outward using anti static gloves or an oil free cloth If the grease or the stain still cannot be removed use anti static gloves or an oil free cloth dipped with detergent and clean the glass surface gently until it is removed Do not use organic...

Страница 7: ...o Output IP Video Compression H 264 H 265 MJPEG ZDP Zero Deviation Positioning technology for high accuracy Silent motor driver solution Intelligent Adaptive IR Illumination up to 100 meters Outdoor Environmental Rating IP67 Corrosion Resistant treatment Power Input AC 24V PoE 80W Bolin PoE 80W Injector needed optional Supports ONVIF Profile S Various Image Functionalities WDR BLC Defog Day Night ...

Страница 8: ...8 WHAT S IN THE BOX Accessories Optional ...

Страница 9: ...Lens 3 Rain Wiper BL PP80 80w PoE Power Injector Optional 1 Data Power Output Connect to the specific PoE camera Power Comsumption 80w port of speed 100 1000Mbps adaptive 2 Data in Connect to network switch 3 DC 48V Power Input Port 4 Power Indicator ...

Страница 10: ...ctions separately The cables available may vary with the product model There are two types of Tail Cable available for SD500 series PTZ camera 1 Type A Cable Full function cable with audio and alarm 2 Type N Cable Only IP video out and Power Cable Connection ...

Страница 11: ...11 N Cable Connection A Cable Connection NOTE Use water proof IP67 rated junction box connection box to protect the RJ45 and other connections A water proof RJ45 connector is available on some models ...

Страница 12: ... RS485 interfaces Ground the terminal properly Cable Requirements Network Cable 10 100 Mbps Ethernet CAT 5 5E 6 UTP cables are applicable to the ANSI EIA TIA 568A B and ISO D Eight wires in the network cable need to be inserted in parallel into the top of the cable connector The cable connector needs to be crimped in position When the cable connector is in position ensure that the metal pieces of ...

Страница 13: ... reliable grounding point PoE Power Injector Other than 24VAC power input Bolin PTZ camera provides PoE power as an optional power input For PoE power you must use Bolin 80W Power PoE Injector model BL PP80 It provides High PoE power up to the PTZ camera Connect this PoE injector to a network switch and then run Ethernet cable for data transmission and power up the PoE PTZ camera Specific model EX...

Страница 14: ... camera properly connect the camera to power Each time the camera is powered on it will perform a self test to check the Pan Tilt Zoom PTZ function After self test you can operate the camera NOTE The self test process starts after the camera is powered up Please wait patiently When the operating temperature is lower than zero degrees Celsius the camera will be automatically pre heat the pre heat p...

Страница 15: ... address of your camera Default IP is 192 168 0 13 and then press Enter to open the login page 6 Enter the username default is admin and password default is admin or 123456 and then click Login NOTE Install the ActiveX on your first login For detailed steps see Installing the ActiveX When the installation of the ActiveX is completed open IE to log in Installing the ActiveX The following message wi...

Страница 16: ...tion in accordance with the quick guide connect the camera to power to start it After the camera is started you can access the camera from a PC client installed with a web browser or the video management software Internet Explorer IE is a recommended web browser Please contact your dealer to get the video management software Please refer to the user manual of video management software for detailed...

Страница 17: ...3 in this example is the default IP address Please replace it with the actual address of your camera if it has been changed Modify user access control settings Optional Before you access the camera follow the steps to set User Account Control Settings to never notify 2 4 http 192 168 0 13 Clear the check box ...

Страница 18: ... set a strong password no less than eightcharacters The camera protects itself from illegal access by limiting the number of failed login attempts If login fails six times consecutively the camera locks automatically for tenminutes 4 Enter the username and password and then click Login For the first login use the default username admin and password 123456 or admin If you log in with Live View sele...

Страница 19: ...nformation displayed on the screen as needed 6 Optional Manage users Change the default password and add common users as needed You can watch the live video after finishing the initial configuration Please configure other parameters as needed 1 Model Number 2 Menu 3 PTZ control area This area is available for PTZ dome cameras and PTZ cameras 4 Live view window 5 Live view toolbar NOTE The displaye...

Страница 20: ...essing Mode i Real Time Prior Recommended if the network is in good condition ii Fluent Prior Recommended if you want short time lag for live video iii Ultra low Delay Recommended if you want the minimum time lag for live video b Video Pixel Format i Set the video format for images on the PC client It is recommended to choose YUV420 if the graphic card of your PC supports it RGB32 is only supporte...

Страница 21: ...o log in The configurations of DNS Domain Name System server are applicable when the device is accessed by domain name 1 Click Setup Network TCP IP 2 Select Static IP from the IP Obtain Mode drop down list 3 Enter the IP address subnet mask and default gateway address Make sure that the IP address of the camera is unique in the network 4 Click Save If a gatekeeper or firewall is used in the networ...

Страница 22: ... the network the camera can automatically obtain an IP address from the DHCP server To manually configure DHCP follow the steps below 1 Click Setup Network TCP IP 2 Select DHCP from the IP Obtain Mode drop downlist 3 Click Save Port 1 Click Setup Network Port 2 Configure relevant port numbers 3 Click Save NOTE This function is not supported by some models please see the actual model for details If...

Страница 23: ...describes some major parameters A SSL a When enabled the e mail will be sent through SSL encryption B Attach Image a When enabled the e mail will contain 3 instant snapshots as attachment according to the Capture Interval 3 Click Save Port Mapping 1 Click Setup Network Port Mapping 2 Enable Port Mapping and select mapping type If Manual is selected then external ports must be configured external I...

Страница 24: ...ow Setting the Scene Set image parameters to achieve the desired image effects based on live video in different scenes Click Setup Image Image Click Scenes The scene management page for some models is displayed as follows Right Top you can select the desired scene in the drop down list The Web interface of certain models is displayed as follows Right Below 1 Click Scenes 2 Select a scene and then ...

Страница 25: ...cted the system switches to a scene automatically when the condition for switching to the scene is met By default the auto switching list includes the default scene D Setup a Click to set conditions for auto switching including schedule illumination and current elevation angle between the PTZ and the horizontal direction It means that auto switching is triggered only when illumination and the curr...

Страница 26: ...t Exposure NOTE This function is not supported by some models please see the actual model for details The default settings are used for common scenes Keep the default settings unless a particular scene is required 1 Click Setup Image Image and then click Exposure 2 Set the parameters as required The following table describes some major parameters A Shutter s a Shutter is used to control the light ...

Страница 27: ...ut Boolean The camera switches between day mode and night mode based on the alarm input H Day Night Sensitivity a Light threshold for switching between day mode and night mode A higher sensitivity means that the camera is more sensitive to the change of light and becomes more easily to switch between day mode and night mode i You can set this parameter only when Day Night Mode is set to Automatic ...

Страница 28: ...es for example road d Illumination Preset Park This mode offers uniform light and is recommended for monitoring small range scenes with many obstacles for example industrialparks e Manual This mode allows you to manually control the intensity of IRillumination f Indoor This mode is recommended for application in indoorscenes B Illumination Level a Set the intensity level of the IR light The greate...

Страница 29: ...lance Adjust the red or blue offset of the image a Auto The camera adjusts the red and blue offset automatically according to the light condition the color tends to be blue b Fine Tune Allow you to adjust the red and blue offsetmanually c Sodium Lamp The camera adjusts red and blue offset automatically according to the light condition the color tends to be red d Outdoor It is recommended for the o...

Страница 30: ...he following table describes some major parameters D Lens Mode a Z F to modify focus and zoom b P Iris to modify iris value c DC IRIS the maximum iris value bydefault E Aperture Control a Automatically or manually adjust iris i You can set this parameter only when Lens Mode is set to P Iris 3 To restore the default settings click Default OSD Settings On Screen Display OSD is the text displayed on ...

Страница 31: ...o double click the preview window to enter or exit full screen mode To cancel OSD for an area clear the OSD content in the Overlay OSD Content column or select None in the Position column The right picture shows an example of Data Time Zoom OSD Privacy Mask On certain occasions you may need to set a mask area on the camera image to protect privacy for example the keyboard of an ATM machine When PT...

Страница 32: ...camera transmits data at a constant data rate b VBR Variable Bit Rate which means that the camera adjusts the bit rate dynamically according to image quality B Frame Rate a Frame rate for encoding images Unit FPS frame per second i To ensure image quality note that the frame rate should not be greater than the reciprocal of shutter speed C Image Quality a When Encoding Mode is VBR you can move the...

Страница 33: ...mpression 1 You can select the video format from Video Compression dropdown menu 2 The selection of the Video compression is different on HD 4K resolution models 3 Click Save after you make the selection Audio Configuration Audio configuration means setting audio encoding parameters for your camera NOTE This function may vary with models please see the actual Web interface fordetails 1 Click Setup...

Страница 34: ...amera is restarted 1 Click Setup Video Audio Media Stream 2 Click select a stream type and then set the IP address and port number of the unicast or multicast group for the decoding device that receives audio and video streams from thecamera If you want the device to establish the media stream that has been configured before automatically after the restart select Yes for Persistent 3 To delete a s...

Страница 35: ... that alarms and the triggered actions can be handled in time Alarm reporting can be scheduled for motion detection alarm alarm input alarm output tampering detection alarm and audio detection alarm The supported alarms may vary with device model For the alarm types that your camera supports see the Web interface Configuring Motion Detection Alarm Motion Detection Motion detection detects the obje...

Страница 36: ...r the lines the greater the frequency of motion 5 Set the alarm parameters a Suppress Alarm s After an alarm is triggered the same alarm will not be reported within the set time b Clear Alarm s After an alarm is triggered i If the same alarm is not triggered within the set time the alarm will be cleared and the same alarm can be reportedagain ii If the same alarm is triggered within the set time t...

Страница 37: ...alarm is triggered 1 Make sure you have completed the post recording time settings before using this function g Enable Plan i Select the check box and set the start and end times during which motion detection alarm is effective You can directly drag the mouse to draw a plan and click Edit to edit time periods in the table The time periods cannot overlap The camera reports alarms during the specifi...

Страница 38: ...ifference an alarm isreported 1 The scale in the audio detection area is used to measure soundvolume 2 Audio detection results are shown in real time The red part indicates that the volume of the audio alarm has reached the threshold and the alarm does not necessarilyreport 3 Set the alarm triggered actions and arming schedule as required For the detailed steps see the descriptions of alarm trigge...

Страница 39: ...on the devices to avoid damaging camera components Check that the alarm type is set to Normally Open default setting and that the camera and the alarm output device are powered off After completing the connection power on the alarm output device first and then power on the camera Configuring Capture With the function of capture configured when an alarm is triggered the camera will automatically up...

Страница 40: ...w data will overwrite the existing data repeatedly ii Stop If there is no free space in the memory card new data will not be saved to the memory card c Post Record s i When an alarm is raised the camera is triggered to record live video and continues recording for a set post record time after the alarm is cleared 3 Click Save Planned storage If planned storage is enabled the camera records video t...

Страница 41: ...me or password to log in Only admin can add and delete users Deleting a user when the user is still logged in will force the user t o log out A deleted user cannot login Setting Secure Data Transmission Set a secure channel for data transmission to ensure security 1 Click Setup Network Port 2 Enter the port number in the HTTPS Port text box and then clickSave 3 Click Setup System Security Under HT...

Страница 42: ...e access Up to 32 IP addresses are allowed And the added IP addresses cannotduplicate The first byte of the IP address can only be a number ranging from 1 to 223 and the fourth byte cannot be 0 For example 0 0 0 0 127 0 0 1 255 255 255 255 and 224 0 0 1 all are invalid IPaddresses Video Watermark You can set the video watermark for the camera to encrypt the video and protect it from being deleted ...

Страница 43: ...custom information and ROI Registration will fail if the device ID is different from that stored on the central management server You need to restart the camera in order for the registration tosucceed If the camera operates independently select None forProtocol Connect via the Private protocol 1 Click Setup Common Server and then click the Management Servertab 2 In the Device ID text box enter an ...

Страница 44: ...TZ for example to zoom or focus by itself instead of through the external PTZ For operations that the camera cannot accomplish by itself the camera uses the external PTZ ii External PTZ Priority The camera first tries to control the PTZ through the PTZ connected through the serial port 1 You can set this parameter only when Port Mode is set to PTZControl 2 When INTERNAL PTZ is selected this parame...

Страница 45: ...OSD data will be reported to the management platform 3 Click Save Transparent Channel Configuration Transparent channel is mainly used to achieve transparent data transmission between two devices NOTE This function is not supported by some models please see the actual model for details Make sure that you have set Port Mode to Trans Channel for your camera The actual displayed Web interface may var...

Страница 46: ...ick Upgrade and then confirm to start The camera will restart automatically after the upgrade is completed NOTE You must use the correct upgrade file for your camera Otherwise unexpected results may occur The upgrade file is a ZIP file and must include all the necessary files The boot program loads the operating system and then the system starts running The upgrade boot program function is disable...

Страница 47: ...k Export 4 To restore default configurations click Default and then confirm the operation The device will restart and restore the defaultconfigurations Collecting Diagnostic Information Diagnostic information includes logs and system configurations You can export diagnostic information to your PC 1 Click Setup System Maintenance 2 Under Diagnosis Info click Browse to select the destination folder ...

Страница 48: ...own menu The smallest number is the camera optical zoom range 3 Click OK NOTE This digital zoom functionality is ONLY available in 3MP 4K H 265 models Live View Live view means playing live video real time audio and video received from a camera in a window through the Web interface If you log in with the Live View check box selected live video appears by default when you are logged in You may doub...

Страница 49: ...sitioning 12 Show hide the PTZ control panel 13 Reset the packet loss rate to zero After you move the mouse cursor on a live view window this button appears on the floating toolbar 14 Collect Expend Tool Bar 15 Display packet loss rate and bit rate information in the bottom a After you move the mouse cursor on a live view window this button appears on the floating toolbar Click this icon to displa...

Страница 50: ...k on the toolbar 2 Click and hold the mouse button and then drag from up to down to specify an area that you want to watch PTZ will move and zoom in to the target automatically 3 Click and hold the mouse button and then drag from down to up to zoom out 4 To exit click Video Playback and Download with Edge Storage NOTE Edge storage refers to recording video to the memory card of a frontend device m...

Страница 51: ... a box camera installed on a Pan Tilt motor NOTE Some of the lens control functions are applicable to cameras equipped with motorized lens The PTZ control buttons may vary with camera model For the PTZ control buttons that your camera supports see the Web interface PTZ Control Toolbar 1 Control the direction of the PTZ camera and release the control 2 Adjust the moving speed of the PTZ camera 3 Ad...

Страница 52: ...t The PTZ camera goes to the selected preset Delete a preset 1 On the Live View page click Preset on the control panel 2 Click for a preset and then confirm the delete Setting Patrol A patrol route is the track by which a PTZ camera follows when moving from a preset to the next The length of time that a PTZ camera stays at each preset is configurable Multiple patrol routes are allowed for a PTZ ca...

Страница 53: ... isselected It is recommended that the first action type is Go to Preset Click Submit Record a patrol route 1 On the Live View page click Patrol on the controlpanel 2 Click to start recording the patrol route You can adjust the direction and zoom of the camera during the recording The system records the motion and track of the camera and adds them to the action list 3 Click to finish recording The...

Страница 54: ...e position and set the time To add a preset see Add a preset 3 Click Save Remote Control PTZ When the third party platform is used and the PTZ protocol does not match that you can set the remote control function to control the PTZ 1 Click Setup PTZ RemoteControl 2 Under Remote Control select Enable and set the listener port and addresscode 3 Click Save NOTE The listener port is the local port numb...

Страница 55: ...nterface HTTPS Hyper Text Transfer Protocol over SSL IE Internet Explorer IMOS IP Multimedia Operation System IP Internet Protocol IPC IP Camera MTU Maximum Transmission Unit NTP Network Time Protocol OSD On Screen Display PoE Power over Ethernet PPPoE Point to Point Protocol over Ethernet PTZ Pan Tilt Zoom ROI Region of Interest SMTP Simple Mail Transfer Protocol SSL Secure Socket Layer UNP Unive...

Страница 56: ...56 Specifications HD Models ...

Страница 57: ...57 STARLIGHT Models ...

Страница 58: ...58 4K Models ...

Страница 59: ...59 Dimensions S Type Unit mm ...

Страница 60: ...60 L Type Unit mm ...

Страница 61: ...61 Model BL PP80 80w PoE Power Injector Unit mm ...

Страница 62: ...62 www bolintechnology com 2082 TECHNOLOGY LLC dba BOLIN TECHNOLOGY ...

Отзывы: