background image

Cleaning 

Modes

Содержание Bob PetHair

Страница 1: ...OWNER S MANUAL bObsweep PetHair ...

Страница 2: ...t his best please read the Quick Start Guide and this manual thoroughly Welcome to the bObsweep family and happy cleaning If you have any questions or concerns feel free to contact our helpful team at support bobsweep com or 1 888 549 8847 for support in the US Canada Our hours are Monday Friday 9 am 5 pm PST ...

Страница 3: ... Remote What Comes in Bob s Box Cleaning Modes Auto 1 Robot Mode Auto 2 Quick Clean Auto 3 Touch up Spot Cleaning UV Light Bob s Anatomy Set Bob s Cleaning Schedule Set Schedule on Charging Station Set Current Time Day Set Bob s Cleaning Schedule Auto Resume 13 49 5 32 24 19 9 39 7 Charging Bob Charging Station Placement Auto Charging Syncing Bob s Charging Station Manual Charging Charging Time Co...

Страница 4: ...s Bob s Challenges Troubleshooting Trouble Numbers 82 Home Checkup Test 94 End User Agreement Warranty Information 91 94 89 92 68 99 Sensors Maintenance Deactivate Edge Sensors Reactivate Edge Sensors Blindfold Stickers 62 ...

Страница 5: ...or carry the charging station by the cord use the cord as a handle close a door on the cord or pull the cord around sharp edges or corners Keep the cord away from heated surfaces To unplug the cord grasp the plug not the cord itself Do not mutilate or incinerate the battery as it will explode at high temperatures Do not attempt to open Bob s charging station Repairs on his station should only be c...

Страница 6: ...quipment This equipment has been tested and found to comply with the limits for a Class B digital device pursuant to part 15 of the FCC Rules These limits are designed to provide reasonable protection against harmful interference in a residential installation This equipment generates uses and can radiate radio frequency energy and if not installed and used in accordance with the instructions may c...

Страница 7: ...ter 5 Remote Control 6 Flat Head Screwdriver 7 2 Side Brushes 1 Spare 8 Cleaning Tool 9 Pack of Screws and Blindfold Stickers 10 Mop Attachment 11 2 Microfiber Mopping Cloths 12 Filter Spare 13 Owner s Manual Quick Start Guide and Warranty Card 14 Bumper Stickers What Comes in Bob s Box ...

Страница 8: ...1 2 3 4 5 6 7 8 9 10 11 12 13 14 ...

Страница 9: ...9 Top View 1 Bumper 2 Transmitter 3 Cover Buttons 4 Display Screen Bob s Anatomy 4 2 1 3 ...

Страница 10: ...10 Bottom View 1 Charging Plates 2 Front Wheel 3 Side Brush 4 Main Brush 5 ON OFF Switch 6 Dustbin 7 UV Lamp 8 Battery 9 Left Wheel 10 Right Wheel R L 1 2 4 7 3 5 8 9 10 6 1 ...

Страница 11: ...11 1 Remote Control 2 Charging Station 1 2 ...

Страница 12: ...F ON 2 PROGRAM Select Bob s cleaning program 3 MODE Select Bob s cleaning mode 4 CHARGE Send Bob to his charging station 5 START Send Bob to clean UV DIRT TROUBLE NR CAPACITY AUTO SPOT WALL FOLLOW DOCK MIN CLEANING CHARGING READY 5 4 3 2 1 ...

Страница 13: ...Get Bob Ready to Clean ...

Страница 14: ...g materials all of which are included inside Bob s box a flat head screwdriver a short screw and a side brush Install Bob s Side Brush You may use the additional side brush and screws as spares 1 2 Flip Bob over onto a flat surface Place the side brush over the empty socket on Bob s underside Secure Bob s side brush using the flat head screwdriver and short screw ...

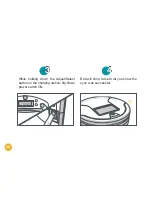
Страница 15: ...the charging station Place Bob on his charging station with the metal plates on his underside sit ting on top of the nodes on his station If Bob can t find his charging station on his own the station needs to be synced see page 32 The charging station will save its last settings for up to 8 hours after being discon nected or turned off ...

Страница 16: ... CLEANING CHARGING READY Bob is now ready to clean First remove the clear plastic cover on Bob s power switch and flip his power switch ON Then press START on his cover or AUTO on his remote and he will clean on his default setting Robot mode Bob s First Clean OR ...

Страница 17: ...d out of standby mode by pressing the power button on his remote To get Bob back to cleaning Standby Mode To wake Bob press any button on his cover or the power button on his remote Press START on his cover or AUTO on his remote 1 2 UV DIRT TROUBLE NR CAPACITY AUTO SPOT WALL FOLLOW DOCK MIN CLEANING CHARGING READY UV DIRT TROUBLE NR CAPACITY AUTO SPOT WALL FOLLOW DOCK MIN CLEANING CHARGING READY ...

Страница 18: ... button on his cover or the power button on his remote Press CHARGE on Bob s cover or remote 1 2 UV DIRT TROUBLE NR CAPACITY AUTO SPOT WALL FOLLOW DOCK MIN CLEANING CHARGING READY UV DIRT TROUBLE NR CAPACITY AUTO SPOT WALL FOLLOW DOCK MIN CLEANING CHARGING READY ...

Страница 19: ...Remote Control ...

Страница 20: ...ies not included Remove the batteries if you are not using it on a regular basis Keep the remote at room temperature 1 Power 2 Auto 3 Corners 4 UV 5 Spot 6 Charge 7 Speed 8 Navigational Arrows 9 Pause Remote Control 4 3 2 8 1 5 6 7 9 8 8 8 ...

Страница 21: ... Robot mode Corners Bob will clean along corners and walls Wall Track mode UV Turns Bob s UV light OFF and ON again Spot Bob will target a small area by traveling in a circle Spiral Track mode Flip Bob s power switch OFF to have him fully power down If Bob is left idle and ON he is in standby mode ...

Страница 22: ...ing station Speed Alternates between Bob s two speeds Navigational buttons Guide Bob forward backward left or right Pause Pauses or resumes Bob s movement Hold down the navigational buttons to keep Bob moving in the desired direction ...

Страница 23: ...ure Bob is not on his charging station To sync Bob s remote If you do not hear Bob chirp repeat the process Syncing Bob s Remote Flip Bob s power switch OFF While holding down the PAUSE button on Bob s remote flip Bob s power switch ON Bob will chirp twice to let you know the sync was successful 1 3 2 ...

Страница 24: ...Charging Bob ...

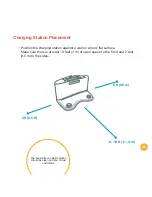
Страница 25: ...hard flat surface Make sure there is at least 10 feet 3 m of open space to the front and 2 feet 0 5 m to the sides The transmitter on Bob s station should be clean and free of dust and debris Charging Station Placement 6 10 ft 2 3 m 2 ft 0 5 ft 2 ft 0 5 m ...

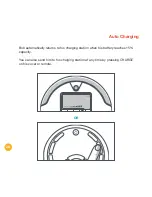
Страница 26: ... station when his battery reaches 15 capacity You can also send him to his charging station at any time by pressing CHARGE on his cover or remote Auto Charging UV DIRT TROUBLE NR CAPACITY AUTO SPOT WALL FOLLOW DOCK MIN CLEANING CHARGING READY OR ...

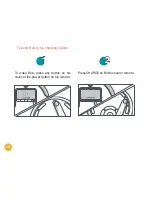
Страница 27: ...ll need to sync the charging station if Bob has trouble finding it To sync the charging station Syncing Bob s Charging Station 1 2 Flip Bob s power switch OFF Plug the charging adapter into the charging station ...

Страница 28: ...28 SET Su Mo Tu We Th Fr Sa CLK 1 2 3 4 While holding down the Adjust Select button on the charging station flip Bob s power switch ON Bob will chirp twice to let you know the sync was successful ...

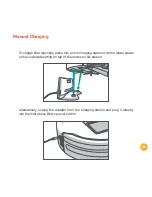
Страница 29: ...om the charging station and plug it directly into the inlet above Bob s power switch Manual Charging To charge Bob manually place him on his charging station with the metal plates on his underside sitting on top of the nodes on his station ...

Страница 30: ...rd READY only UV DIRT TROUBLE NR CAPACITY AUTO SPOT WALL FOLLOW DOCK MIN CLEANING CHARGING READY UV DIRT TROUBLE NR CAPACITY AUTO SPOT WALL FOLLOW DOCK MIN CLEANING CHARGING READY When Bob is charging the battery bars and the word CHARGING flash Charging Time ...

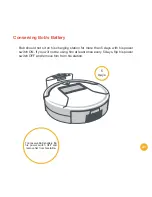
Страница 31: ...5 days with his power switch ON If you will not be using him at least once every 5 days flip his power switch OFF and remove him from his station Conserving Bob s Battery To conserve Bob s battery flip his power switch OFF and remove him from his station 5 days ...

Страница 32: ...Cleaning Modes ...

Страница 33: ...d with three automatic cleaning modes Auto 1 Robot 60 min Auto 2 Quick Clean 30 min Auto 3 Touch Up 15 min Bob will return to his charging station after every cleaning mode Choose the setting that best suits your needs Cleaning Modes ...

Страница 34: ... cleaning mode Bob will thoroughly cover a large area for about an hour To select this setting UV DIRT TROUBLE NR CAPACITY AUTO SPOT WALL FOLLOW DOCK MIN CLEANING CHARGING READY Press START on Bob s cover Press AUTO on Bob s remote 1 2 OR ...

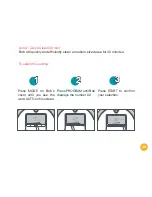
Страница 35: ...the word AUTO on his screen Press PROGRAM until Bob displays the number 02 Press START to confirm your selection 1 3 2 UV DIRT TROUBLE NR CAPACITY AUTO SPOT WALL FOLLOW DOCK MIN CLEANING CHARGING READY UV DIRT TROUBLE NR CAPACITY AUTO SPOT WALL FOLLOW DOCK MIN CLEANING CHARGING READY UV DIRT TROUBLE NR CAPACITY AUTO SPOT WALL FOLLOW DOCK MIN CLEANING CHARGING READY ...

Страница 36: ...on his screen Press PROGRAM until Bob displays the number 03 Press START to confirm your selection 1 3 2 UV DIRT TROUBLE NR CAPACITY AUTO SPOT WALL FOLLOW DOCK MIN CLEANING CHARGING READY UV DIRT TROUBLE NR CAPACITY AUTO SPOT WALL FOLLOW DOCK MIN CLEANING CHARGING READY UV DIRT TROUBLE NR CAPACITY AUTO SPOT WALL FOLLOW DOCK MIN CLEANING CHARGING READY ...

Страница 37: ...ce twice or three times to choose Bob s movement pattern Press START to confirm your selection 1 3 2 UV DIRT TROUBLE NR CAPACITY AUTO SPOT WALL FOLLOW DOCK MIN CLEANING CHARGING READY UV DIRT TROUBLE NR CAPACITY AUTO SPOT WALL FOLLOW DOCK MIN CLEANING CHARGING READY UV DIRT TROUBLE NR CAPACITY AUTO SPOT WALL FOLLOW DOCK MIN CLEANING CHARGING READY ...

Страница 38: ... s UV light can also be toggled on and off while Bob is cleaning Waffle Track 4 min Bob will target a 6 x 5 in 2 x 1 5 m spill zone by tracing a grid pattern Wall Track 10 min Bob will travel along the perimeter of your home The UV light is only visible while Bob is cleaning UV DIRT TROUBLE NR CAPACITY AUTO SPOT WALL FOLLOW DOCK MIN CLEANING CHARGING READY ...

Страница 39: ...Cleaning Schedule ...

Страница 40: ...ecorded in his memory Removing and replacing Bob s battery will require reprogramming Bob s cleaning schedule There are 5 buttons on Bob s charging station 1 On Off 2 OK Cycle 3 Current Time 4 Schedule 5 Adjust Select Set Schedule on Charging Station SET Su Mo Tu We Th Fr Sa CLK 1 2 These buttons are used to set Bob s time cleaning schedule 1 3 2 5 4 ...

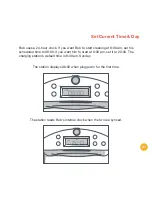
Страница 41: ...u want him to start at 8 00 pm set it to 20 00 The charging station s default time is 8 00 am Sunday Set Current Time Day SET Su Mo Tu We Th Fr Sa CLK 1 2 SET Su Mo Tu We Th Fr Sa CLK 1 2 The station displays 08 00 when plugged in for the first time The station reads Bob s internal clock when the two are synced ...

Страница 42: ... Make sure Bob s power switch is ON Set the minutes To set the minutes press the button once The words SET and CLK will turn on The first minute digit will start flashing Use the Adjust Select button to select the current minute s first digit Press the button to moveontothenextminute digit Use the Adjust Select button to adjust the second minute digits 1 3 2 ...

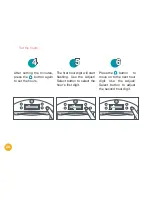
Страница 43: ... Fr Sa CLK 1 2 After setting the minutes press the button again to set the hours The first hour digit will start flashing Use the Adjust Select button to select the hour s first digit Press the button to move on to the next hour digit Use the Adjust Select button to adjust the second hour digit 4 6 5 ...

Страница 44: ...ed choosing your desired settings Set the day SET Su Mo Tu We Th Fr Sa CLK 1 2 SET Su Mo Tu We Th Fr Sa CLK 1 2 SET Su Mo Tu We Th Fr Sa CLK 1 2 Press the button again and the icon of the first weekday Su blinks Use the Adjust Select button to select the current day Press OK Cycle to save Bob will chirp to let you know the time setup was successful 7 9 8 ...

Страница 45: ... SET Su Mo Tu We Th Fr Sa CLK 1 2 SET Su Mo Tu We Th Fr Sa CLK 1 2 SET Su Mo Tu We Th Fr Sa CLK 1 2 To set the minutes press the button once The word SET and a broom icon will turn on The first minute digit will start flashing Use the Adjust Select button to select minute s first digit Press the button to move on to the next minute digit Use the Adjust Select button to adjust the second minute dig...

Страница 46: ...h Fr Sa CLK 1 2 After setting the minutes press the button again to set the hours The first hour digit will start flashing Use the Adjust Select button to select the hour s first digit Press the button to move on to the next hour digit Use the Adjust Select button to adjust the second hour digit 4 6 5 ...

Страница 47: ... button to move on to the next day If you would like to skip a certain day press the Adjust Select button while the weekday icon is still blinking To deselect a day scroll past it using the Adjust Select button When all desired days are selected press OK Cycle to save Bob will chirp to let you know the schedule setup was successful 7 9 8 You can choose any and all weekdays for cleaning Bob starts ...

Страница 48: ...the station s screen This means Bob is on auto resume and will automatically resume cleaning when his battery reaches full charge While the broom icon and GO are lit Bob leaves his charging station and begins cleaning EVERY TIME his battery is full Once activated auto resume stays in effect until it is turned off by you To disable auto resume press OK Cycle once more The broom icon and GO will dis...

Страница 49: ...Parts Maintenance ...

Страница 50: ...hment You may dampen Bob s mopping cloth with water or cleaning liquid before placing it on his mop attachment Mop Press down on the mop attachment until both sides are secured Hold the mop with the prongs near the top Align the two prongs of the mop attachment between Bob s left and right wheels 1 2 ...

Страница 51: ...t when Bob is cleaning carpets or rugs To do so gently press the prongs inward and lift the attachment up Bob s microfiber mopping cloth can be washed manually or in the washing machine A spare cloth is provided in Bob s package ...

Страница 52: ...n then slide the dust bin out Hold the dusbtin in one hand and using the other hand carefully open the plastic gate upto a 90 degree angle to empty the bin 1 2 Do not force the dustbin gate beyond 90 degrees to avoid damaging it Make sure the fil ters do not fall out of the dustbin as you empty it ...

Страница 53: ...ther liquid Open the plastic gate see page 60 step 2 Wipe the dustbin with a dry cloth or brush it with Bob s cleaning tool When done close the plastic gate line the prongs on the sides of the plastic gate and shut it slowly to avoid break age Slide the dustbin back into Bob 3 90 MAX ...

Страница 54: ...54 Three filters are located inside the dustbin s ceiling To remove the filters Filters First eject the dustbin and open the plastic gate See page 60 step 2 Then pull the filter frame out 1 2 90 MAX ...

Страница 55: ...r for fine particles 2 Electrostatic filter for smaller particles 3 Mesh filter for larger particles Use the cleaning tool to brush dust off the filters If you are using Bob regularly it is recommended that you change his filters about once every 6 months 1 2 3 ...

Страница 56: ...g Bob s main brush using a flat head screwdriver Use the cleaning tool to re move debris from the ends of the brush as well as the brush compartment You may use a pair of scissors to cut away hair or thread wrapped around the brush or a pair of tweezers to remove con gestion from the notches where the main brush is held 1 3 2 ...

Страница 57: ...57 To reinstall the main brush Replace the brush cap and insert the square end of the brush into the square notch inside the brush compartment Lower the brush into place and re tight en the screw 1 2 ...

Страница 58: ... to sweep along corners and walls When Bob is first delivered to you his side brush is not installed To do so Use the flat head screwdriver and short screw included in Bob s box to secure the side brush into the empty socket on Bob s underside Side Brush ...

Страница 59: ...b s side brush on a weekly basis To do so Remove the side brush using a flat head screw driver Replace the side brush and re tighten the screw Use the cleaning tool to remove debris on the side brush and the sock et where the side brush is held 1 2 3 ...

Страница 60: ... the battery cover on Bob s underside using a Phillips head screw driver Lift the battery out of its compartment and unplug the connecting wires 1 2 Reminder After replacing the battery Bob s cleaning schedule should be reprogrammed see page 47 ...

Страница 61: ...erything in a dry place at room temperature Do not let Bob sit idly with his power switch ON for more than 5 days switch him OFF and remove him from his station to conserve battery life Plug the new battery in and slide it into the empty compartment Re tighten the screws on the battery cover 3 4 Do not leave Bob in direct sunlight ...

Страница 62: ...Sensors ...

Страница 63: ... wall sensors are located along his bumper and his edge sensors are located on his underside Regularly cleaning these sensors ensures that Bob keeps working at his best To do so Wipe the wall and edge sensors using a soft cloth slightly dampened with cold water or alcohol Cleaning Bob s Sensors ...

Страница 64: ...par ticularly dirty spot while cleaning his dirt sensors will activate the word DIRT will appear on his screen and Bob will focus his attention on the spot Bob s dirt sensors are located on the back wall of his interior where the dustbin attaches To clean the sensors wipe them with a soft cloth ...

Страница 65: ...ve been deactivated Bob will be unable to detect stairs or edges UV DIRT TROUBLE NR CAPACITY AUTO SPOT WALL FOLLOW DOCK MIN CLEANING CHARGING READY Flip Bob s power switch ON Hold down the UV button on Bob s cover The 5 bars on top of Bob s screen will begin to flash After the 5 bars flash 7 times and remain still release the UV button The 5 bars will remain lit This means Bob s edge sensors are d...

Страница 66: ...er The 5 bars on top of the screen will begin to flash After the 5 bars flash 7 times and dis appear release the UV button Bob s edge sensors have been reactivated 1 2 Reactivate Edge Sensors UV DIRT TROUBLE NR CAPACITY AUTO SPOT WALL FOLLOW DOCK MIN CLEANING CHARGING READY ...

Страница 67: ... the blindfold stickers that came in his box to cover his sen sors Peel off the backs of each blindfold sticker and place one onto each of Bob s four sensors Make sure each sensor is completely covered Remember while Bob is blind folded he will not be able to detect stairs or edges ...

Страница 68: ...Troubleshooting ...

Страница 69: ...g the suggested solutions Bob s problem persists you may want to perform a home checkup test see page 94 You may also contact our customer care center at support bobsweep com Visit bobsweep com pethair support or download the bObsweep App on your iOS or Android device for handy video guides or scan this QR code Trouble Numbers UV DIRT TROUBLE NR CAPACITY AUTO SPOT WALL FOLLOW DOCK MIN CLEANING CHA...

Страница 70: ...ng tool or com pressed air to remove any debris that may be jamming the wheel If this does not solve the problem and Bob still displays Trouble Number 00 run a checkup test and see how the wheel performs see page 94 UV DIRT TROUBLE NR CAPACITY AUTO SPOT WALL FOLLOW DOCK MIN CLEANING CHARGING READY ...

Страница 71: ...ing tool or com pressed air to remove any debris that may be jamming the wheel If this does not solve the problem and Bob still displays Trouble Number 01 run a checkup test and see how the wheel performs see page 94 UV DIRT TROUBLE NR CAPACITY AUTO SPOT WALL FOLLOW DOCK MIN CLEANING CHARGING READY ...

Страница 72: ...of scissors to cut hair or thread wrapped around the brush or a pair of tweezers to remove congestion from the notches where the main brush is held If Bob displays Trouble Number 02 while cleaning on a shag carpet or rug you may re move his main brush and allow him to vacuum without it UV DIRT TROUBLE NR CAPACITY AUTO SPOT WALL FOLLOW DOCK MIN CLEANING CHARGING READY ...

Страница 73: ...gestion is not removable from the outside detach the front wheel and remove the obstruction For a comprehensive how to video visit bobsweep com pethair support If Bob s front wheel is clean and spinning freely his front wheel sensor may need to be replaced UV DIRT TROUBLE NR CAPACITY AUTO SPOT WALL FOLLOW DOCK MIN CLEANING CHARGING READY ...

Страница 74: ...r What to do Wipe the sensors using a clean cloth or dust them using compressed air If Bob displays Trouble Number 04 while working on dark colored carpet or patterned flooring you may need to deactivate his edge sensors see page 76 UV DIRT TROUBLE NR CAPACITY AUTO SPOT WALL FOLLOW DOCK MIN CLEANING CHARGING READY ...

Страница 75: ...th to wipe away any debris from the strip on Bob s bumper Gently tap the bumper or use compressed air to clear it of debris If the issue persists try running a checkup test see page 94 UV DIRT TROUBLE NR CAPACITY AUTO SPOT WALL FOLLOW DOCK MIN CLEANING CHARGING READY ...

Страница 76: ...any obstructions Use compressed air to clear it of debris Press on both ends of the bumper until you hear a tiny click If the bumper is not clicking on its ends Bob s touch sensors may need to be replaced UV DIRT TROUBLE NR CAPACITY AUTO SPOT WALL FOLLOW DOCK MIN CLEANING CHARGING READY ...

Страница 77: ...and clean the ends You may use a pair of tweezers to remove congestion from the notches where the main brush is held Make sure the brush s square end fits securely in the corre sponding square notch in the main brush compartment UV DIRT TROUBLE NR CAPACITY AUTO SPOT WALL FOLLOW DOCK MIN CLEANING CHARGING READY ...

Страница 78: ...d gently wipe the two metal connectors on its bottom with a dry cloth If the two metal connectors seem damaged they may need to be replaced Lastly clean the metal contact points inside Bob where the dustbin is inserted UV DIRT TROUBLE NR CAPACITY AUTO SPOT WALL FOLLOW DOCK MIN CLEANING CHARGING READY ...

Страница 79: ...ter from his station into the inlet above his power switch Allow Bob to charge for 2 hours before asking him to clean again If Bob is still displaying Error Code 09 send a short explanation to support bobsweep com and leave the rest to us UV DIRT TROUBLE NR CAPACITY AUTO SPOT WALL FOLLOW DOCK MIN CLEANING CHARGING READY ...

Страница 80: ...nd check his battery connection Open the battery compartment and unplug the battery Wait 30 seconds then reinstall the battery Plug the charging adapter directly into the inlet above his power switch Let him charge with his adapter overnight If Bob is still displaying Error Code 10 he may need a replacement part Contact support bobsweep com for further assistance UV DIRT TROUBLE NR CAPACITY AUTO S...

Страница 81: ...t in the US and Canada or email us at support bobsweep com Put Bob in checkup mode Bob will chirp three times to let you know he is now in checkup mode You may release the UV button Do not press any additional buttons Home Checkup Test UV DIRT TROUBLE NR CAPACITY AUTO SPOT WALL FOLLOW DOCK MIN CLEANING CHARGING READY Flip Bob s power switch OFF and place him on a light colored surface While holdin...

Страница 82: ...on flip Bob over and clean his edge sensors See if all four lights turn on now Lift Bob about 6 inches 15 cm off the ground You should see the 4 lights turn off Place Bob back on the floor UV DIRT TROUBLE NR CAPACITY AUTO SPOT WALL FOLLOW DOCK MIN CLEANING CHARGING READY Do not press any additional buttons Continue to the next step ...

Страница 83: ... the imi tation wall from the left side of Bob s bumper around to the right side UV AUTO SPOT WALL FOLLOW and DOCK will light up one by one as you do this UV DIRT TROUBLE NR CAPACITY AUTO SPOT WALL FOLLOW DOCK MIN CLEANING CHARGING READY Do not press any additional buttons Continue to the next step ...

Страница 84: ...Bob s screen should display the number 77 If you see a different number make sure that Bob s bumper is perfectly aligned with the sensor on top of his station If Bob still does not display 77 clean the window on the charging station and the small hole in the center of Bob s bumper UV DIRT TROUBLE NR CAPACITY AUTO SPOT WALL FOLLOW DOCK MIN CLEANING CHARGING READY Do not press any additional buttons...

Страница 85: ...p release the right side and MIN CLEANING should disappear Press the center of the bumper and DIRT and MIN CLEANING should both light up on the screen Do not press any additional buttons Continue to the next step UV DIRT TROUBLE NR CAPACITY AUTO SPOT WALL FOLLOW DOCK MIN CLEANING CHARGING READY UV DIRT TROUBLE NR CAPACITY AUTO SPOT WALL FOLLOW DOCK MIN CLEANING CHARGING READY UV DIRT TROUBLE NR CA...

Страница 86: ...creen should light up in a repeating rotation Press the UV button again and every light on Bob s screen should light up and remain solid UV DIRT TROUBLE NR CAPACITY AUTO SPOT WALL FOLLOW DOCK MIN CLEANING CHARGING READY Do not press any additional buttons Continue to the next step ...

Страница 87: ...r flowing out of the dustbin then Bob s vacuum motor may need to be replaced If the brushes are not moving remove and clean them before repeating the test see page 66 Ignore the icons and numbers on the dis play screen during test mode Do not press any additional buttons Continue to the next step UV DIRT TROUBLE NR CAPACITY AUTO SPOT WALL FOLLOW DOCK MIN CLEANING CHARGING READY ...

Страница 88: ...ive forward Flip Bob over and you should see his UV lamp lit Do not look directly into the UV lamp Press the MODE button once more Bob s wheels should drive backwards and his UV lamp should turn off This is the end of checkup test If Bob completes the checkup test without any issues then his internal parts are working properly Contact support bobsweep com if you have any questions as our doctors a...

Страница 89: ...Warranty Information ...

Страница 90: ...hes filters and mopping cloths Postal charges are not covered by the warranty Additional coverage plans are available for purchase at bobsweep com coverageplan After Bob s 1 year warranty expires all his replacement parts and visits to the bObsweep hospital are subsidized between 25 50 for the next 5 years To activate Bob s warranty keep your original purchase receipt and register him at bobsweep ...

Страница 91: ... Rest assured Bob will efficiently clean your home within the course of a full cycle just check his dustbin for the evidence It is best to let Bob work in his own way even if his movements appear odd Moving him around manipulating his movements or picking him up may confuse him and disrupt his cycle If you wish to control Bob s movements manually you may use the navigational buttons on his remote ...

Страница 92: ...tect edges and stairs because dark colored carpet absorbs most light it may seem like an edge to Bob s sensors If Bob displays TROUBLE NR 04 while working on dark colored carpet you may need to tem porarily deactivate his edge sensors To do so simply hold down the UV button on Bob s cover until the 5 bars at the top of his screen flash 7 times and then re main lit see page 76 Just remember that wh...

Страница 93: ...uck for a few min utes and then decide to clean somewhere else This is because Bob wants to cover every spot in your home and will try his hardest to overcome any obstacle As long as Bob does not display a Trouble Number on his screen let him con tinue cleaning and find his own way around Take note of the areas Bob finds the most challenging and if possible spread or adjust some of your furniture ...

Страница 94: ...arges using the charging station or charging adapter the battery bars and the word CHARGING on his display screen flash When Bob s bat tery is fully charged CHARGING and the battery bars disappear and the word READY appears on his screen 4 How often should I empty the dustbin Bob s dustbin has a 1000 mL capacity larger than most robotic vacuum cleaners on the market This means you may not need to ...

Страница 95: ...plug the adapter from the charging station and plug it directly into the inlet above Bob s power switch When Bob charges the battery bars on his display screen flash Let Bob recharge fully before using again 7 Why is my Bob beeping Bob beeps when he encounters a problem and needs assistance In addi tion to beeping he will display a Trouble Number on his screen which lets you know why he has stoppe...

Страница 96: ...nce he may need a few minutes to figure out how to escape on his own You will not need to assist him when this happens unless Bob stops cleaning completely and starts beeping If you would like Bob to avoid a certain area such as an area with wires you may use blOck sold separately to create a digital barrier 11 Why does Bob start cleaning when I did not tell him to clean Bob will start up on his o...

Страница 97: ...pill When Waffle Track is selected Bob travels in a grid pattern when Spiral Track is selected Bob travels in a gradually widening circle Select Wall Track to make Bob travel along the perimeter of your room 13 Bob is stopping and displaying TROUBLE NR on his screen How can I fix this Bob s Trouble Number let s you know the specific reason his work has been interrupted This allows you to identify ...

Страница 98: ...witch OFF and ON again If this does not solve the issue Bob might need a mainboard reset To do so flip his power switch OFF and plug the charging adapter directly into the inlet above his power switch Leave him to charge over night to fully refresh his system 16 I have a question and need to contact Bob s support team How do I do that Our devoted team is always eager to help you You can reach us b...

Страница 99: ...ne individual within your organization to have the sole right to use the Bobsweep Software and the Bobsweep in the manner provided above RESTRICTIONS You agree not to i use or copy the Bobsweep Software or the Bobsweep except as provided in this Agreement ii rent or lease the Bobsweep Software or the Bobsweep to any third party iii assign this Agreement or transfer the Bobsweep Software or the Bob...

Страница 100: ... LIMITATION VICARIOUS LIABIL ITY CONSEQUENTIAL DAMAGES INCIDENTAL DAMAGES DAMAGES FOR LOSS OF BUSINESS PROFITS BUSINESS IN TERRUPTION LOSS OF BUSINESS INFORMATION OR OTHER LOSS ARISING OUT OF THE USE OF OR INABILITY TO USE THE BOBSWEEP SOFTWARE THE BOBSWEEP OR SOFTWARE THAT YOU DEVELOPED FOR YOUR BOBSWEEP EVEN IF BOBSWEEP HAS BEEN ADVISED OF THE POSSIBILITY OF SUCH DAMAGES BECAUSE SOME JURISDICTIO...

Страница 101: ...pply to this Agreement INTEGRATION This Agreement represents the complete agreement concerning the subject matter hereof and any and all un derstandings conversations and communications proposals and counterproposals oral and written including any draft of this Agreement are merged into and superseded by this Agreement and shall be of no force or eect except as expressly provided herein No such un...

Страница 102: ... and bObsweep Inc All rights reserved ...

Отзывы: