background image

31

2000008437 – 09/12

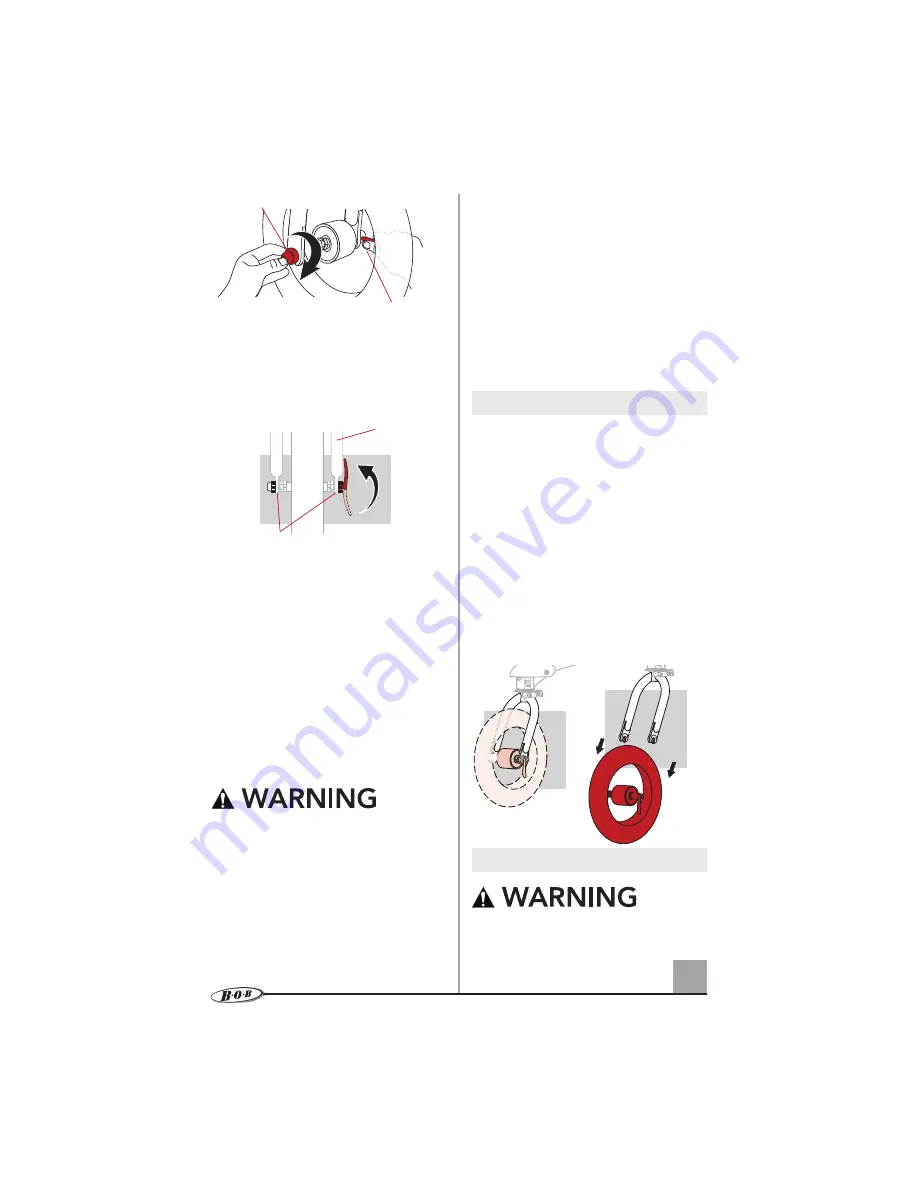
4.  Close Quick Release Lever

To properly close the quick release 
and secure the front wheel in 
the dropouts, confi rm the axle is 
contacting the top of the dropouts 
on both sides and the wheel is 
centered left to right. 


FULLY OPEN

FULLY CLOSED

While maintaining the wheel in this 
position, rotate the quick release 
upward and into the FULLY CLOSED 
position. When properly closed, 
the curve of the quick release will 
be pointing toward the wheel 
and parallel to the fork blade. To 
generate enough clamping force 
it is necessary to wrap your fi ngers 
around the fork blade while closing 
the quick release lever. The proper 
force required to close the quick 
release lever should leave a visible 
imprint in the palm of your hand.

It takes considerable force to 
securely clamp the wheel. If you are 
able to completely close the quick 
release without wrapping your 
fi ngers around the fork blade and 
the quick release lever does not 
leave a visible imprint in the palm of 
your hand, the tension is not 
adequate. Rotate the lever to the 

FULLY OPEN position and turn the 
tension adjusting nut a quarter turn 
clockwise and repeat the closing 
process.

If the quick release lever cannot 
be rotated to the FULLY CLOSED 
position, rotate the lever to the 
FULLY OPEN position and turn the 
tension adjusting nut a quarter turn 
counterclockwise. Repeat the closing 
process.

REMOVING FRONT WHEEL

1.  Open Quick Release Lever

Move the wheel’s quick release lever 
from the locked or FULLY CLOSED 
position to the FULLY OPEN position. 
Your front fork has integral secondary 
retention devices that require loosen-
ing the tension adjusting nut enough 
to allow removal of the wheel.

2.  Remove Front Wheel 

Raise the front wheel a few cm off the 
ground and tap the top of the wheel 
with the palm of your hand to knock 
the wheel out of the front fork.

UNFOLD STROLLER

Care must be taken when folding 
and unfolding the stroller to 
prevent fi nger entrapment or 
injury.

Fork Blade

Dropouts

Quick Release Lever

Tension Adjusting Nut

Содержание REVOLUTION CE

Страница 1: ...semble or use your new stroller read and understand these assembly and use instructions completely as well as the warnings at the beginning and throughout this document to ensure proper assembly and o...

Страница 2: ...unpaved wet or slick surfaces as these conditions create additional hazards and can lead to a loss of stability Do not modify the stroller or any WARNINGS labels Doing so voids the warranty and could...

Страница 3: ...equipped with the Type A adapter An infant carrier may generally only be transported facing backwards on the stroller When used as a travel system please fol low the instructions for your infant carri...

Страница 4: ...ssure Adjust Tracking Fine Tune Tracking Select Shock Setting Setting Parking Brake Secure Child In Seat Attach Wrist Strap Recline Seat Position Canopy Accessory Adapter TRAVEL SYSTEM ADAPTER WEATHER...

Страница 5: ...lease Lever Swing Arm Seat Harness Low Boy Cargo Basket CONGRATULATIONS Congratulations on your purchase of the BOB Revolution SE or Revolution CE For updates to this manual warranty and other recent...

Страница 6: ...ller Remove all packaging materials and discard to avoid choking and suffocation hazards WHEELS Before attempting to install wheels read and understand warnings and instructions completely Using your...

Страница 7: ...clamping force The tension adjusting nut only needs minor adjustments to provide the correct clamping force less than a half turn can mean the difference between safe and unsafe clamping force REAR WH...

Страница 8: ...mpletely close the quick release without wrapping your ngers around the dropout and the quick release lever does not leave a visible imprint in the palm of your hand the tension is not adequate Rotate...

Страница 9: ...ty Secondary retention devices are not a substitute for correct quick release adjustment and tightening Using your stroller with an improperly adjusted and tightened wheel quick release can allow the...

Страница 10: ...d the quick release lever does not leave a visible imprint in the palm of your hand the tension is not adequate Rotate the lever to the FULLY OPEN position and turn the tension adjusting nut a quarter...

Страница 11: ...ed position SNAP 2 Rotate Handlebar Lift handlebar up and back until it snaps into locked and upright position SNAP FOLD STROLLER 1 Lock Parking Brake Set parking brake in locked position 2 Remove Chi...

Страница 12: ...ivel left or right as it does in WALK MODE Never go off road with the stroller in walk mode WALK MODE Slide swivel knob up and to the left Fork will now rotate 360 degrees NOTE Stroller is shipped wit...

Страница 13: ...Empty Stroller Remove contents from low boy cargo basket and pockets 2 Check Tire Pressure 3 Set Stroller to Off Road Mode Slide swivel knob to right Knob will slide into downward position Rotate for...

Страница 14: ...r is folded stroller shocks default SOFTER position SETTING PARKING BRAKE The parking brake prevents the stroller from moving while loading and unloading The parking brake is not designed as a stoppin...

Страница 15: ...ller will become unstable Avoid serious injury from falling or sliding out Always use seat harness Always use the crotch strap in combination with the waist belt Never leave your child in the stroller...

Страница 16: ...ose your grip on the stroller When using the stroller make sure the strap is securely looped over your wrist Failure to attach wrist strap can result in damage or injury Secure Wrist Strap Slip loop o...

Страница 17: ...lity and injury POSITION CANOPY 1 Extend Canopy Rotate canopy away from handlebar for additional shade 2 Retract Canopy Push canopy toward handlebar ACCESSORY ADAPTER This BOB stroller is equipped wit...

Страница 18: ...ER The BOB Infant Car Seat Adapter allows you to easily attach leading infant car seat models to a BOB Stroller utilizing the BOB Accessory Adapter feature Installation of the Travel System Adapter CL...

Страница 19: ...is unobstructed After installing Weather Shield con rm vents on Weather Shield are aligned with space above seat back and all other vents are free of obstruction WEATHER SHIELD The Weather Shield is...

Страница 20: ...r the stroller Adding weight to the seat back changes the center of gravity of the stroller and increases the possibility that it will tip over backwards resulting in injury For this reason loads in t...

Страница 21: ...et the highest requirements in terms of colour fastness to UV radiation However all substances fade if they are exposed to UV radiation This is not a material defect but normal wear and tear for which...

Отзывы: