background image

21

20

ENGLISH

ENGLISH

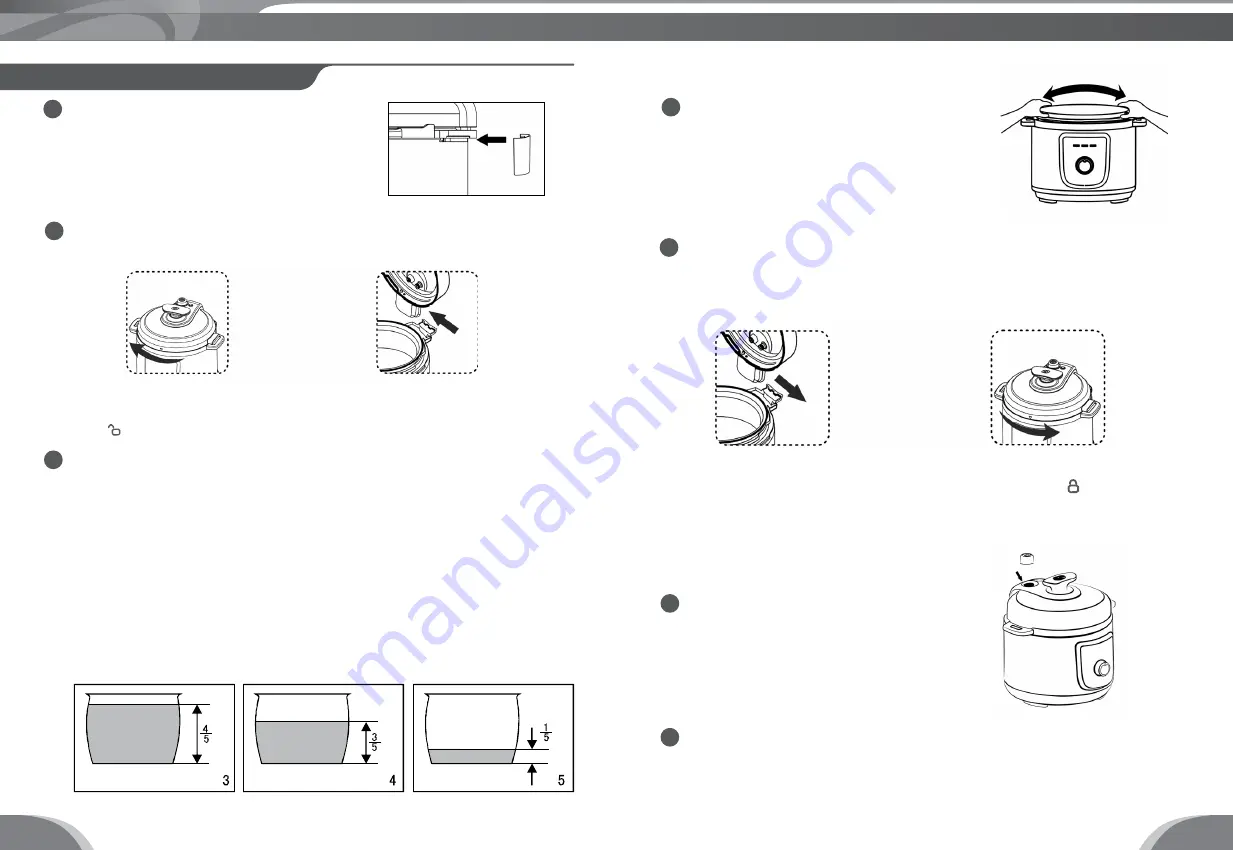
Open the cover 

Before opening the lid, make sure the float is descended. 

2

Hold the lid handle by one hand 

and rotate to the position indicated 

by  “   ” . Then lift the lid to open. 

To detach the lid, hold the lid 

handle, then maintain a 90

angle and pull to the left.

3

Take out the inner pot, place a desired amount of food & water neatly 

within the inner pot & indicated my the measuring marks..

NOTE:

a -  For cooking rice, the maximum quantity for 6L is 12 cups.

b - Add water according to the scaled level on inner pot. For example, 

cooking 2 cups of rice will require the water level to be filled up to the 

“2” mark. You can adjust the water levels according to your own taste and 

different kinds

c - Please follow these tip for an approximation of how much food to be 

cooked in the innder pot at time: 4/5 the height for all types of food (3/5 

for highly expandable food) but no less than 1/5 the height measure 

within the inner pot.  . (See picture 3, 4, 5) of rice.

Picture 3

Picture 4

Picture 5

Install the water box

Check to see if the water box has been 

installed firmly onto the cooker. Please 

refer to the figure for visual instruction 

on how to lodge the water box in its 

right place. 

1

COOKING INSTRUCTION

Place the pot inside the pressure cooker.

Please keep the pot and heating plate clean 

and dry before placing the inner pot inside. 

Ensure the heating plate is neatly & fully 

making contact with the inner pot surface.

4

To attach the lid, place 

the lid in its coupling and 

turn to the right.

Close the lid.

5

Please thoroughly check the sealing ring. Make sure that it’s firmly installed in 

its proper position on the lid before closing the pressure cooker. 

Close the lid and rotate it to 

close position “   “

Install the pressure limiting exhaust valve. 

Make sure that the valve is securly installed 

in place and fully descend before operating 

the pressure cooker.

6

Select the corresponding cooking function/program you want to cook.

7

Содержание PCB-5639

Страница 1: ...p su t H ng d n s d ng Model PCB 5639 a ch c n ng d v n h nh ti n l i v i ch c n ng n u t ng D d ng thao t c v s d ng v i b ng i u khi n c An to n v ti n d ng v i n t x van p su t gi p ch ng h n khi...

Страница 2: ...p c tr s ch nh t i 7809 Michigan Ave Oakland CA 94605 Hoa K S n ph m BlueStone c thi t k theo ki u d ng c ng nghi p v i m u s c a d ng D i s nghi n c u v thi t k c a c c chuy n vi n thi t k v k thu t...

Страница 3: ...qu nhi u h i tho t ra xung quanh n p Thi t b x p su t ang ho t ng i u ti t m t p su t qu cao N u hi n t ng nh tr n x y ra l p t c r t i n ra v em thi t b n trung t m b o h nh c h tr s a ch a N u ph t...

Страница 4: ...gu n i n tr c khi m n p Kh ng c m n p khi n c ang s i 1 2 3 4 5 6 C NH B O H NG D N S D NG CHUNG L p khay t ch n c Ki m tra khay t ch n c c l p hay ch a N u ch a l p khay t ch n c v o v tr nh h nh 1 N...

Страница 5: ...n khi van phao h xu ng N u kh ng th c n d ng l ng s tr o ra qua ng x p su t B n c th t kh n t tr n n p n i y nhanh qu tr nh l m ngu i c a n i p su t b R t i n ra tr c khi m n p 6 7 8 H NG D N V N H N...

Страница 6: ...r nh n u Th i gian n u c thay i i ch t t y theo l ng th c ph m n c v lo i g o Th i gian n u Th i gian un n ng Th i gian duy tr p su t 1 3 2 M n n Th i gian duy tr p su t ph t C 1 9 C m 9 12 S n 12 15...

Страница 7: ...c a van phao V ng k n nhi t c a van phao b v r ch hay c d u hi u b h h ng Thay i v ng k n nhi t c a van phao 5 Van phao kh ng n ng l n Ch a l ng th c n v n c Cho l ng th c n v n c v o n i N p n i hay...

Страница 8: ...ual Model PCB 5639 Integrated function convenient operation automatically cook food in delicious Easy to use with mechanical control panel Fast cooking and maintaining the nutritional value of food Al...

Страница 9: ...d color variations offering a broad range of possibilities for customers Through the experienced designers and technicians Bluestone design has highly reliable solutions so the customers are assured o...

Страница 10: ...ick up the pressure cooker by holding on the lid handle Do not attempt to manually repair or disassemble the the appliance by yourself If any components need to be replace please seek for repair by th...

Страница 11: ...e food but no less than 1 5 the height measure within the inner pot See picture 3 4 5 of rice Picture 3 Picture 4 Picture 5 Install the water box Check to see if the water box has been installed firml...

Страница 12: ...cooker is too high the Keep warm indicator display will blink continuously When this is the case the pressure cooker will automatically function to readjust and balance the temperature vs pressure ins...

Страница 13: ...ed to continue keeping the food warm insider the cooker please safely unplug the cooker from the power outlet Cooking time may vary depending on different cooking program selections and as per the qua...

Страница 14: ...an the sealing ring Lid is not properly closed Close the lid properly 4 Leakage of floating valve Food debris adhere to the sealing ring of floating valve Clean the sealing ring of floating valve Seal...

Страница 15: ......

Отзывы: