background image

7

6

SECTION 4: INSTAllATION

• 

Ensure the blender vents are unobstructed, which will allow proper 

cooling during use� Place the motor base on a flat, clean and dry surface�

• 

Ensure an electrical outlet is within reach of the blender�

• 

Ensure the power switch is turned to the OFF position, and then plug 

the blender into an outlet�

• 

Turn the unit on�

• 

Place the blender jar, with the lid secured, on the blender base�

Note:  We recommend plugging your blender into a GFI protected outlet� 

We also recommend washing and sanitizing your jar before first use�

Section 5: operational overview

5.1


qUICK RECIPE TIPS 


Complete the following steps to start blending!

• 

Choose a recipe from 

Fresh Blends 

or 

WildSide Jar Recipes

• 

Gather all of the ingredients�

• 

Load the blender jar as indicated in the recipe�

• 

Attach the lid to the jar; ensure the lid sits on the jar completely�

• 

Place the jar on the motor base, ensuring the jar is secure and fully 

seated on the base�

• 

Turn on the power switch located on the back of the motor base�

• 

Press the button indicated in the recipe� You can stop the cycle at any 

time by pressing “Stop” 

• 

When the cycle has finished, or you have manually stopped the 

blending, remove the jar from the motor base�

• 

Remove the jar lid, and serve as indicated by the recipe�

5.2


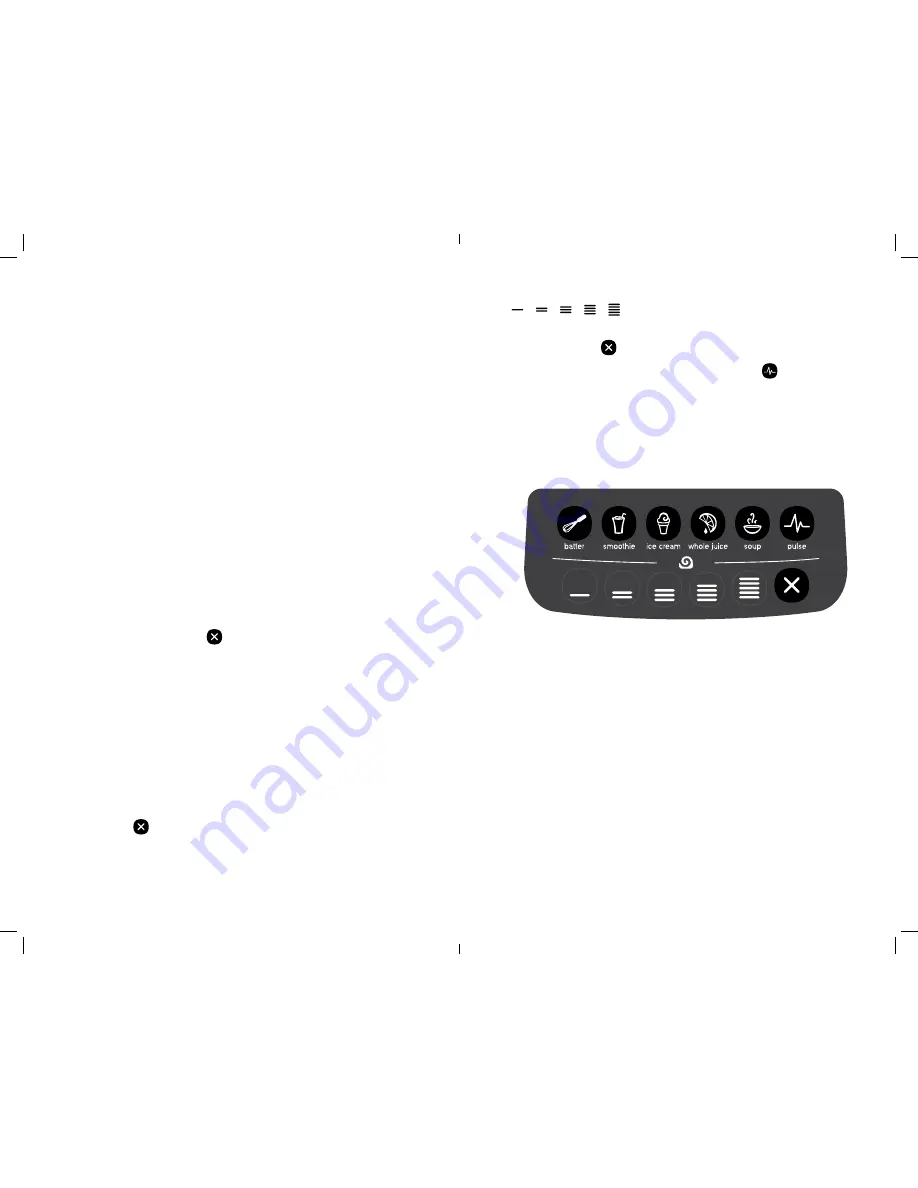
UNDERSTANDING THE CONTROL SURFACE BUTTONS 

The touch pad includes the following buttons (see Figure 3):

Automatic cycles:


The Blendtec Signature Series has labeled buttons 

that activate preprogrammed blending cycles for various needs� These 

cycles run the blender at speeds that change during the course of the 

cycle, allowing the blender to draw the contents into the blending vortex 

and create the desired texture� When the blend cycle is complete, the 

blender automatically shuts off� If you want to stop the blender during the 

cycle, press 

Manual operation—speed buttons:

 The five speed buttons 

 allow you to manually control the blender speed� 

When you press a speed button, the blender will run at the selected speed 

and then shut off automatically after 50 seconds� To end the cycle before 

50 seconds, press 

Manual operation—“Pulse” button:

 Use “Pulse” 


to chop, mince, 

whip or do other quick tasks that do not require a long blend cycle� 

The motor will only run while the button is held down; release the button to 

shut off the motor�

Note: While a blend cycle is underway, you may instantly switch to another 

blend cycle or blending speed by pushing the desired button�

Figure 3

5.3


BLEND CYCLES

why blend cycles?


In the world of professional blending, there are 

many factors that go into making a delicious and consistent blended 

recipe� Different ingredients have different blending characteristics, and 

each ingredient must be considered� For example, ingredients that are 

thick and fibrous need to blend longer and at higher speeds than other 

ingredients� The Signature Series’ blend cycles were developed based on 

these principles� With these blend cycles, you can make a virtually limitless 

number of recipes and achieve consistently impressive results�

How will blend cycles help my recipes? 

Blend cycles allow the Signature 

Series to produce consistent results across a wider range of recipes than 

any other home blender� During a cycle, the blender will speed up and slow 

down in a specific pattern based on the desired end results (see Figure 4)� 

However, factors like the temperature of ingredients and the amount of 

liquid used will create different blending characteristics� 

Fresh Blends 

and 

WildSide Jar Recipes 

are designed for the typical amounts of liquid 

and temperatures of ingredients� If your ingredients differ from the typical 

characteristics, you may need to include more or less ice or larger or 

smaller portions of ingredients� For example, if a drink is too thick to blend 

Содержание Signature Series

Страница 1: ...Owner s Manual and User Guide SignatureSeries ...

Страница 2: ...TION 1 IMPORTANT SAFEGUARDS 1 SECTION 2 UNPACKING 4 SECTION 3 GETTING TO KNOW YOUR BLENDER 4 SECTION 4 INSTALLATION 6 SECTION 5 OPERATIONAL OVERVIEW 6 SECTION 6 CLEANING 10 SECTION 7 TROUBLESHOOTING 10 SECTION 8 WARRANTY 12 ...

Страница 3: ... Blendtec is producing equipment to stringent criteria This certification ensures that your Signature Series has been tested for electrical and mechanical safety 1 2 Health Certification The Signature Series and the accessories bearing the NSF mark are listed by NSF International NSF standards have been developed over many years to prevent contamination from toxic substances and to ensure ease of ...

Страница 4: ... not operate the blender with any attachments not sold or endorsed by Blendtec Using such attachments may cause fire and or injury and will void the warranty 1 13 Caution Touching Drive Socket After Extensive Use The blender drive socket and or drive shaft may become hot after numerous cycles Avoid touching either after using the blender extensively 1 14 Power Cord Precautions Never operate the bl...

Страница 5: ...____________________ ____ Place of Purchase ___________________________________________ _____________ 2 3 Registering Your Blender Register your blender online at www blendtec com registration Section 3 Getting to Know Your Blender 3 1 Blender Jar Assembly The blender jar assembly consists of the following see Figure 1 Lid The flexible lid keeps liquids in the jar during blending Clear vented lid ...

Страница 6: ...lender during the cycle press Manual operation speed buttons The five speed buttons allow you to manually control the blender speed When you press a speed button the blender will run at the selected speed and then shut off automatically after 50 seconds To end the cycle before 50 seconds press Manual operation Pulse button Use Pulse to chop mince whip or do other quick tasks that do not require a ...

Страница 7: ...icious results What blend cycles are on my Signature Series The Signature Series is preprogrammed with five carefully selected and designed blend cycles to make it easy for you to successfully complete a wide range of blending tasks These cycles include Batter Smoothie Ice Cream Whole Juice and Soup Fresh Blends and WildSide Jar Recipes included with your machine contain instructions on which cycl...

Страница 8: ...er jar from the motor base and turn the shaft by hand to ensure the blade turns freely If the blade does not move freely check for any obstruction in the jar The problem may also be the jar itself not the motor If the blade moves freely plug in the unit and turn the blender on If the overload condition reoccurs call 1 800 BLENDTEC or 801 222 0888 for further assistance Overtemp This message indica...

Страница 9: ...hout charge This warranty does not cover damage caused by misuse accident or negligence All implied warranties including but not limited to implied warranties of fitness and merchantability are limited in duration to the warranty period on the motor and jar Any unit submitted for repair must be accompanied by proof of original purchase and should be shipped prepaid to Blendtec 1206 South 1680 West...

Страница 10: ... out of warranty repair When you ship your unit please include the following Your Name ______________________________________________________ Address ________________________________________________________ Phone Number _________________________________________ ______ _ ____ Motor Serial No found on bottom of motor base ______________________ Cycle Count From the LCD display ______________________...

Страница 11: ...206 South 1680 West Orem Utah 84058 U S A 1 801 222 0888 blendtec com 2011 K TEC INC All Rights Reserved Blendtec is a registered trademark of K TEC INC OWN RD 109 Manual Owner s Signature Series Rev 01 ...

Отзывы: