background image

8

Wall mounting

IMPORTANT - Before drilling any holes in the wall ensure you are not drilling where there could be 

electrical wires, water or gas pipes.

1) Remove the four screws located at the back of the TV set.

2) The wall mount can now be easily attached to the mounting holes, 
located on the back of the TV, using the same four screws removed.

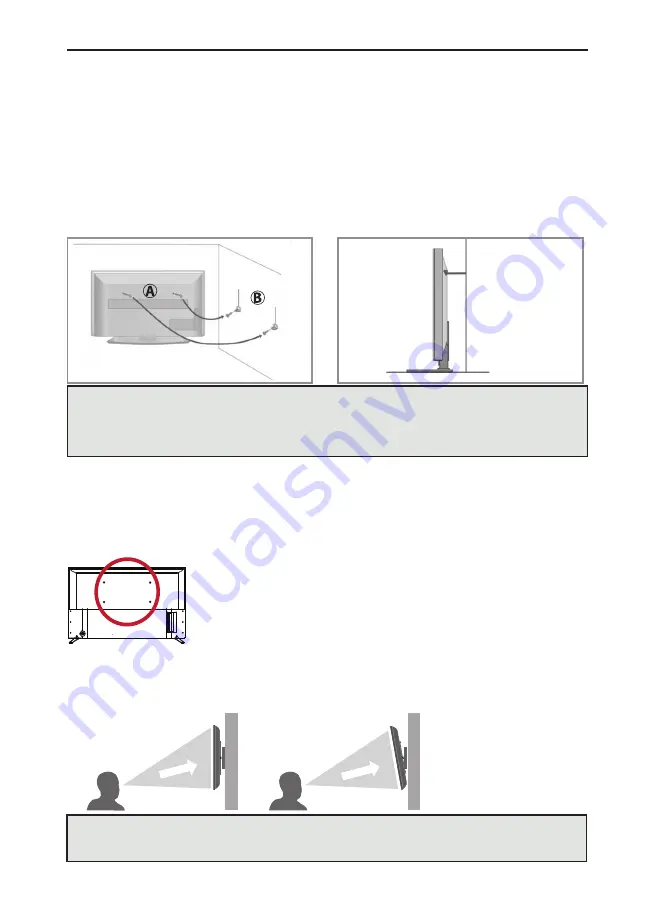
VESA mounting points are located on the rear of the set, see example above.

For optimum viewing, if wall mounting the TV higher than eye level, the TV should be tilted downwards 
so that the TV’s screen is ‘face on’. See fi g 1 and 2.

Wall Mounting and Set Security

SECURING THE TV TO A WALL


Securing the TV to a wall with anti-tip straps

For maximum safety in the home, when using a TV with its stand, anti-tip straps should be fi tted. These 
are available from major retailers & websites and are an easy, inexpensive and effective way of ensuring 
your TV stays safely upright. Straps are designed to be attached to the rear of the TV and then tethered 
to the wall or the furniture the TV is stood on, these are fi tted as follows.

The Royal Society for the Prevention of Accidents is urging people to take care with fl at-screen televisions. 
RoSPA stated in 2010 that “Toddlers are particularly at risk of pulling fl at-screen televisions on to 
themselves. They are unsteady on their feet and are attracted by colourful television images.” The risk has 
increased as televisions become lighter.

A)

 Using one or both of the top wall-mounting 

holes and screws fasten one end of the fastening 
cord/s to the TV. (the screws are already supplied in 
the wall mounting holes)

B)

 Secure the other end of the fastening cord/s to 

your wall. (you will need screws/fi xings suitable 
for your wall type - available separately from most 
DIY stores).

fig 1

fig 2

TV

TV

Viewing angle

Viewing angle

INCORRECT

CORRECT

Important:

 If wall mounting this TV, only use the screws already provided in the wall mounting holes.

Using other screws which are longer could cause irreparable damage to internal parts. When using a
wall bracket, please ensure the screws in the back of the TV set are not over tightened.

Note

: Please ensure that children do not climb on or near the TV set.

Note:

 When handling the set do not grip the LCD Panel.

Note:  

Do not pull the set when mounted on a bracket. If using a moveable bracket, adjust via the 

bracket and not the set.

Содержание BN24H1012

Страница 1: ...BN24H1012 HD TV with Freeview...

Страница 2: ......

Страница 3: ...mation Telephone UK 0330 024 0803 ROI 01443 3323 Web support www umc uk co uk Email service umc uk co uk Calls to 0330 numbers are charged at standard call rates and are included as part of any bundle...

Страница 4: ...rly to children can be avoided by taking simple precautions such as Use cabinets or stands recommended by the manufacturer of the television set Only use furniture that can safely support the televisi...

Страница 5: ...not an exhaustive list TV channel logos e g shopping channel logos and pricing displays especially if they are bright and stationary Moving or low contrast graphics are less likely to cause ageing of...

Страница 6: ...s and other countries The DVB logo is the registered trademark of the Digital Video Broadcasting DVB project The FREEVIEW text and logos are trademarks of DTV Services LTD DTV Services Ltd Manufacture...

Страница 7: ...ontrol 11 First Time Installation 12 13 Main Menu 14 TV Menu Operation 15 28 Picture Menu 15 16 Sound Menu 17 18 Channel Menu 19 22 Lock Menu 23 Time Menu 24 Source Menu 25 Setup Menu 26 27 USB Menu 2...

Страница 8: ...l Society for the Prevention of Accidents is urging people to take care with at screen televisions RoSPA stated in 2010 that Toddlers are particularly at risk of pulling at screen televisions on to th...

Страница 9: ...les See Fig 1 below 4 x Screw including D18 washer 4 x Spacer These should be used as indicated in the picture below Ensure that the screws are not overtightened as this may cause damage to the set No...

Страница 10: ...ld the centre of the control stick back to previous menu Choosing Mode Input Source Use the source menu to switch between input connections A Using the buttons on the remote control 1 Press SOURCE The...

Страница 11: ...e information about current programme ASPECT To switch the screen between the different picture formats SLEEP Press repeatedly to cycle through the sleep options AUDIO To change the audio language if...

Страница 12: ...n Environment Use this option to select either Home or Store Mode Home Mode is a power saving mode which reduces the energy used by up to 25 by reducing the power to the LED LCD panel When in STORE MO...

Страница 13: ...n UK 0330 024 0801 ROI 01443 3940 You can also visit our website www umc uk co uk IMPORTANT PLEASE KEEP ALL THE PACKAGING FOR YOUR TV AS YOU MAY NEED IT IN THE EVENT OF WARRANTY SERVIE SUPPORT Press E...

Страница 14: ...CHANNEL Choose the Channel menu to enable a retune of the TV scheduling and channel editing LOCK This menu allows you to control settings relating Parental Guidance setting a PIN and locking the tele...

Страница 15: ...mode after 3 5 hours in the event that the TV buttons or remote control buttons are not pressed change the picture mode to another setting to de activate this function In the economy mode the brightn...

Страница 16: ...Aspect Ratio of the displayed image Choose from the following 16 9 Default settings 4 3 Displays the 4 3 picture in its original size Side bars are shown to ll the 16 9 screen Auto The TV will switch...

Страница 17: ...sired sound settings the following options can be selected by pressing the SOUND button on the remote control Standard Default settings Music Emphasises music over voices Movie Provides live and full...

Страница 18: ...peakers connected via digital audio output Range 0 250 Audio Delay ms Enables the user to adjust setting to sync picture and audio Range 0 100 Audio Description This allows the user to increase and de...

Страница 19: ...st Signal Information Software Update OA On Auto Tuning Allows you to retune the television for all digital channels digital radio stations and analogue devices Digital Manual Tuning Allows you to man...

Страница 20: ...nd favourite channels To do this follow these procedures Adding a Favourite Channel Highlight the channel you want to set as a favourite Once highlighted press the FAV button on the Remote Control The...

Страница 21: ...ete move skip and set favourite channels Schedule List Allows you to view the scheduled list of TV programmes To set programmes into the schedule please read the section TV Guide on page 29 Signal Inf...

Страница 22: ...on for analogue channels Analogue Manual Tuning Allows you to manually tune your analogue signal by selecting the channel number Press OK to start Channel Edit Allows you to delete move skip and set f...

Страница 23: ...onomy LOCK Adjust Move Select System Lock Set Password Channel Lock Parental Guidance Key Lock Off Off Off System Lock System Lock allows a user to lock the TVs functions When switching on for the rst...

Страница 24: ...ng the SLEEP button on the remote Off 10m 20m 30m 60m 90m 120m 180m or 240m Auto Standby Controls the amount of time the set will continue to operate without any buttons being pressed on the set or re...

Страница 25: ...t this menu at anytime press the EXIT button Economy Input Source Move Select DVB T DVB S ATV AV HDMI1 HDMI2 USB DVB T Selects the DVB T Source DVB S Selects the DVB S Source ATV Selects the ATV Sourc...

Страница 26: ...On Off LED Status Sets the TVs LED power LED On Off Blue Screen Shows a blue screen when no signal is receieved to a source On Off SETUP MENU To access this menu press MENU on the remote control and s...

Страница 27: ...o Receiver Automatically switches to the source when a new signal is input On Off Device Auto Power Off Enable automatic device power off when television turns off On Off TV Auto Power On Enable telev...

Страница 28: ...view text les stored on the installed USB device 28 USB Menu USB MENU To access this menu press MENU on the remote control and select USB If you wish to make a change to any of the default settings u...

Страница 29: ...ge of Beer Also in HD S 19 30 20 00 EastEnders 16 30 17 15 Antiques Road Trip 15 00 15 45 Escape to the Country 15 45 16 30 Garden Rescue 17 15 18 00 Pointless 19 00 19 30 The One Show 18 30 19 00 Sou...

Страница 30: ...ing TV TV GUIDE To set a reminder use the arrow keys on the remote to adjust the following Channel Minute hour Month Day These settings will be defaulted to the programme time you set the reminder but...

Страница 31: ...to a device with Composite AV Video output TV source should be set to AV Connection example for TV models with AV input Connecting to a device with HDMI output A HDMI cable can output both video and...

Страница 32: ...USB Media USB USB USB Mini OPTION 1 Connection to a USB memory stick OPTION 2 Connection to an external hard drive HDD Connecting to External Digital Audio Device To use the USB input TV source should...

Страница 33: ...I have re tuned my television but when I switch it off it is not storing the channels If the TV does not save the channels when you power it off it s likely the channel database has become corrupt 1 T...

Страница 34: ...am TS TRP TP MP4 MP4 MOV 3GPP 3GPP 3GP AVI AVI MKV MKV ASF ASF MPEG4 1080P 30fps MP4 MP4 MOV MPEG Program Stream MPG MPEG ASF ASF 3GPP 3GPP AVI AVI MKV MKV H 264 1080P 60fps FLV FLV MP4 MP4 MOV 3GPP 3...

Страница 35: ...MPEG program stream DAT VOB MPG MPEG Music EAC3 EC3 MP4 M4A AAC LC HE AAC Movie AVI AVI Matroska MKV 3GPP 3GPP 3GP MP4 MP4 MOV MPEG transport stream TS TRP TP MPEG program stream DAT VOB MPG MPEG FLV...

Страница 36: ...BLA MAN 0420...

Отзывы: