


26
A-QAMOS-IPM •
Part no. 5111.81
• IP- /ASI-TV Modulator
7.2.12 Menu ”NIT”
The NIT processing for all to a headend associated devices of the A-QAMOS and QAMOS product group can be done in
2 ways: as an automatic or manual NIT processing.
The simplest and by installation and support expense safest way is the automatic NIT processing. The precondition is
that all to the headend associated above mentioned devices have a different IP address and an Ethernet switch must
be connected to each other. The NIT settings must be made here only in one of the above mentioned devices of the
headend and after confirmation they are automatically included of all other devices.
The Ethernet connection among each other is not necessary for the manual NIT processing, but the settings must be
made or maintained
separately in each device
of the headend, which means a much higher expense.
To start the NIT processing it is first necessary to put together the headend in the user interface:
Menu
Setup
→
Headend
“Read“
or in the case of factory setting of the device:
Menu
Overview
→
Headend “Read“
.
All devices of the A-QAMOS and QAMOS product group are listed that are within the network. If there is no network
connection between the mentioned devices (the case of manual NIT processing), here only this one device appears on
which the settings are being implemented. The next step, all mentioned devices are selected, which should belong to
the headend (in the case of the manual NIT processing the device itself) and the selection has to be confirmed with the
“
Send
“
button.
7.2.12.1 Automatic NIT processing
As explained above, all devices of the A-QAMOS and QAMOS product group of the headend must be connected via
an Ethernet switch for automatic NIT processing. The creation or editing of the NIT settings must only be done on one
device of the headend and is then applied from all other
devices automatically.
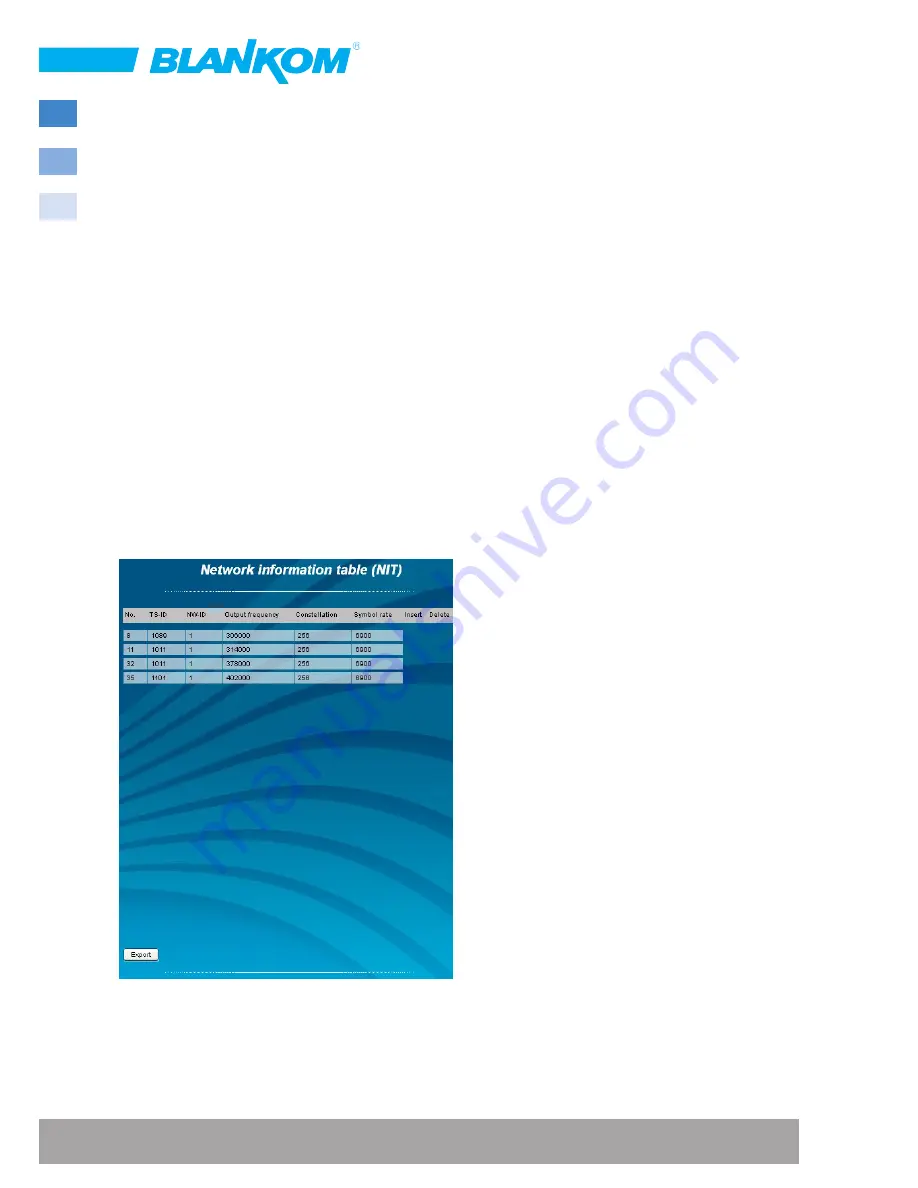
It presents the last created NIT table of the whole headend
with continuous listing of the following parameters:
transport stream ID, original network ID, output frequency
in kHz, QAM constallation, symbol rate in kSps, insert and
delete fields
It presents the last created NIT table of the whole headend
with continuous listing of the following parameters:
transport stream ID, original network ID, output frequency
in kHz, QAM constallation, symbol rate in kSps, insert
and delete fields. A characteristic of the automatic NIT
processing is that all channels of the devices are listed in
frequency-ascending blue colored table cells. If the first
time a NIT is created, a list appears with no table entries.
The loading or update of the NIT is then in edit mode. By
clicking the
“
Export
“
button, the NIT of the headend is
saved as a .xml-file on the PC.
By clicking the box
“
Edit
“
in the top right of the user
interface you can switch to edit mode and edit the NIT
entries. With the
“+“
button, an entry will be added. The
settings of the last table entry are accepted and must be
adjusted accordingly. With the
“
Delete
“
button the table
entry is removed. Also in this mode, you can save the NIT of the device with the
“
Export
“
button as .xml-file on the PC.
By clicking the
“
Import
“
button, another NIT can be added, which was previously stored as a .xml file on the PC. In this
way its easy possible to create a NIT of a system with multiple devices of the A-QAMOS and QAMOS product group. In
the NIT processing all the selected table entries are included.
In the lower part of the GUI it appears additionally an overview of the settings for the NIT processing of all the channels


