background image

DR900S-1CH

77

1

Click the 

Advanced settings

 button.

2

Double click the video from the list that you want to use as a G-Sensor data reference.

3

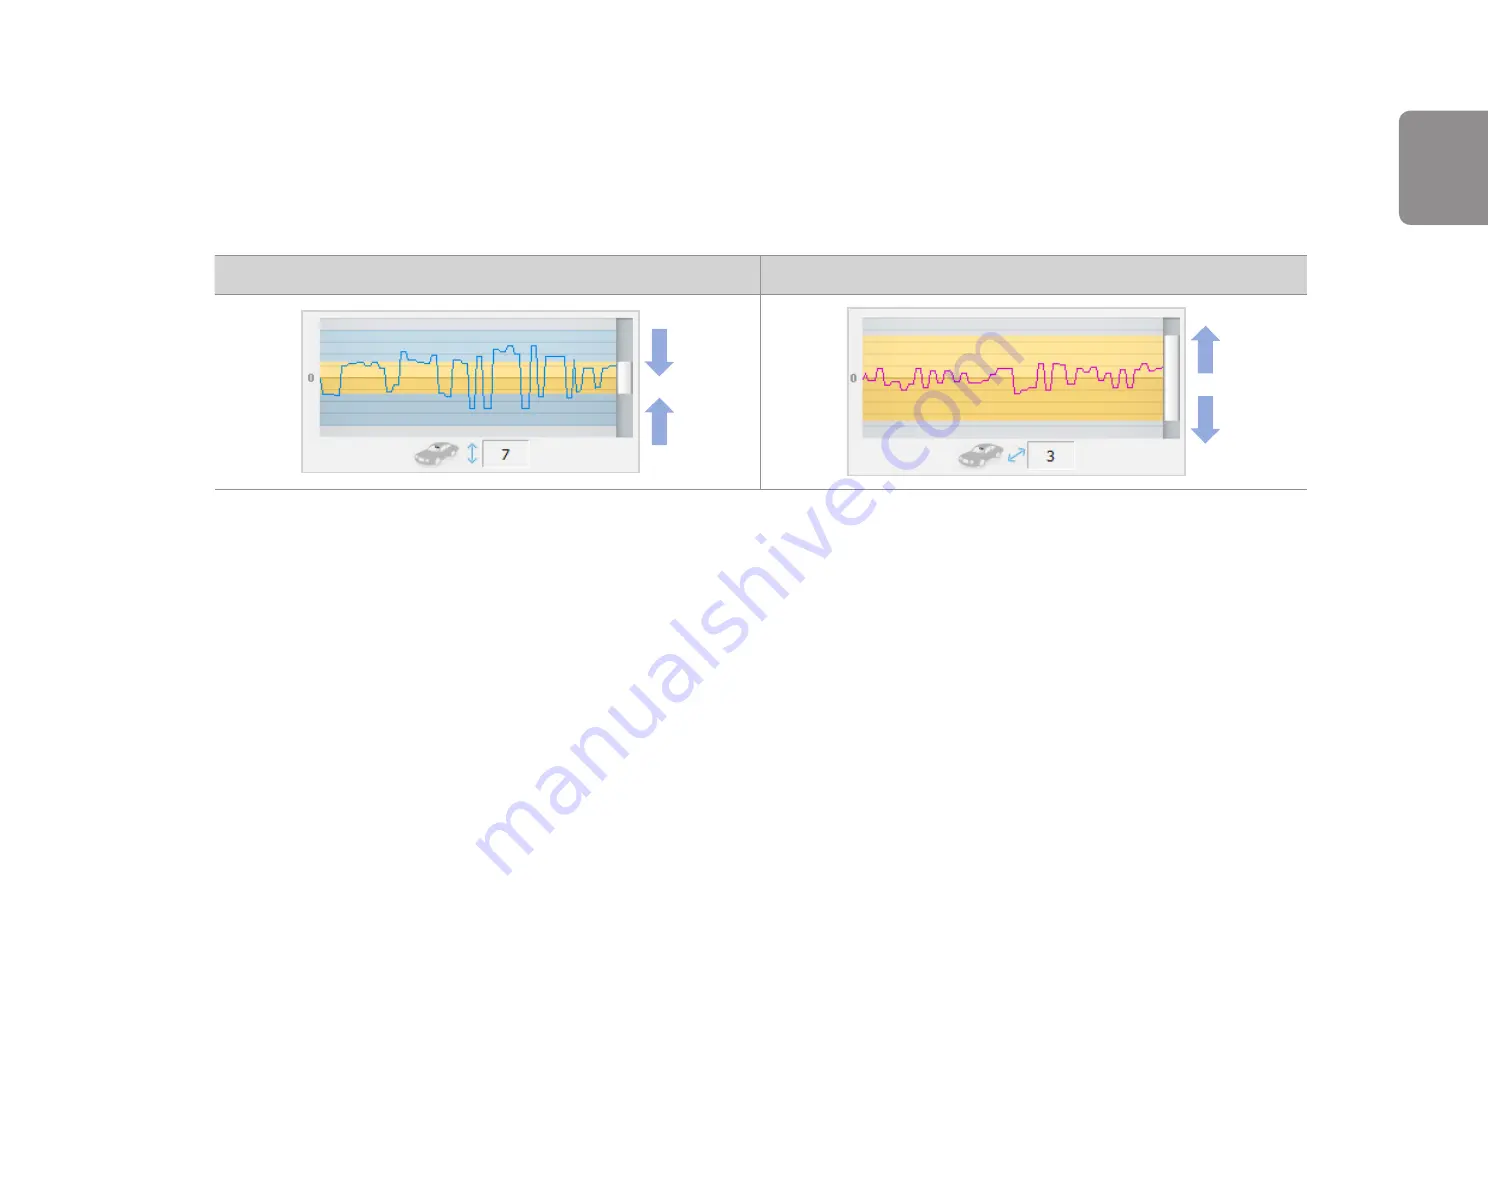
Set the thresholds by adjusting the control bars next to each G-Sensor axis. Any G-Sensor data that crosses over the threshold on any 
of the 3 axes will trigger an Event recording.

Event recording will occur

No event recording will occur

4

Click 

Save and close

.

ENGLISH

Содержание DR900S-1CH

Страница 1: ...ENGLISH DR900S 1CH Manual ...

Страница 2: ...er Windows Mac 27 Removing the microSD card 27 Opening video files in BlackVue Viewer 28 Viewer screen composition 29 Windows Viewer 29 Mac Viewer 30 Playing video 31 Playing back videos 31 Identify video files by recording type 31 Checking the displayed time 33 Using BlackVue Viewer 33 Exploring the timeline and G Sensor graph 34 Zoom options 35 Checking the GPS data 36 Managing videos 37 Capturi...

Страница 3: ...ush notification settings 66 FW Language 67 Changing settings using your computer Windows Mac 68 BlackVue Viewer settings 69 Select language 69 Speed unit on map 69 Select map service 69 Use video accelerator 69 Firmware settings 70 Basic settings 71 Time settings 71 Video settings 72 Recording settings 73 Sensitivity settings 75 G Sensor Normal mode G Sensor Parking mode 75 Motion detection Parki...

Страница 4: ...i SSID and password 91 On device Wi Fi SSID and password reset 91 Change Wi Fi SSID and password over the Cloud 92 Change the Wi Fi password using BlackVue Viewer Windows or Mac 94 Product specifications 95 Recording time 97 Disposal and recycling information 98 ...

Страница 5: ...dashcam we recommend that you read through this manual to ensure correct usage To improve the performance of the product the contents of this manual are subject to change without prior notice Note y y A formatted microSD card is provided with the BlackVue dashcam when you purchase the product Insert the microSD card in the dashcam and power it up The microSD card will be initialized ENGLISH ...

Страница 6: ...ontact the service center for repair y y Do not adjust the product while driving Doing so may cause an accident Stop or park your car in a safe place before installing and setting up the product y y Do not install the product in a location where the product can interfere with the driver s field of vision Doing so may cause an accident y y Do not use a damaged or modified power cord Only use the co...

Страница 7: ...k or malfunction y y If smoke or an unusual smell is emitted from the power cord detach the power cord immediately Contact the service center or your distributor y y Keep the terminals of the power cord clean Failure to do so may cause excessive heat and fire y y Use the correct input voltage Failure to do so may cause explosion fire or malfunction y y Plug in the power cord firmly so that it cann...

Страница 8: ...eo may not be recorded y y Excessively tinted windshield glass can distort the recorded video or cause recorded video to be indistinct y y Prolonged use of the product can increase the interior temperature and cause burns y y microSD cards are consumables so replace microSD cards after prolonged use microSD cards may not record video correctly after extended use so check the microSD card s recordi...

Страница 9: ...tart guide Pry tool Double sided tape for the Mounting Bracket Cable clips 5 EA Note y y The illustrations in this manual may differ from the product y y To improve the performance of the product the contents of this manual are subject to change without prior notice y y For more information about the package components and accessories visit the BlackVue website www blackvue com ENGLISH ...

Страница 10: ...detection standby Blinks quickly when i an event is being recorded impact detected ii manual recording has started or iii motion is detected in parking mode Lock button 55 mm 118 5 mm GPS LED GPS is on Recording LED Blinks orange in normal mode Blinks red when i an event is being recorded impact detected or ii manual recording has started Blinks green in parking mode when motion is detected Speake...

Страница 11: ...i Fi Internet LED Direct Wi Fi is on Blinks when connected to the internet Cloud connected Wi Fi Format button Press once to turn on off Wi Fi Press and hold for 5 seconds and once voice instructions start release the button Then press once again to reset the Wi Fi SSID and password or press and hold for 5 seconds to format the microSD card Cover DC in power connector microSD card slot ENGLISH ...

Страница 12: ...s label Default Wi Fi SSID Default Wi Fi password Cloud code QR code y y To remove the dashcam from its bracket press the LOCK button and pull the dashcam out of the mounting bracket y y To insert the dashcam into its bracket push the dashcam into the mounting bracket until it clicks in ...

Страница 13: ...ny foreign matter and clean and dry the windshield before installation Warning y y Do not install the product in a location where it can obstruct the driver s field of vision 1 Turn off the engine Open the cover of the microSD card slot gently push the card into the slot until it locks into place and close the cover ENGLISH ...

Страница 14: ...he angle of the lens by rotating the body of the dashcam We recommend pointing the lens slightly downwards 10 below horizontal so as to record video with a 6 4 road to background ratio 4 Plug the power cord into the cigarette lighter socket and the dashcam 5 Use the pry tool to lift the edges of the windshield trim molding and tuck in the power cord ...

Страница 15: ... this feature is disabled You can enable it from firmware settings and choose to either overwrite them with new event files when the event file storage is full or lock the 50 event files and save the new event files in loop recording storage Please note that formatting the microSD card deletes all the recordings including the locked event files y y The recording LED blinks while recording default ...

Страница 16: ...re and install it on your smartphone 2 Pair your smartphone with the BlackVue dashcam via direct Wi Fi a Unplug the power cable and remove the front dashcam from its mount With the label visible plug in the power cable and wait for the dashcam to start normal recording Press the Wi Fi button once to turn on Wi Fi b Go to your smartphone s Settings then select Wi Fi and make sure Wi Fi is turned on...

Страница 17: ...nd password are printed on the dashcam s label e Open the BlackVue app and select BLACKVUE WI FI Note y y Direct Wi Fi lets you directly connect your smartphone to your dashcam via Wi Fi within a range of 10m y y The BlackVue app is available for devices running Android 4 4 2 and higher or iOS 9 0 and higher y y You can change the Wi Fi SSID and password as described on page 92 and 94 ENGLISH ...

Страница 18: ...n Firmware settings Live View BlackVue SSID File type filter buttons Refresh video list Copy to Internal Memory Video file pop up menu Video list Note y y All images shown are for illustration purposes only Actual app may differ from images shown ...

Страница 19: ...ashcam records in normal mode by default Event When the dashcam detects an impact while in normal or parking mode it switches to event mode and saves an event recording beginning 5 seconds before the event trigger Exceeding the set speed limit will also trigger an event recording Parking In parking mode the dashcam continuously buffers video When motion is detected in the dashcam s field of view i...

Страница 20: ...20170104_150838_NF mp4 Date time 4th January 2017 03 08 38 PM Recording type Normal Camera direction Front camera Note y y Use the buttons to filter the video list by recording type Normal Event Parking and Manual The filter button displays both E Event and I Impact event while parked recordings y y The dashcam requires a constant power source to record in parking mode See Optional accessories on ...

Страница 21: ...en If the displayed time in the recorded videos is incorrect please see Time settings on page 52 or 71 Portrait and landscape display Video file Date Time Speed Model name The vehicle s speed is displayed in the lower left corner of the video Rotate your smartphone or press the rotate button to switch between portrait and landscape display modes ENGLISH ...

Страница 22: ...ne s Settings Wi Fi and connect to your dashcam 2 Open the BlackVue app Select BLACKVUE WI FI and tap the button 3 Rotate your smartphone or press the rotate button to switch between portrait and landscape display modes Note y y When watching Live View via direct Wi Fi map data isn t displayed because your smartphone can t access the internet as long as it is connected to the dashcam s Wi Fi ...

Страница 23: ... start to replace the oldest video files called loop recording so you will always have the most recent video files Copy to Internal Memory To copy individual files to your smartphone tap next to the video you want to copy Select Copy to Internal Memory To copy multiple files to your smartphone in one go tap Select which files to copy or tap to select all files Tap to begin copying ENGLISH ...

Страница 24: ...24 BLACKVUE Managing videos in INTERNAL MEMORY Open the BlackVue app and select INTERNAL MEMORY Tap to see file options You can delete copy or move files change the name of files and share files ...

Страница 25: ... a new folder To create a new folder tap at the top of the screen and select New folder Enter a new folder name and press OK Copying and pasting videos To copy multiple files in one go tap at the top of the screen and select Copy Select which files to copy or tap to select all files Tap to copy the selected files Go to another folder and tap to paste the selected files there To copy individual fil...

Страница 26: ...iles tap next to the video you want to move Select Move Go to another folder and tap to move the file there Renaming a video To rename a video tap next to the video you want to rename Select Change name Enter a new name and tap OK Uploading sharing or emailing a video Tap next to the video you want to share Select Share file Choose the app you want to share with The available options will depend o...

Страница 27: ...rd to turn off the dashcam 2 Open the cover of the microSD card slot 3 To remove the microSD card gently press on the card to release the lock then carefully pull the card out To insert the microSD card gently push the card into the slot until it locks into place and close the cover Open side cover To remove To insert ENGLISH ...

Страница 28: ...shcam 2 Insert the card into the microSD card reader and connect it to a computer 3 Download BlackVue Viewer from www blackvue com Support Downloads and install it on your computer 4 Run BlackVue Viewer To play select a video and click on the play button or double click the selected video ...

Страница 29: ... delete or verify it Settings Format View full screen Switch front rear view Flip upside down Front rear screen mode Flip horizontally Print Fit to playback screen Capture Playback screen Program info Playback speed control Previous frame Play pause Next frame Stop Timeline for hour min sec selection G Sensor information Switch between SD card Viewer and Cloud Viewer Select card Note y y All image...

Страница 30: ...election Capture Playback Screen rear camera Playback Screen front camera Full Screen view Previous frame Timeline for min selection Playback speed control Playback Pause Volume control Next frame Playback time Play next file View upside down Flip horizontally Front Rear screen mode Front Rear reverse view Normal screen size Play previous file Switch between SD card Viewer and Cloud Viewer Format ...

Страница 31: ...y not support 4K UHD or H 265 video playback If you encounter issues please check your computer s video playback capabilities y y Depending on your computer s hardware and software the dashcam videos that are recorded at 60fps may not play smoothly or at higher speeds 2x 4x etc Identify video files by recording type y y Recording type N Normal E Event P Parking mode motion detection M Manual y y C...

Страница 32: ...gger Exceeding the set speed limit will also trigger an event recording Parking In parking mode the dashcam continuously buffers video When motion is detected in the dashcam s field of view it saves a parking recording beginning 5 seconds before the motion detection Manual If proximity sensor is set as a manual recording trigger in the firmware settings touching or waving a finger within 20mm of t...

Страница 33: ...in the recorded videos is incorrect please see Time settings on page 52 or 71 Using BlackVue Viewer View full screen Switch between the front and rear view 2CH Flip upside down Front rear screen mode 2CH Flip horizontally Print image paused Fit to playback screen Capture image paused Playback speed control Previous frame Play pause Next frame Stop Playback time ENGLISH ...

Страница 34: ...ed videos by date hour minute and second using the timeline You can check the impact sensitivity G Sensor information in the line graph Select month Timeline for hour min sec selection G Sensor information Select date Dates with recordings are black Click a date to filter recordings date changes to red and circled ...

Страница 35: ...store the video to the default size y y You can resize the playback frame or the BlackVue Viewer window by dragging the borders y y Full screen view Double click on the video image to enter full screen view Double click again or tap ESC to return to the default view Mac Windows ENGLISH ...

Страница 36: ...PS data of the recorded video in BlackVue Viewer while video is playing back The driving speed and coordinates are displayed above the map frame Note y y GPS data is not recorded during parking mode Map data cannot be displayed for parking mode recordings ...

Страница 37: ...ing a still image from video 1 Double click a file in the file list to play 2 Click the pause button to pause the video 3 Select the capture button to capture the image or the print button to print directly Deleting videos For Windows users 1 Select the video or videos using the checkboxes from the recorded video list 2 Click Delete y y You can also delete individual files by clicking next to a vi...

Страница 38: ...38 BLACKVUE For Mac users 1 Go to BlackVue Record 2 Select the video from the recorded video list 3 Click Move to Trash ...

Страница 39: ...ers 1 Click next to a video in the recorded video list 2 Click Export 3 If you want to extract a segment of a file select Save segment and edit the start and end second points To export without audio select Sound Off 4 Click the OK button ENGLISH ...

Страница 40: ...next to a video in the recorded video list 2 Click Copy to 3 Select the folder in which to copy the file and enter the file name 4 Click the Select folder button y y To copy multiple files at once check the boxes next to the file names and press the Copy to button y y When copying files the segment adjustment and sound off tools are not available ...

Страница 41: ...DR900S 1CH 41 For Mac users 1 Go to BlackVue Record 2 Select the video from the recorded video list 3 Click Copy file name ENGLISH ...

Страница 42: ...e BlackVue Press and hold the Wi Fi button for 5 seconds and once voice instructions start release the button Then press and hold again for 5 seconds to format the microSD card Format using BlackVue Viewer Windows 1 Insert the microSD card into the microSD card reader and connect the reader to your computer 2 Download BlackVue Viewer Windows from www blackvue com Support Downloads and install it o...

Страница 43: ...d connect the reader to your computer 2 Download BlackVue Viewer Mac from www blackvue com Support Downloads and install it on your computer 3 Launch the BlackVue Viewer that is installed on your computer 4 Click the Format button and select the microSD card from the list of drives in the left frame ENGLISH ...

Страница 44: ... y Only use official BlackVue microSD cards Other cards may have compatibility issues PittaSoft Co Ltd will not be held responsible for any problems caused by using another manufacturer s microSD card y y For Windows users To format the microSD card directly from My Computer right click the microSD card drive and select Format Select File system as FAT32 and Allocation unit size as 64KB then click...

Страница 45: ...elect Help Video tutorials Makes sure your smartphone has a stable internet connection 1 Open the BlackVue app 2 Tap and select Firmware download 3 Select your dashcam model and the firmware language and tap OK Note y y Please select the firmware language currently installed in your dashcam Once upgrade is completed you can change the firmware language from dashcam settings as described on page 67...

Страница 46: ...ed on 7 Choose your BlackVue dashcam from the network list The dashcam s default SSID begins with its model number e g BlackVue 8 Enter the password and tap join The default Wi Fi SSID and password are labeled on the dashcam To find them unplug the cables and remove the dashcam from its mount ...

Страница 47: ...sion currently installed on the microSD card is shown first Below it the firmware version you downloaded in step 4 is shown 10 Tap OK to apply the firmware upgrade 11 The dashcam s firmware will be upgraded this may take a few minutes The dashcam needs to reboot to complete the firmware upgrade ENGLISH ...

Страница 48: ... BlackVue dashcam model 1 Insert the microSD card into the microSD card reader 2 Connect the microSD card reader to a computer 3 Launch BlackVue Viewer and click on the About button y y For Mac users click and select About BlackVue from the menu 4 Check the current firmware version of your BlackVue dashcam and proceed only if your version is not the latest one Mac Windows 5 Format the microSD card...

Страница 49: ... firmware upgrade Make sure the power remains on until the upgrade is completed Any power interruption may prevent the firmware upgrade from completing resulting in malfunction Note y y Do not insert or remove the microSD card when the dashcam is turned on Doing so may damage the data and cause a malfunction of the microSD card y y Your saved settings are not affected by firmware upgrade y y The f...

Страница 50: ...ct BLACKVUE WI FI to access the Firmware settings menu 3 After making any changes go back to the Firmware settings menu tap and tap Save and close Caution y y Please backup necessary recordings before changing time video resolution image quality or video segment length settings If any of the aforementioned settings are changed and saved the dashcam will format the microSD card and delete all recor...

Страница 51: ...DR900S 1CH 51 Basic settings ENGLISH ...

Страница 52: ...52 BLACKVUE Time settings Select your time zone to auto sync with GPS time or you can set the time and date manually after enabling Manual time setting ...

Страница 53: ...1 Paris GMT 3 Moscow GMT 8 Singapore GMT 9 Seoul GMT 10 Sydney If you are unsure of your GMT offset please look up your city on https greenwichmeantime com Selecting Daylight saving time will advance the clock by one hour y y When setting the time manually please set to the expected time you will use the BlackVue not the present time ENGLISH ...

Страница 54: ... 265 coded videos depends on your device s hardware and software Older devices may not support 4K UHD or H 265 video playback If you encounter issues please check your device s video playback capabilities y y At 4K UHD 3840x2160 30fps Extreme resolution the image quality is automatically set to Highest Extreme and Video segment length to 1 min These settings can not be changed y y Frame rate may v...

Страница 55: ...ity bit rate Choose between y y Highest 12 Mbit s y y High 10 Mbit s y y Normal 8 Mbit s These are the maximum bit rates when the resolution is set to 4K UHD 3840x2160 30fps Increasing the image quality will increase the size of the video files Loading and copying time will increase accordingly If your phone does not support video streaming at the highest image quality setting please copy the reco...

Страница 56: ... turned off the dashcam does not record in normal mode Automatic parking mode If enabled the dashcam switches from normal mode to parking mode when the vehicle is stationary for 5 minutes Voice recording When turned off the dashcam does not record audio ...

Страница 57: ...newer recordings Impact event recordings during normal and parking mode E and Manual recordings M A maximum of 50 files can be locked Once this limit is reached to lock new recordings please review locked files on the microSD card and free up space or enable Overwrite locked files with new event files when storage is full to allow the oldest locked files to be overwritten Front camera rotation If ...

Страница 58: ...58 BLACKVUE Sensitivity settings ...

Страница 59: ...de to side and front and back When the G sensor detects significant or sudden movement such as an impact or collision it will trigger an event recording You can adjust the sensitivity so minor incidents and bumps don t trigger an event recording To turn off event recordings by impact detection set the G sensor sensitivity to off ENGLISH ...

Страница 60: ...deo and saves a parking recording when motion is detected in the dashcam s field of view You can adjust the sensitivity of the motion detection so minor motion caused by wind or rain doesn t trigger a recording Please take into account your vehicle s surroundings when adjusting the sensitivity ...

Страница 61: ...rn the recording status LED on off Security Normal mode You can turn the security LED on off for normal mode Security Parking mode You can turn the security LED on off for parking mode Wi Fi Parking mode You can turn the Wi Fi LED on off for parking mode ENGLISH ...

Страница 62: ...dashcam reboots automatically once a day if in parking mode at the set time for improved stability If the dashcam is recording at the set time the scheduled reboot is skipped You can enable disable and change the time for scheduled rebooting Default time is 03 00 am Speed alert Set a speed limit up to 300 km h or 200 MPH for the speed alert When the vehicle exceeds the specified speed limit the da...

Страница 63: ...ou turn on the dashcam and remain on If you disable the Cloud service you will be able to adjust the Wi Fi auto turn on off setting ON OFF Wi Fi auto turn on Wi Fi turns on when the dashcam turns on Wi Fi does not turn on when the dashcam turns on Wi Fi auto turn off Wi Fi turns off if it is inactive for 10 minutes Wi Fi does not turn off automatically You can also press the physical Wi Fi Format ...

Страница 64: ...64 BLACKVUE Cloud settings Enable Cloud service Turn on to use the Cloud service If you don t use the Cloud service you can turn it off ...

Страница 65: ... portable hotspot and work Choose your Wi Fi hotspot from the list and enter the password Tap 2 and 3 to add settings for additional hotspots Your BlackVue will try to connect to hotspot 1 first If it cannot connect to hotspot 1 it will then try to connect to hotspot 2 and then hotspot 3 ENGLISH ...

Страница 66: ...66 BLACKVUE Push notification settings You can customize when you want to receive push notifications ...

Страница 67: ...DR900S 1CH 67 FW Language You can change the Firmware language of your dashcam ENGLISH ...

Страница 68: ...ng settings using your computer Windows Mac Click on the Settings button Windows or the menu mac OS to open the BlackVue settings panel You will be able to change most of the BlackVue settings to customize its operation ...

Страница 69: ...erface from the dropdown list Speed unit on map Change the speed unit displayed on the map Select map service Change the mapping service used Use video accelerator If you experience synchronization issues when playing front and rear recordings at the same time we recommend you enable the video accelerator ENGLISH ...

Страница 70: ...he selected language Caution y y Please backup necessary recordings before changing time video resolution image quality or video segment length settings If any of the aforementioned settings are changed and saved the dashcam will format the microSD card and delete all recordings stored on the card including locked event files in order to ensure optimal performance ...

Страница 71: ...es of GMT time offsets are GMT 7 Los Angeles GMT 4 New York GMT 0 London GMT 1 Paris GMT 3 Moscow GMT 8 Singapore GMT 9 Seoul GMT 10 Sydney If you are unsure of your GMT offset please look up your city on https greenwichmeantime com Selecting Daylight saving time will advance the clock by one hour y y When setting the time manually please set to the expected time you will use the BlackVue not the ...

Страница 72: ...streaming Video Codec Choose between H 265 HEVC and H 264 AVC y y H 265 HEVC is recommended particularly for 4K UHD resolution recording In comparison to AVC HEVC offers about double the data compression ratio at the same level of video quality However older devices may not support HEVC video playback y y H 264 AVC can be chosen for compatibility with older desktop and mobile devices Image quality...

Страница 73: ...ng When turned off the dashcam does not record in normal mode Automatic parking mode If enabled the dashcam switches from normal mode to parking mode when the vehicle is stationary for 5 minutes Voice recording When turned off the dashcam does not record audio Date time display Turn on off the date and time display on videos Speed unit Select km h MPH or turn off Video segment length Choose betwee...

Страница 74: ...ecordings M A maximum of 50 files can be locked Once this limit is reached to lock new recordings please review locked files on the microSD card and free up space or enable Overwrite locked files with new event files when storage is full to allow the oldest locked files to be overwritten Front camera rotation If you installed the front camera in a flipped position use this setting to rotate the fr...

Страница 75: ...and down side to side and front and back When the G sensor detects significant or sudden movement such as an impact or collision it will trigger an event recording You can adjust the sensitivity so minor incidents and bumps don t trigger an event recording To turn off event recordings by impact detection set the G sensor sensitivity to off ENGLISH ...

Страница 76: ...ensitivity of the motion detection so minor motion caused by wind or rain doesn t trigger a recording Please take into account your vehicle s surroundings when adjusting the sensitivity Advanced sensitivity settings for normal and parking mode Advanced sensitivity settings allows you to fine tune the event recording G Sensor threshold while watching pre recorded G Sensor data and video as a refere...

Страница 77: ... to use as a G Sensor data reference 3 Set the thresholds by adjusting the control bars next to each G Sensor axis Any G Sensor data that crosses over the threshold on any of the 3 axes will trigger an Event recording Event recording will occur No event recording will occur 4 Click Save and close ENGLISH ...

Страница 78: ...78 BLACKVUE System settings LED Recording status You can turn the recording status LED on off Security Normal mode You can turn the security LED on off for normal mode ...

Страница 79: ...u want to hear Impact detected in parking mode Notifies when exiting parking mode if an impact had been detected during parking mode however it ignores any impact detected within three minutes before exiting parking mode Volume You can adjust the volume of the voice guidance announcements Scheduled Reboot The dashcam reboots automatically once a day if in parking mode at the set time for improved ...

Страница 80: ...hcam beeps and switches to event recording After saving one event recording file the dashcam switches back to normal mode recording User text overlay You can create a user text overlay of up to 20 characters using a combination of English letters A Z a z numbers 0 9 and symbols _ The text is overlaid in the top left corner of the recorded videos ...

Страница 81: ...on when you turn on the dashcam and remain on If you disable the Cloud service you will be able to adjust the Wi Fi auto turn on off setting ON OFF Wi Fi auto turn on Wi Fi turns on when the dashcam turns on Wi Fi does not turn on when the dashcam turns on Wi Fi auto turn off Wi Fi turns off if it is inactive for 10 minutes Wi Fi does not turn off automatically You can also press the physical Wi F...

Страница 82: ...82 BLACKVUE Cloud settings Enable Cloud service Turn on to use the Cloud service If you don t use the Cloud service you can turn it off ...

Страница 83: ...t cannot connect to hotspot 1 it will then try to connect to hotspot 2 and then hotspot 3 Push notification settings You can customize when you want to receive push notifications Applying the settings You can automatically apply the configuration by inserting the microSD card into the BlackVue dashcam and turning it on Configure the settings before using the dashcam To reset the settings in the cu...

Страница 84: ...smartphone anywhere anytime Connect to BLACKVUE CLOUD Optional If you don t have a mobile Wi Fi hotspot or if you don t want to use the BLACKVUE CLOUD service you can skip this step If you have a mobile Wi Fi hotspot also known as a portable Wi Fi router a car embedded wireless internet network or a Wi Fi network near your car you can use the BlackVue app to connect to BLACKVUE CLOUD and see in re...

Страница 85: ... and line up the QR Code on your smartphone s screen The QR code can be found labeled on the front camera when you remove it from its mount or Manual registration Enter your camera s Serial number and Cloud code and press Register v The app will ask for your permission to access your dashcam s GPS data If you allow access the app will be able to show you your dashcam s location and speed If you do...

Страница 86: ...ial or go to the main menu and select Help Video tutorials i Make sure your BlackVue dashcam and mobile Wi Fi hotspot are on ii Pair your smartphone with the BlackVue dashcam via direct Wi Fi iii Open the BlackVue app Select BLACKVUE WI FI Cloud settings iv Ensure Enable Cloud service is on Select Cloud service hotspot settings ...

Страница 87: ...ose your Wi Fi hotspot from the list and enter the password Tap 2 and 3 to add settings for additional hotspots Once done tap OK Note y y Up to 3 Wi Fi hotspot SSIDs can be saved e g home portable hotspot and work ENGLISH ...

Страница 88: ...t Select BLACKVUE CLOUD from the main screen to access all of the Cloud features Note y y You can also change the dashcam settings through BLACKVUE CLOUD by tapping next to your camera name and selecting Camera settings y y For more information about using the BlackVue app please refer to the manual by going to the main menu and selecting Help App manual ...

Страница 89: ...ideo while the engine is turned off a hardwiring kit such as the Power Magic Pro is required The Power Magic Pro powers your dashcam when the engine is off by hardwiring it to the automotive battery A low voltage power cut off function and a parking mode timer protect your vehicle s battery from discharge Dashcam Power Magirc Pro Fuse Panel ENGLISH ...

Страница 90: ...tery you can install a parking mode battery pack The Power Magic Battery Pack B 112 powers a single dashcam for up to 12 hours after 1 hour of rapid charging When the engine is off the battery pack powers the dashcam When the engine is on the dashcam is powered directly from the vehicle s battery and the battery pack charges ...

Страница 91: ... following methods On device Wi Fi SSID and password reset Press and hold the Wi Fi button on the dashcam for 5 seconds and once voice instructions start release the button Then press once again to reset the Wi Fi SSID and password to default The default Wi Fi SSID and password can be found labeled on the dashcam when you remove it from its mount ENGLISH ...

Страница 92: ...nly when the dashcam is ON and connected to the internet Cloud A blue colored icon means the dashcam is connected to the Cloud while a grey colored icon means that the dashcam is not connected to the Cloud 3 Tap next to your camera name and select Camera settings Firmware settings Wi Fi Login credentials You can change the camera s SSID and Wi Fi login password ...

Страница 93: ...DR900S 1CH 93 4 Go back to the Firmware settings menu tap and tap Save and close ENGLISH ...

Страница 94: ...ct it to a computer 3 Launch BlackVue Viewer You can download BlackVue Viewer from www blackvue com Support Downloads and install it on your computer 4 In BlackVue Viewer click on the Settings button Windows or the menu macOS to open the BlackVue settings panel 5 Click the Firmware tab then the Wi Fi tab and under Login credentials change the password 6 Click Save and close ...

Страница 95: ...ck or a Parking Mode Hardwiring Kit Power Magic Pro is required Camera 8 Megapixel CMOS Sensor Viewing Angle Diagonal 162 Horizontal 136 Vertical 77 Resolution Frame Rate 4K UHD 3840x2160 30fps Extreme 4K UHD 3840x2160 30 fps Full HD 1920x1080 60 fps Full HD 1920x1080 30 fps Frame rate may vary during Wi Fi streaming Video Codec H 265 HEVC H 264 AVC Image Quality Highest High Normal Video Compress...

Страница 96: ... super capacitor Input Power DC 12 V 24 V DC Plug Ø3 5 x Ø1 35 MAX 1 A 12 V Power Consumption Avg 280 mA 3 36 W at 12 V when GPS is On and Wi Fi is Off Avg 260 mA 3 12 W at 12 V when GPS and Wi Fi are Off Actual power consumption may vary depending on use conditions and environment Operation Temperature 20 C 70 C 4 F 158 F StorageTemperature 20 C 70 C 4 F 158 F High Temperature Cut Off Approx 75 C...

Страница 97: ...HR 40 MIN 64GB Highest Extreme 5 HR x x x Highest x 10 HR 20 MIN 10 HR 20 MIN 10 HR 20 MIN High x 12 HR 12 HR 12 HR Normal x 15 HR 20 MIN 15 HR 20 MIN 15 HR 20 MIN 128GB Highest Extreme 10 HR x x x Highest x 20 HR 40 MIN 20 HR 40 MIN 20 HR 40 MIN High x 24 HR 24 HR 24 HR Normal x 30 HR 40 MIN 30 HR 40 MIN 30 HR 40 MIN Bitrate Mbps Highest Extreme 25 x x x Highest x 12 12 12 High x 10 10 10 Normal ...

Страница 98: ...he government or the local authorities Contact local authorities to learn about disposal and recycling options available in your area 2 The correct disposal of your BlackVue dashcam will help prevent potential negative consequences for the environment and human health 3 For more detailed information about disposal of your BlackVue dashcam please contact your city office waste disposal service or t...

Страница 99: ...visit www blackvue com You can also email a Customer Support expert at cs pittasoft com Copyright Trademark y y This instruction manual is protected by Copyright Law and all rights to it are protected by law y y It is prohibited to reproduce copy modify or translate this instruction manual without permission BlackVue is the registered trademark of Pittasoft Co Ltd Pittasoft Co Ltd reserves all rig...

Страница 100: ...FCC ID YCK DR900S 2CH HVIN DR900S 1CH IC 23402 DR900S2CH 2018 DR900S 1CH ...

Отзывы: