background image

Using for Capture and Playback

Installation for Capture and Playback

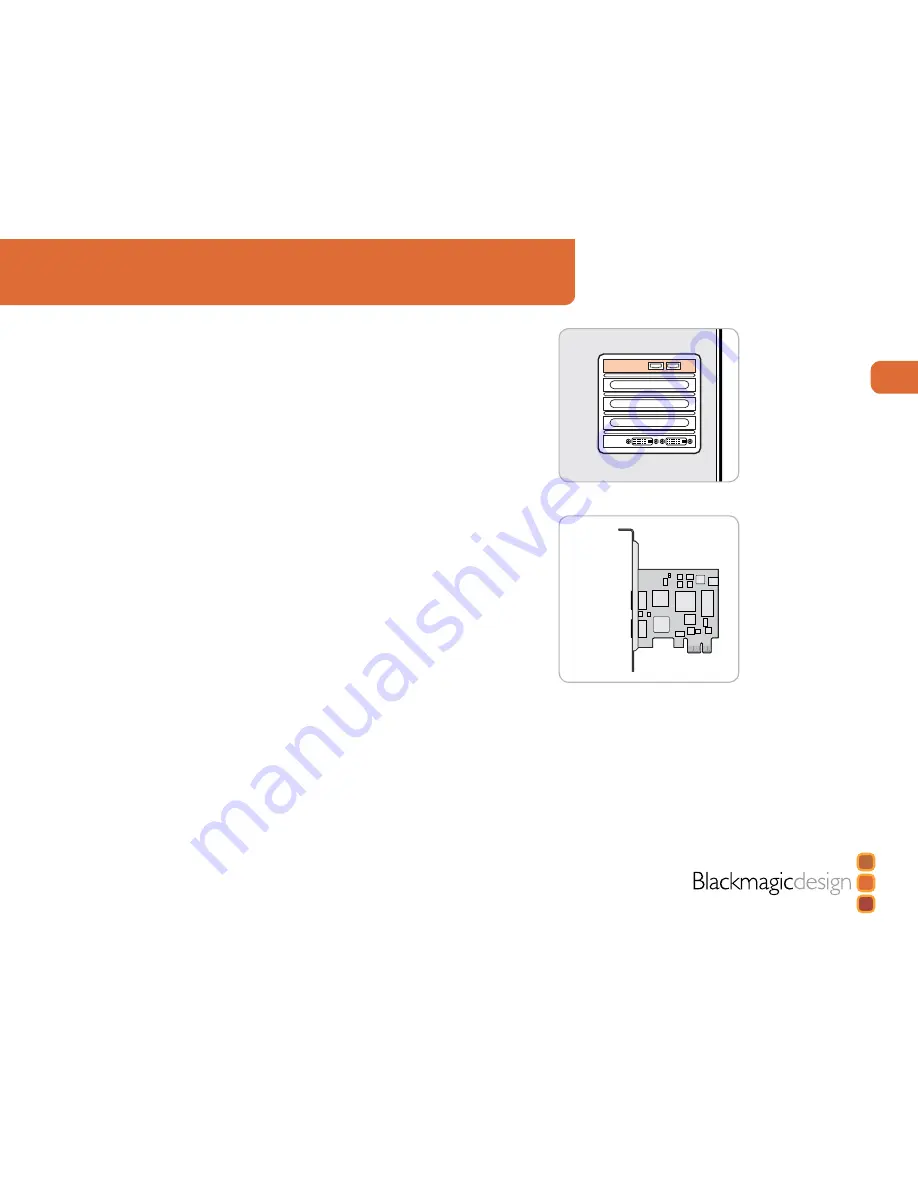
Connecting to your PCIe Mac or PC

1.  Shut down and remove the power plug from the back of your computer. This is a safety precaution 

before opening your computer. Ensure that you are statically discharged by using a static strap.

2.  Remove the side cover of your computer to gain access to the PCI Express slots.

3.  Remove your Intensity card from the protective static bag making sure you don’t touch the gold 

connectors on the base of the card. 

4.  Find a spare PCI Express slot within the computer, any slot will do. Intensity is a PCI Express 1 

lane card and is compatible with 1,4,8 and 16 lane PCIe slots. Remove the metal port access 
cover and it’s screw from the back of your computer.

5.  Insert your Intensity PCI Express card and ensure it clicks firmly into place. 

6.  Secure the card with a screw and replace the side cover of your computer. 

7.  Connect HDMI devices, such as HDV cameras to Intensity’s HDMI input.

8.  Connect HDMI compatible large screen televisions or projectors to the HDMI output.

Note

: This is also a great time to install disk arrays and extra memory into your computer.

Connect HDMI devices.

Video Out

Video In

Connect HDMI devices.

Содержание Intensity

Страница 1: ...Intensity Operation Manual Mac OS X December 2006 Windows XP ...

Страница 2: ... for Capture and Playback 5 Third Party Applications 8 Blackmagic Design Applications 15 Supported File Formats 22 Troubleshooting 23 Connection Diagrams Typical Intensity Setup 24 Connecting to an HDMI HDTV 25 Monitoring using Intensity 26 Setup for Blackmagic On Air 27 Warranty 12 Month Limited Warranty 28 ...

Страница 3: ...o available to all of us so now your creative abilities can make you the world s best We are really excited about what you ll do with your new Intensity The instruction manual you re reading now contains all the information you ll need for installing your Intensity card plus extra instructions on using it as a powerful HDMI based editing design and effects solution Please take the time to check it...

Страница 4: ...ge detail If you need lower data rate editing you can also select from a range of professional compressed video capture modes Intensity includes the same Blackmagic Design video technology used on Hollywood feature films so quality won t limit your creativity Professional video standards Instantly switch between HD and SD video standards including HDTV 1080i 59 94 1080i 50 720p 59 94 720p 50 NTSC ...

Страница 5: ...Find a spare PCI Express slot within the computer any slot will do Intensity is a PCI Express 1 lane card and is compatible with 1 4 8 and 16 lane PCIe slots Remove the metal port access cover and it s screw from the back of your computer 5 Insert your Intensity PCI Express card and ensure it clicks firmly into place 6 Secure the card with a screw and replace the side cover of your computer 7 Conn...

Страница 6: ... Make sure that your applications such as Adobe Premiere Pro and QuickTime are installed before running the Intensity installer Intensity software 1 The CD supplied with your Intensity contains the Intensity software Before you install check you have the latest driver Visit www blackmagic design com support software 2 Open the Intensity Installer folder and launch the Intensity Installer applicati...

Страница 7: ...ity installer If you want to use the included On Air software for live mixing you will need to install two Intensity cards as one is used for each of the two connected HDMI cameras Intensity software 1 The CD supplied with your Intensity contains the Intensity software Before you install check you have the latest driver Visit www blackmagic design com support software 2 Open the Intensity Installe...

Страница 8: ...atches the format of your project e g NTSC 8 bit Take your media from within your Premiere Pro project and drop it into the timeline You should now see the image on both your computer desktop and your Intensity HDMI output If you can t see any video on your Intensity output check the HDMI connections again Note Your HDMI display needs to be powered on before starting your PC If necessary restart y...

Страница 9: ...Preferences Audio Hardware You can also select the mix of the multi channel audio from this menu Device Control Selection of the Serial Device Control is configured via Edit Preferences Device Control Options Protocol Refer to your camera or deck manual for information on which protocols it supports Port The Firewire port will appear in the list of available communication ports Time Source It is r...

Страница 10: ...up ForeachTVformat NTSC PALandHDTV youwillfindarangeofcompressedanduncompressed file formats you can choose For example if you are working in NTSC format you could choose one of the following Easy Setups Intensity NTSC Uncompressed Intensity NTSC DV The Easy Setup you choose will be dictated partly by the speed of your disk array and partly by whether you already have movie clips in a particular f...

Страница 11: ...ure Intensity detects the display during startup Capture To capture choose File Log Capture Command 8 Your video deck or camera will respond in the same way as a clip in the timeline via the spacebar j k and l keys It is important to set the correct tape number for your clip To immediately capture click the Capture Now button If you wish to log the clip enter the desired in and out points using ei...

Страница 12: ...ton in the Logging tab of the Log Capture window Control C To set handles on the clips go to and choose File Batch Capture Control C Enable the Add Handles box to capture additional frames handles before and after the In and Out points of a clip RT Extreme Real Time Effects Real Time Effects are one of the great features of Final Cut Pro and with your Intensity you are fully compatible with Apple ...

Страница 13: ...rendered to see what it looks like when output as video Create a New Composition Go to the Composition menu and select Composition New Composition Control n for PC or Command n for Mac In the dialogue box select an appropriate television standard from the pulldown menu Click OK For all HD standards select upper field first For NTSC and NTSC DV use 720 x 486 and select lower field first For PAL 720...

Страница 14: ...e Bit Depth and select Capture Image Export an image from Photoshop 1 Select File Export Blackmagic Image Export 2 Select Video Output Format and then Output Image Note Once you have set the options in the Export window each subsequent export will not display the window so you can grab output frames much faster However if you would like to change your export formats hold the Alt key for PC or Opti...

Страница 15: ...ly more fun You re flying by the seat of your pants and you can t help but get emotionally connected to the event you re editing as it unfolds before you Mistakes aren t a problem as you can also record to the video tape in each camera and drop those shots in later Blackmagic On Air is a self contained two camera television studio designed to feature a complete interface within a single applicatio...

Страница 16: ...me program monitoring via the single window interface To capture live video using Intensity 1 Select Preferences Video Format Selecteither720por1080icompressedoruncompressed video and frame rate 2 Select Capture Location For compressed video you can select your internal disk however for uncompressed video you will need to select an external disk array 3 Give your movie a filename 4 Select audio so...

Страница 17: ...dissolve and for 1080i 50 25 frames for a 1 second dissolve Easy A B mode video mixing Blackmagic On Air features two separate modes of mixing which you can select between based on your past experience Easy A B mode mixing is the simplest and is often the method people use first because it s easy to use With Easy A B mode you select one camera on the top row and one on the bottom and then move the...

Страница 18: ...t or create a logo with an alpha channel and save it in a format such as Photoshop TIF or Targa that supports an alpha channel The next page has some instructions on preparing graphics for video keying 2 Drag and drop the logo into the Graphic panel of Blackmagic On Air Your logo will now appear in the bottom left window of Blackmagic On Air 3 To enable the over layed graphic simply select G for g...

Страница 19: ...layer fill it with white and send to the back 3 Duplicate the logo layer 4 Select the bottom logo and apply the minimum filter This will expand the graphic slightly so it keys better 5 Select the layer transparency from the top logo by command or control clicking on the layer thumbnail and click Save selection as channel 6 Flatten and save with alpha channels Your graphic will be in RGBA format fo...

Страница 20: ...king with uncompressed HD video the internal hard disk will not be fast enough You need a high speed disk array These can be purchased pre built or you can build your own using two hard disks for SD or at least eight hard disks for HD The first step is to install and connect the hard disks If you intend to run your disk array as a software stripe you will need to make sure that host RAID is disabl...

Страница 21: ... look at the 8 bit YUV 4 2 2 video sections as intensity uses the 8 bit uncompressed video format Using the Apple Xserve RAID Disk Array When you re working with uncompressed HD video your internal hard disk will not be fast enough In this case you need a high speed disk array such as the Apple Xserve RAID The Apple Xserve RAID works great for both SD and HD when fully populated with 14 disks and ...

Страница 22: ...G Windows XP Frame Size MB per second MB per minute GB per hour 720x486 29 97fps NTSC 5 1 306 17 93 720x576 25fps PAL 4 8 288 16 88 High Definition DVCPro HD Mac OS X 1280x720p 59 94fps 14 837 9 49 1 1920x1080 50i 14 837 9 49 1 1920x1080 59 94i 14 837 9 49 1 High Definition JPEG Windows XP 1280x720p 59 94fps 5 300 17 58 1920x1080 50i 11 660 38 67 1920x1080 59 94i 13 19 791 21 46 36 Uncompressed Vi...

Страница 23: ... Call your reseller Your reseller will have the latest technical updates from Blackmagic Design and should be able to give you immediate assistance We also recommend you check out the support options your dealer offers as they can arrange various support plans based on your workflow requirements Your reseller will also understand your disk array configuration and as disk array problems account for...

Страница 24: ... your computer for use with popular editing and design applications Intensity captures video in real time directly from the HDMI output on HDV cameras and will playback directly to large screen HDTVs or HD projectors for client monitoring and editing Connection Diagrams HDTV Camera Outputs HDMI In HDMI Out ...

Страница 25: ...o input on your HDTV for high definition monitoring Connection Diagrams AUDIO OUT DIGITAL OUT OPTICAL AUDIO VIDEO S VIDEO R L R L AUDIO R L PR PB Y L R IN RGB PC IN AUDIO HDMI IN AUDIO CONTROLS VIDEO IN HD DVD IN IN OUT AUDIO OUT DIGITAL OUT OPTICAL AUDIO VIDEO S VIDEO R L R L AUDIO R L PR PB Y L R IN RGB PC IN AUDIO HDMI IN AUDIO CONTROLS VIDEO IN HD DVD IN IN OUT HDTV with HDMI Intensity ...

Страница 26: ...a large screen HDTV with an HDMI input Intensity can be used to client monitor in either NTSC PAL 4 3 and 16 9 or High Definition 1080i and 720p formats NTSC PAL NTSC PAL 4 3 16 9 Desktop High Definition Desktop Connection Diagrams 1080i 720p ...

Страница 27: ...ackmagic On Air is a live video mixer that uses two Intensity cards This application can live edit between two HDV cameras recording directly to your local disk or external disk array Connection Diagrams Computer Display Camera 2 Camera 1 ...

Страница 28: ...ntatives to install repair or service the product b to repair damage resulting from improper use or connection to incompatible equipment c to repair any damage or malfunction caused by the use of non Blackmagic Design parts or supplies or d to service a product that has beenmodifiedorintegratedwithotherproductswhentheeffectofsuchamodificationorintegration increasesthetimeordifficultyofservicingthe...

Отзывы: