


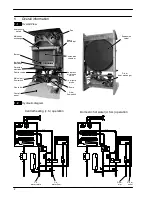

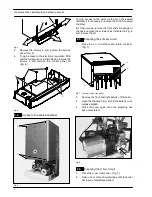
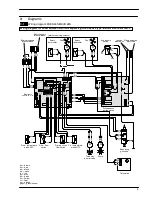


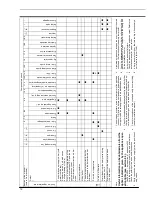


Diagrams
8
bn = brown
bu = blue
bk = black
wh = white
rd = red
gy = grey
gn = green
ye = yellow
vt = violet
og = orange
gnye = green/yellow
Ignition
electrodes
Flame detection
electrode
Safety
thermostat
Electric supply
Fan
Air pressure
switch
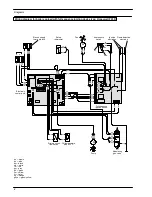
1
2
3
bk
t
bk
bk
bk
M
~
bk
bk
bk
bk
bk
M
~
bk
bk
terminal block
gy bk
Pump
Modulating
Primary circuit
gas valve
flow switch
CH temperature
probe NTC
Electronic
control p.c.b.
Full sequence
ignition device
gnye
gnye
bu
gnye
gy
rd
bu
bu
bn
bu
bn
bn
bu
bn
bu
rd
bu
bn
bn
gn
ye
gn
ye
gn
ye
gnye
gnye
gn
ye
gn
ye
gn
ye
gn
ye bu bn
rd
bu
rd
rd
gy
bn
bu
bu
bu
bn
bu
gy
rd
gn
ye
ye
wh
gn
ye
vt
og
bn
bu
bk
NC
COM
NO
og
ye
bk
wh
vt
bu
bn
bn gn
ye
bu
Wiring diagram for boiler equiped with full sequence ignition device type: Honeywell FPLD
Содержание RIVA PLUS M90S.24S
Страница 2: ......
Страница 43: ...Short spare parts list 41 1 2 6 4 5 7 3 8 15 18 12 13 20 21 22 23 25 26 14 16 24 17 19 9 10 11 9...
Страница 44: ...1796209146 17962 0914 6 3804 44A4 UK...


