background image

   page 6 


        Accessory Installation Guide 


Qt X Controller

Plenum Bracket Installation

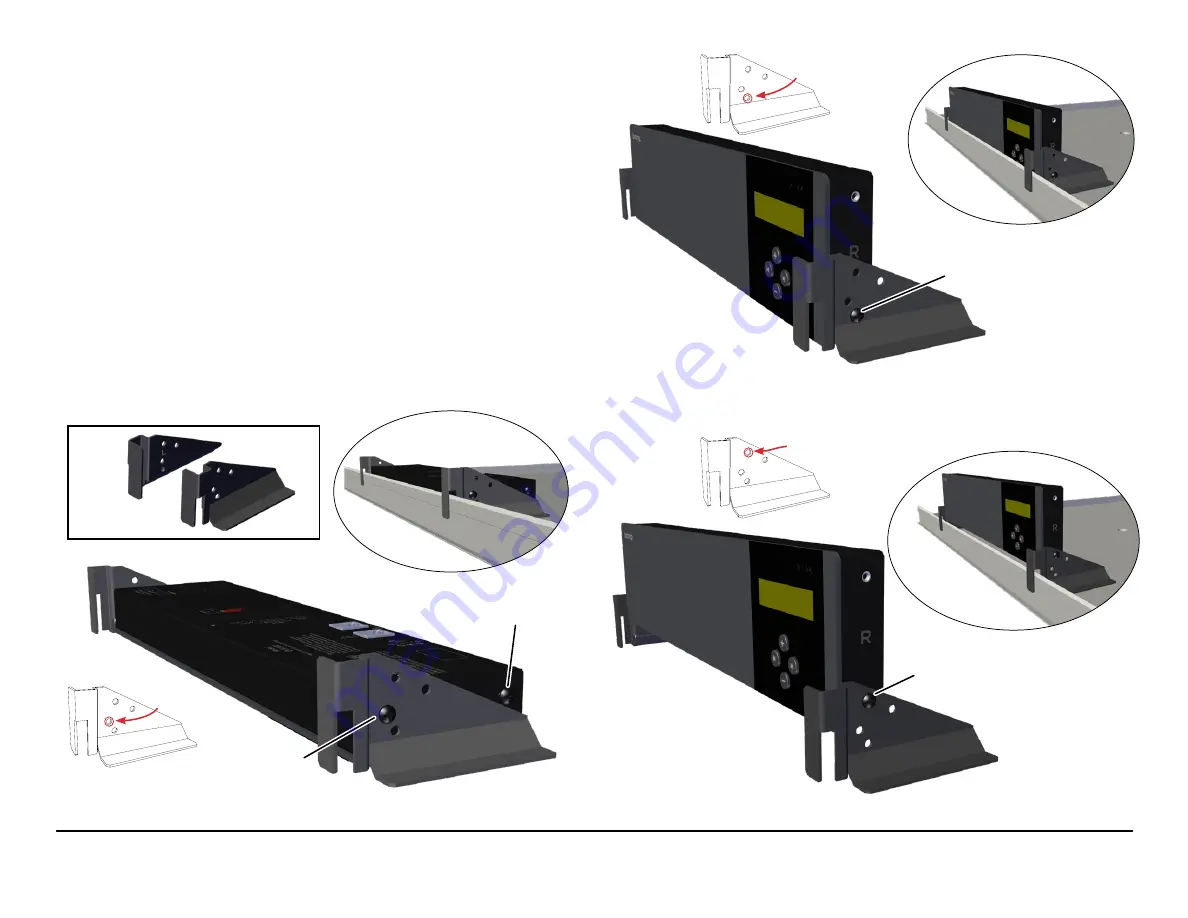
A pair of mounting brackets and M4 screws are included with the plenum bracket kit. 

They can be positioned as shown below in any of 3 configurations to fit over a 

ceiling rail (shown in the smaller inset images). Chose the orientation that best fits 

your application (Figures 12-14). Orient brackets as shown – right (R) and left (L). 
Remove the controller from any other bracket reserving the M4 screws for 

plenum bracket attachment. Secure each bracket with a screw threaded in the 

appropriate hole as noted on the smaller bracket drawing for each configuration. 

Both brackets must be installed in the same configuration to adequately secure 

the panel. Tighten the screws so that the controller doesn't move in the brackets. 
A safety cable may be threaded through any of the open holes to prevent 

movement and/or further secure the unit in the ceiling.  

IMPORTANT NOTES: 

1. 

If the panel is installed in the face down position (below), an additional M4 screw 

must be installed in the lower holes on each side to prevent panel movemen

t. 

2. 

All wiring must be plenum rated if it is installed in a plenum space.  

3. 

The installer is responsible for sourcing and installing the proper safety cable to meet 

all applicable local building codes and standards.

Figure 12.

 Controller is face down against the ceiling tile with an additional M4 

screw on each side to prevent panel movement

Figure 13.

 Base of controller is flush with the bottom of the brackets

Figure 14.

 Controller is raised above the rail

M4 screw

M4 screw

Mount here

Mount here

M4 screw

Additional

M4 screw

Mounting brackets

R

L

Mount here

Содержание Qt X

Страница 1: ...on to change from a rack mount Qt X 805 and install on a wall Plenum Mount Kit Qt X PLMT KT allows a Qt X 300 600 or 805 to be mounted in a plenum space and includes the mounting brackets See instruct...

Страница 2: ...need to have both the wall mount kit and the power supply kit Start with Step 3 1 If necessary remove the existing wall bracket from the controller Figure 1 and reserve the M4 screws to attach the ra...

Страница 3: ...troller Figure 4 The brackets and controller are marked with R L Match the bracket to the appropriate side of the controller 5 Secure the Qt X controller to the rack via the rack ears as shown Figure...

Страница 4: ...rting bracket from the longer R rack mount bracket Figure 7 Reserve the hex nuts for reattachment to the wall bracket Figure 8a Attach bracket and power supply Figure 8b Assembled bracket with power s...

Страница 5: ...out capturing the upper slots in the bracket Figure 9 The control module rotates forward for wall mounting and cable installation Install Wall Mount Bracket continued Figure 10 Mount unit wall bracket...

Страница 6: ...screws so that the controller doesn t move in the brackets A safety cable may be threaded through any of the open holes to prevent movement and or further secure the unit in the ceiling IMPORTANT NOTE...

Страница 7: ...led Plug the power cord into the power supply Do not power the controller until suggested in the installation instructions PoE Class 4 Power Injector Designed to provide power to Qt X 800 800D models...

Страница 8: ...te and accurate at the time of printing However due to ongoing technical advances changes or modifications may have occurred that are not covered in this manual The latest version is available at www...

Отзывы: