background image

   page 21 


Installation and Operation Guide 


Qt X Sound Masking System

Qt X Web Interface

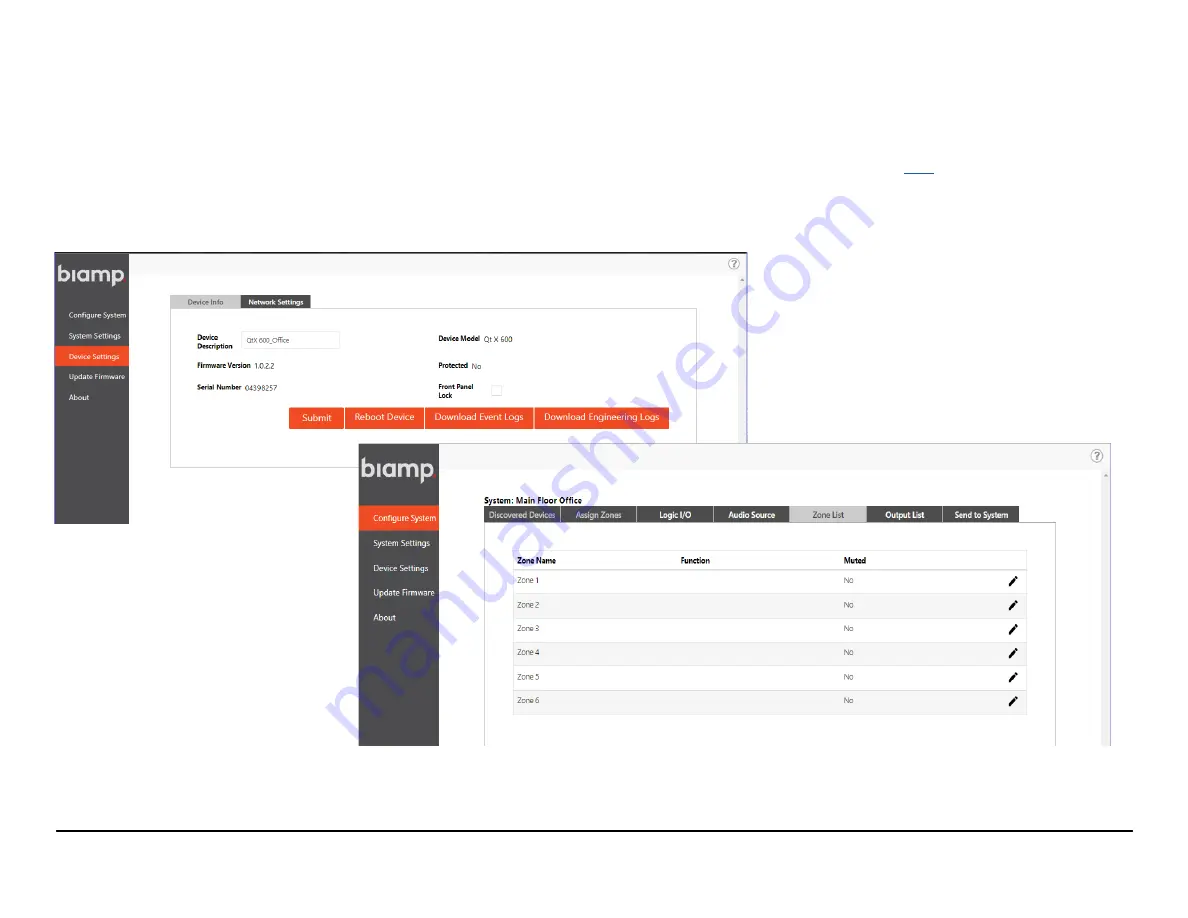
The Qt X Web Interface (or web UI) is a browser-based user interface. This web 

interface allows users to configure sound-masking control devices in a sound-

masking system, configure audio controls and additional functions that comprise 

a biamp sound-masking system. It can be accessed by inputting either the IP 

address or device name of the controller. 

NOTE:

 You must be on-site directly connected to the controller or on the same 

WLAN or subnet that the system is on.    

IMPORTANT: 

Please refer to the web help <

here

> for additional information on 

configuring a system or setting specific items.

Interacting with a Qt X system 

(continued)

Содержание Cambridge Qt X

Страница 1: ...and audio installations of up to 72 000 square feet 6 689 m Outputs can be assigned to a zone and then the zones are adjusted for masking and audio levels and spectra Qt X 300 600 models have preset...

Страница 2: ...ng before installing a system Sound masking is the addition of a specifically tailored frequency signal which is added to a listener s environment to increase speech privacy In open offices the additi...

Страница 3: ...ones as required Assign controller outputs to zones Create music paging Audio Sources and assign to Zones ensure emitter type in use supports audio sources Define behaviors of input and outputs Set zo...

Страница 4: ...t Maximum Number of Standard or Active Emitters Qt X 300 600 Qty 60 per Output run A or B Qty 120 per Output total A B Qty 25 per Injector Output Qty 50 per Injector Qty 100 per paired A B outputs req...

Страница 5: ...Active Both runs on an output are matched in all settings and are detailed on pages 16 18 1 LCD Display The LCD display indicates system statuses and parameters Users may navigate through the display...

Страница 6: ...and rotate forward as shown Figure 3 IMPORTANT If using the wall mount bracket as a template to drill into the wall remove the bracket from the Qt X prior to drilling to avoid getting debris in the Qt...

Страница 7: ...on view of both types Field test each cable after fabrication with the RJ 45 connectors before final installation with a standard network LAN tester to check for continuity shorts and 1 1 straight thr...

Страница 8: ...pin See Figure 5 To instantly mute sound masking connect a two conductor cable to the two contact closure connectors labeled 1 Gnd To use this feature with audio configured as Push to Talk Input 2 on...

Страница 9: ...and GND Switching the output to Active Low indicates the selected zone is unmuted Output Talk Now Provides indication of the state of the Push to Talk Contact Input 2 or any available IO port configu...

Страница 10: ...is as follows Privacy 1 Connect the positive lead of a privacy sign to Pin 1 and GND observe polarity Select a zone in the Zone Name dialog to associate the Privacy light to a specific sound masking...

Страница 11: ...2 For mono unbalanced line level signals connect the positive and negative terminals Place a short jumper wire between negative and GND terminals as shown in Figure 9 2 below 3 For stereo line level...

Страница 12: ...pe of emitter are 60dBA at 1 meter with a sound masking frequency response of 200Hz to 6 3kHz Qt Active Emitter The active emitter is a self powered audio loudspeaker device suitable for sound masking...

Страница 13: ...placement and wiring information on pages 14 18 NOTE For Active Emitters a Qt Power Injector purchased separately will need to be installed directly adjacent to the first emitter Each output on the p...

Страница 14: ...ce sound try the following troubleshooting steps Try a different emitter Test the four 4 previous cables in the run for continuity and shorts Repair or replace faulty cabling If a short is present cir...

Страница 15: ...for the room size Figure 15 10 x 8 room layout with 2 x4 ceiling tiles Telephone Rooms Exam Rooms Mothers Rooms Emitter Spacing It is permissible to install a single emitter in very small spaces to ga...

Страница 16: ...nce 1000 ft 304 8m Qt Passive emitters Room Control QT RC3 Accessory option VERY IMPORTANT Use of the Qt RC3 room control is ONLY recommended for zones broadcasting background music or paging and only...

Страница 17: ...ct and Incorrect Layouts below show runs with Passive emitters the same layout will work for Active Emitter runs with the addition of the power injector prior to the 1st Qt Active Emitter The same emi...

Страница 18: ...here hallway width is less than the emitter spacing used in the open office the space should be either a separate zone or have the DIP switch attenuation applied at the corridor emitters Each corridor...

Страница 19: ...of this FW version number Fault status message Hostname MAC address Control IP Address Control Netmask Control MAC Address Media IP Address Media Netmask Media Zone Audio level Qt X Web Interface onl...

Страница 20: ...configuration needs to be removed erased This can be accomplished within the web interface or in the Qt X software On certain screens the user can modify the values shown 1 Press the down button to e...

Страница 21: ...onfigure audio controls and additional functions that comprise a biamp sound masking system It can be accessed by inputting either the IP address or device name of the controller NOTE You must be on s...

Страница 22: ...e supports audio sources Define behaviors of input and outputs Set zone sound masking levels 42dBA SPL to 48dBA SPL using a calibrated sound pressure meter Measure at 4ft 1 2m Adjust masking spectrum...

Страница 23: ...rated measurement equipment by the qualified installer COMMISSION THE SYSTEM continued Once sound masking levels are optimized for a space it is always recommended to that they remain consistent indef...

Страница 24: ...25 Qt Active Emitters in a single run Emitter Mounting options Universal Bracket AE UB W AE UB B Mount the Qt Active or Passive emitter to a wall or ceiling Beam Bracket AE BB W AE BB B Mount the Qt A...

Страница 25: ...all mount bracket from the controller and reserve the M4 screws to attach the rack mount brackets later Figure 20 2 Disconnect the power supply supporting bracket from the wall mount bracket Figure 21...

Страница 26: ...roller The brackets and controller are marked with R L Match the bracket to the appropriate side of the controller Figure 23 5 Secure the Qt X device to the rack via the rack ears as shown in Figure 2...

Страница 27: ...en the screws so that the controller doesn t move in the brackets A safety cable may be threaded through any of the open holes to prevent movement and or further secure the unit in the ceiling Importa...

Страница 28: ...tters Inserting the room control in line with the cable run counts as two emitters on the run thus decreasing the total run count by two emitter devices Two layouts are presented at right Figure 28 1...

Страница 29: ...________ Netmask control media __________________ _________________ Location _________________________________________________ Admin Name Password ___________________ _________________ Installation Se...

Страница 30: ...page 30 Installation and Operation Guide Qt X Sound Masking System Notes Notes...

Страница 31: ...ados por UL 2043 para su instalaci n en un espacio plenum PELIGRO La fuente de alimentaci n CA CC proporcionada con este producto no se ha evaluado seg n UL 2043 y no debe instalarse en un espacio ple...

Страница 32: ...complete and accurate at the time of printing However due to ongoing technical advances changes or modifications may have occurred that are not covered in this manual The latest version is available...

Отзывы: