EN
32
4. Use
Slightly grease both plates (3 and 4) with edible oil only after having
cleaned (with a damp cloth) and wiped them.
•
Close the upper lid (2) and plug in appliance (red indicator light 6
turned on).
•
After few minutes, the green light (7) will turn on, signalling that the
appliance is ready for use.
•
Open the upper lid (2).
•
Put the slices of bread on the lower plate (3).
•
Close the upper lid (2) and hook it to the lower one through the appo-
site lever (5), Fig. F.
•
Press slightly the upper lid (2) downwards until the lever (5) snaps.
During cooking, the green light (7) will go on and then off to signal
the thermostat is keeping the proper temperature.
It is not possible to lower the lever (5) in the ON position when the
plug isn’t properly connected to the power socket.
•
To open the lids (1 and 2), release the lever (5) and lift the upper one (2).
•
Check the cooking level according to personal taste. After cooking, re-
move the toast from the lower plate (3) using the wooden spatula (not
supplied) to prevent burns.
Avoid the use of sharp metal tools as they might damage the plate
coating.
Attention!
Fire hazard. Do not place the appliance on
tablecloths, paper sheets, etc.
•
After each use, disconnect the plug from the power socket.
Содержание TST04
Страница 9: ...IT 9 A 3 Descrizione del prodotto 11 B 10 8 1 1A 9 2 2A 8 5 4 3 7 6...
Страница 10: ...IT 10 3 Descrizione del prodotto C 8 D...
Страница 11: ...IT 11 E CLICK F 3 Descrizione del prodotto...
Страница 12: ...IT 12 G 3 Descrizione del prodotto min 20cm min 50cm min 20cm H...
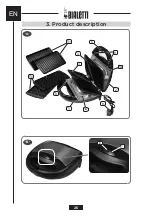
Страница 26: ...EN 26 A 3 Product description 11 B 10 8 1 1A 9 2 2A 8 5 4 3 7 6...
Страница 27: ...EN 27 3 Product description C 8 D...
Страница 28: ...EN 28 E CLICK F 3 Product description...
Страница 29: ...EN 29 G 3 Product description min 20cm min 50cm min 20cm H...
Страница 38: ...Nota Note Notes Nota Nota...
Страница 45: ...FR 45 A 3 Description du produit 11 B 10 8 1 1A 9 2 2A 8 5 4 3 7 6...
Страница 46: ...FR 46 3 Description du produit C 8 D...
Страница 47: ...FR 47 E CLICK F 3 Description du produit...
Страница 48: ...FR 48 G 3 Description du produit min 20cm min 50cm min 20cm H...
Страница 63: ...DE 63 A 3 Beschreibung des Produkts 11 B 10 8 1 1A 9 2 2A 8 5 4 3 7 6...
Страница 64: ...DE 64 3 Beschreibung des Produkts C 8 D...
Страница 65: ...DE 65 E CLICK F 3 Beschreibung des Produkts...
Страница 66: ...DE 66 G 3 Beschreibung des Produkts min 20cm min 50cm min 20cm H...
Страница 80: ...ES 80 A 3 Descripci n del producto 11 B 10 8 1 1A 9 2 2A 8 5 4 3 7 6...
Страница 81: ...ES 81 3 Descripci n del producto C 8 D...
Страница 82: ...ES 82 E CLICK F 3 Descripci n del producto...
Страница 83: ...ES 83 G 3 Descripci n del producto min 20cm min 50cm min 20cm H...


