EN
31
4. Use
POSITIONING AND STARTING
Follow the following precautions when positioning the appliance:
•
Put the appliance on a horizontal surface.
•
Put the appliance so that it is protected against overheating.
•
Plug the power cord into the power socket.
Warnings:
Electric shock hazard in case of use of the
appliance with damaged power cord. Nev-
er start the appliance with damaged power
cord.
Attention!
Burn hazard. The plates heats up quickly
during operation. Do not touch the plate
surface.
While using the appliance for the first time, let it operate empty, until
fumes caused by manufacturing residues burning on the heating re-
sistance have dissipated.
INSTALLATION / DISMANTLEMENT OF THE PLATES
•
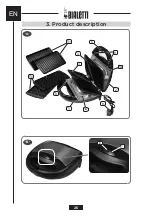
The plates (3, 4, 10, 11) can be removed by pressing buttons (8) (Picture C).
•
To properly position them back, insert the flaps into the appropriate
seats and press the plates to lock them (Picture D).
GETTING STARTED
•
Make sure plates are properly positioned in their seats.
•
Allow the appliance to cool down and disconnect it from power socket
to clean both plates using a damp cloth or a sponge, then wipe them
with a soft cloth.
•
Do not use abrasive materials to clean the plates.
•
Grease the plates with edible oil using a brush.
•
Close the upper lid (2), plug in appliance and allow the appliance to
warm up for about 10 minutes.
It is advisable to make the first toasting with the appliance empty.
Содержание TST04
Страница 9: ...IT 9 A 3 Descrizione del prodotto 11 B 10 8 1 1A 9 2 2A 8 5 4 3 7 6...
Страница 10: ...IT 10 3 Descrizione del prodotto C 8 D...
Страница 11: ...IT 11 E CLICK F 3 Descrizione del prodotto...
Страница 12: ...IT 12 G 3 Descrizione del prodotto min 20cm min 50cm min 20cm H...
Страница 26: ...EN 26 A 3 Product description 11 B 10 8 1 1A 9 2 2A 8 5 4 3 7 6...
Страница 27: ...EN 27 3 Product description C 8 D...
Страница 28: ...EN 28 E CLICK F 3 Product description...
Страница 29: ...EN 29 G 3 Product description min 20cm min 50cm min 20cm H...
Страница 38: ...Nota Note Notes Nota Nota...
Страница 45: ...FR 45 A 3 Description du produit 11 B 10 8 1 1A 9 2 2A 8 5 4 3 7 6...
Страница 46: ...FR 46 3 Description du produit C 8 D...
Страница 47: ...FR 47 E CLICK F 3 Description du produit...
Страница 48: ...FR 48 G 3 Description du produit min 20cm min 50cm min 20cm H...
Страница 63: ...DE 63 A 3 Beschreibung des Produkts 11 B 10 8 1 1A 9 2 2A 8 5 4 3 7 6...
Страница 64: ...DE 64 3 Beschreibung des Produkts C 8 D...
Страница 65: ...DE 65 E CLICK F 3 Beschreibung des Produkts...
Страница 66: ...DE 66 G 3 Beschreibung des Produkts min 20cm min 50cm min 20cm H...
Страница 80: ...ES 80 A 3 Descripci n del producto 11 B 10 8 1 1A 9 2 2A 8 5 4 3 7 6...
Страница 81: ...ES 81 3 Descripci n del producto C 8 D...
Страница 82: ...ES 82 E CLICK F 3 Descripci n del producto...
Страница 83: ...ES 83 G 3 Descripci n del producto min 20cm min 50cm min 20cm H...


