background image

15

6.4  Changing the hydraulic oil


  • Drive the push-block back to start position.  


  • When changing the oil, never let used oil drop down on the ground,    

rather collect whole of it in a sealed container for due disposal. Oil    

disposal containers should be of at least 4 l capacity. 


  • Release and remore the oil dipper rod and pull it without extracting 

the oil gasket (Fig. 6).  


  • Tip the splitter over and set it upright on its wheeks to drain the oil      

out of the pressure lines. (Fig. 7). 

Fig. 6 


  • Then tip the splitter over again till the oil filler is facing up. This is a  

very easy one-man operation!


  • Fill the new oil in (2.7 l) using a new clean funnel.


  • Clean both the dipper rod and the oil gasket making sure that the    

gasket is tightly in place. Worn out gasket should be replaced before    

starting to work again. 


  • Secure the dipper rod tightly in place avoiding to apply excessive    

torque on the screw and therefore to avoid damaging the oil gasket    

and the thread of the cylinder cap. 

Fig. 7

• 

Used oil is very polluting and should be disposed in accor    

dance with local rules! 

Do not spill nor dispose used oil with other domestic waste. 

Checking the oil level  

- Unscrew and pull the dipper rod out, clean the rod and the gasket     

  (broken gaskets to be replaced). 

- Dip the rod back in down to the stop and then pull it out again.


Lower         Upper   Oil gasket  • If the oil level is between the two marks, it means the oil level in-

mark           mark                      the tank is enough. 


• If the level hardly reach the lower mark, then you need to top up

  oil in the tank using a new/clean funnel.  

- Dip and screw the rod back in. 


Содержание THS 5

Страница 1: ...ting the rewood maschine HYDRAULIC LOG SPLITTER THS 5 S dharzer Maschinenbau GmbH Helmestra e 94 99734 Nordhausen Harz Receptionist 03631 6297 0 111 Internet www bgu maschinen de e mail info bgu masch...

Страница 2: ...11 5 4 Hydraulic specs 12 5 5 Operating your log splitter 12 5 6 Splitting tips 12 5 7 Splitting cycle 13 5 8 End of the work 13 6 Repairs and maintenance 14 6 1 Ordinary periodic maintenance 14 6 2 S...

Страница 3: ...the problem or functional trouble is not listed in the troubleshooting chart contained in this manual ask your Au thorized Service Centre for service When you have checked all the possible causes lis...

Страница 4: ...ransport damages must be noti ed within latest 2 days from delivery Therefore delivery must be collected and inspected with in this term Later claims shall be disregarded In case of assumed but not vi...

Страница 5: ...ERVIEW Push block Control push button Lateral log guides Log splitter main parts and controls Cylinder cover Splitter wedge Oil dipper rod Hand guard Electric motor 2 hands control levers Piston rod A...

Страница 6: ...nt or loss of hearing wear a suitable protective device such as ear plugs or goggles 5 Operation safety label It is strictly forbidden to run the machine without its safeties and pro tections to bypas...

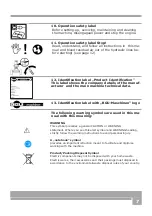
Страница 7: ...Identi cation label with BGU Maschinen logo The following warning symbols are used in this ma nual with this meaning WARNING This symbol precedes a general CAUTION or WARNING statement Where you see...

Страница 8: ...t or wood ash for this purpose Make sure that the equipment stands on a safe stable foundation 4 1 General safety rules Following precautions must be taken at all times Only skilled competent persons...

Страница 9: ...lcohol or other medicaments Keep your workplace tidy and as clear as possible from surrounding obstacles to avoid dangerous situations for your own safety Due and proper illumination of the working si...

Страница 10: ...anty claims in which case the manufacturer will not be responsible for custo mers claims or resulting damages and or injuries 4 4 Electric safety Use IEC power cords 60245 H 07 RN F with at least 2 5...

Страница 11: ...rom surrounding obstacles and slippery foundation oors should be duly treated 5 2 Start up Before you start working with the log splitter inspect the conditions of the connection lines and inspect the...

Страница 12: ...in the machine Then press both control levers down at the same time to operate the ma chine g 1 As you operate both handles concurrently down the push block starts to slide and feed the log completel...

Страница 13: ...s that may damage the machine In this case stop the machine Fig 4 turn the chunk around and try again Clearing logs sticking to the wedge Clear both control buttons and control handle to let the push...

Страница 14: ...ed using a ne grin ding le Makes sure to remode chips and dust before using the splitter again see gure 5 Fig 5 6 3 Hydraulic oil specs Periodically check the oil level inside the hydraulic oil tank W...

Страница 15: ...aking sure that the gasket is tightly in place Worn out gasket should be replaced before starting to work again Secure the dipper rod tightly in place avoiding to apply excessive torque on the screw a...

Страница 16: ...ahead of discarding Certain components need deactivation and dismantling in order to assure that no furtheru se is made by other parties and that no worn out parts are recycledfor other applications...

Страница 17: ...one tted with unau thorized modi cation Any modi cations to your machine can cause personal injuries and will void your Warranty Consumable parts with a prescribed life i e pulleys tools and variousau...

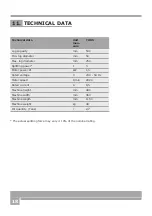
Страница 18: ...ea sure THS 5 Log capacity mm 530 Min log diameter mm 50 Max log diameter mm 250 Splitting power t 5 Motor power P1 kW 1 5 Rated voltage V 230 50 Hz Motor speed 1 min 2820 Rated current A 8 5 Machine...

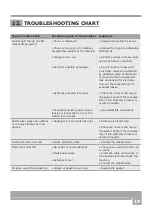
Страница 19: ...r discolora tion Let the manufacturer x eventual leasks Check the oil level and top up if required Contact the manufac turer if the problems remains or occurs frequently Use admissible connections Pus...

Страница 20: ...Seal for air bleed screw 5 Lateral log guide 6 Upper plastic pad 7 Lower plastic pad 8 Connectors 9 Control handle w hand guard 10 Wheels 11 Cylinder Pos Nr Description 12 Piston rod 13 Stop rod 14 Mo...

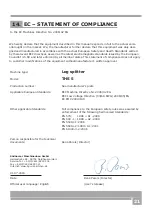
Страница 21: ...further declare that this equipment was duly desi gnedand manufactured in accordance with the actual European Safety and Health Standards settled by therelevant EEC directives as well as the latest e...

Страница 22: ...22...

Страница 23: ...23...

Страница 24: ...harzer Maschinenbau GmbH Helmestra e 94 99734 Nordhausen Harz Service Tel 49 0 3631 6297 104 Fax 49 0 3631 6297 111 Internet www bgu maschinen de Subject to change without notice Form 2008 04 12 2006...

Отзывы: