BGS technic 1893 Скачать руководство пользователя страница 4

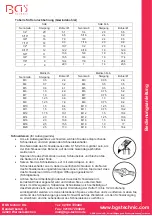
Table for drill hole (tap) 

SAE SAE 

Fein

Nominal Pitch  Drill Ø

Nominal

Pitch

Drill 

Ø

1/4" 20

5,1

1/4

28

5,5

5/16" 18

6,5

5/16

24

6,9 

3/8" 16

7,9

3/8

24

8,5

7/16" 14

9,3

7/16

20

9,8 

1/2" 13

10,7

1/2

20

11,4

9/16" 12

12,2

9/16

18

12,9

5/8" 11

13,6

5/8

18

14,5

3/4" 10

16,5

3/4

16

17,4

7/8" 9

19,4

7/8

14

20,4

1" 8

22,3

1

14

23,5

Metric Metric Fine 

Nominal Pitch  Drill Ø

Nominal

Pitch

Drill 

Ø

M3 0.5

2.4

M3

0.35

2.6

M4 0.7

3.2

M4

0.5

3.5 

M5 0.8

4.1

M5

0.5

4.5 

M6 1.0

4.9

M6

0.75

5.2

M7 1,0

6,0

M7

0,75

6,2

M8 1.25

6.6

M8

1.0

6.9

M9 1,25

7,8

M9

0,75

8,2 

M10 1.5

8.4

M10

1.25

8.6 

M11 1,5

9,5

M11

0,75

10,2

M12 1.75

10.1

M12

1.5

10.4

M14 2.0

11.8

M12

1.25

10.6

M16 2.0

13.8

M16

1.5

14.4

M18 2,5

15,5

M18

1,0

17

M20 2.5

17.3

M18

1.5

16.4

Dies (for external threads) 

x

  To cut an external thread, such as on a bolt, select the correct die for the rod, 

being threaded, the die-stock and cutting-oil. 

x

  The size of the rod or bolt is of great importance. It must not be larger than 

the desired thread and preferably .005" to .010" undersized. An oversized 
workpiece may demage the die and will make turning very difficult. Slightly 
undersized workpieces are easier to thread and furnishes enough thread-
height for normal use. 

x

  After securing the part being threaded, insert the die into the die-stock and 

run the set screw snugly into one of the recesses in the outside surface of the 
die. (The recess and slot pattern of dies allows use with a variety of die 
stocks)

x

  The chamfered side of the die is used for starting the threading operation. 

Always bevel the end of the bolt or rod to be threaded, to make angles 
starting easier. This filed or ground chamfer also helps in starting at right to 
the work, which is of major importance. 

x

  Start the die on the rod with clockwise rotation until it begins leading onto the workpiece. Metal-

chips will flow into the holes provided and should be broken by reversing the direction every 1/4 to 
1/2 revolution, depending on the tightness encountered. Continue this operation until threads of 
the desired length have been cut. Provide proper lubrication to the workpiece while cutting 
threads.

Содержание 1893

Страница 1: ...g ergibt eine unzureichende Höhe der Gewindeflanken eine zu kleine Bohrung führt zu Beschädigung des Gewindebohrers und evt zur Zerstörung des Werkstückes x Stecken Sie den Vierkant des Gewindebohrers zwischen die Spannbacken des passenden Windeisens und spannen Sie ihn fest x Spannen Sie das Werkstück in einen Schraubstock oder befestigen Sie es mit Schraubzwingen Stecken Sie den Gewindebohrer in...

Страница 2: ...4 2 0 11 8 M12 1 25 10 6 M16 2 0 13 8 M16 1 5 14 4 M18 2 5 15 5 M18 1 0 17 M20 2 5 17 3 M18 1 5 16 4 Schneideisen für Außengewinde x Um ein Außengewinde zu schneiden wählen Sie das entsprechende Schneideisen und den passenden Schneideisenhalter x Das Nennmaß des Schneideisens sollte 0 15 0 25 mm größer sein als der Durchmesser des Bolzens auf den das Gewinde geschnitten werden soll x Spannen Sie d...

Страница 3: ...he tool or even the workpiece x Secure the tap by the square in the tap wrench x Fix the workpiece in a bench vise or by using clamps and start threading by turning the wrench in clockwise direction Great care must be taken to start the tap square to the hole As the tap is turned it bites into the metal and leads into the hole x After the tap has been started the metal chips that flow into the flu...

Страница 4: ...er than the desired thread and preferably 005 to 010 undersized An oversized workpiece may demage the die and will make turning very difficult Slightly undersized workpieces are easier to thread and furnishes enough thread height for normal use x After securing the part being threaded insert the die into the die stock and run the set screw snugly into one of the recesses in the outside surface of ...

Страница 5: ...cas échéant une destruction de la pièce x Enfichez le carré du taraud entre les mâchoires de serrage du tourne à gauche adapté et serrez le x Serrez la pièce dans un étau ou fixez la avec des serre joints Enfichez le taraud dans le trou et tournez le dans la matière dans le sens de rotation du filet Veillez à ce que le taraud soit en position verticale x Le taraud coupe alors le filet et rentre da...

Страница 6: ...ropriée ainsi que le porte filière correspondant x La cote nominale de la filière devra être supérieure de 0 15 0 25 mm par rapport au diamètre de l axe sur lequel le filet doit être réalisé x Serrez la pièce dans un étau et cassez les arêtes à l aide d une lime x Insérez la filière le cas échéant avec un adaptateur dans le porte filière de manière à ce que les vis latérales puissent être vissées ...

Отзывы: