BFM Europe Da Vinci Illumia MK2 Скачать руководство пользователя страница 46

5.2

ABOUT YOUR NEW DA VINCI MK2 GAS FIRE 

The Collection “Da Vinci” / “Distinction” MK2 log effect gas fire incorporates a

unique and highly developed fuel bed which gives the realism of a loose log layout 

combined with realistic flames and glow.  The use of durable ceramic material in

the construction of the fuelbed components ensures long and trouble free 

operation.  
Please take the time to fully read these instructions as you will then be able to

obtain the most effective and safe operation of your fire.

IMPORTANT SAFETY INFORMATION

WARNING
This appliance is a heating appliance and as with all heating appliances a

fireguard should be used for the protection of children, the elderly and

infirm.  Fireguards should conform to B.S. 8423 : 2002 (Fireguards for use

with gas heating appliances).

It is important that this appliance is serviced at least once a year by a GAS SAFE

registered engineer.  During the annual service, replacement of the pilot must be

carried out.  

This is a condition of the manufacturers guarantee.

Any debris or

deposits should be removed from the fuel bed from time to time.  This may be 

carried out by referring to the cleaning section as described later in this book.

Only the correct number and type of logs must be used and only 

complete and genuine replacement sets must be used.  Always keep furniture and

combustible materials well clear of the fire and never dry clothing or items either

on or near to the fire.  Never use aerosols or flammable cleaning products near to

the fire when it is in use.

The ceramic fuel bed remains hot for a considerable period after use and

sufficient time should be allowed for the fire to cool before cleaning etc.

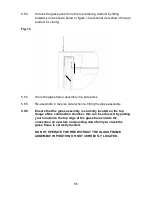
IMPORTANT :  DO NOT UNDER ANY CIRCUMSTANCES USE THIS FIRE IF 

THE GLASS PANEL IS BROKEN, CRACKED OR MISSING.

IMPORTANT : THIS APPLIANCE IS NOT INTENDED FOR USE BY 

PERSONS (INCLUDING CHILDREN) WITH REDUCED 

PHYSICAL, SENSORY OR MENTAL CAPABILITIES, OR 

LACK OF EXPERIENCE AND KNOWLEDGE, UNLESS 

THEY HAVE BEEN GIVEN SUPERVISION OR 

INSTRUCTION CONCERNING USE OF THE APPLIANCE 

BY A PERSON RESPONSIBLE FOR THEIR SAFETY.  

CHILDREN SHOULD BE SUPERVISED TO ENSURE THAT 

THEY DO NOT PLAY WITH THE APPLIANCE. ANY 

ELECTRICAL WORK MUST BE  CARRIED OUT BY A 

COMPETENT, QUALIFIED ELECTRICIAN.

46

Содержание Da Vinci Illumia MK2

Страница 1: ... MK2 CONVENTIONAL FLUE LOG EFFECT GAS FIRE Installation Maintenance User Instructions Hand these instructions to the user Model No DDCL RN2 is only for use on Natural Gas G20 at a supply pressure of 20 mbar in G B I E denotes cosmetic variant ...

Страница 2: ...36 3 3 Fitting the handset wall bracket 36 3 4 Instructing the user product handover 37 3 5 Checking for clearance of combustion 38 products 3 6 Fitting the flue restrictor baffle 39 Section 4 Maintenance 4 1 Removal of the burner assembly 40 4 2 Removal of the control valve 40 41 4 3 Removal of the oxypilot 41 4 4 Removal of the receiver unit 41 4 5 Removal of the convection fan 41 4 6 Replacing ...

Страница 3: ... with fire Supply Voltage 230V a c Supply Frequency 50Hz Supply Fuse 3 Amp to BS 1362 Electrical Supply Required 230v AC 50Hz IP Rating IPX0 Appliance Efficiency Declaration The efficiency of this appliance has been measured as specified in BS 7977 1 2009 A1 2013 and the result is 70 The net calorific value of the fuel has been used for this efficiency calculation The test data from which it has b...

Страница 4: ...himneys and flues 7 B S E N 1858 Chinmeys Components Concrete Flue Blocks 8 I S 813 1996 Domestic Gas Installation Republic of Ireland No purpose made additional ventilation is normally required for this appliance when installed in G B When Installing in I E please consult document I S 813 1996 Domestic Gas Installation which is issued by the National Standards Authority of Ireland If installing i...

Страница 5: ...re place and is clear of any obstruction Any dampers or register plates must be removed or locked in the open position 2 Brick stone built chimneys or any chimney or flue which has been used for an appliance burning fuel other than gas must be thoroughly swept The base of the chimney flue must also be thoroughly cleared of debris etc 3 Any under floor air supply to the fire place must be completel...

Страница 6: ...und must be constructed from suitable non combustible material to produce a correct size opening The fire must be suitably sealed to the fireplace opening to prevent leakage See below in figure 2 When installing into a brick built chimney you must ensure that there is sufficient depth to accomodate any debris which may fall from the chimney This depth must be sufficient to accomodate 12 litres of ...

Страница 7: ...tted with an existing chairbrick without the removal of the chairbrick 1 8 FITTING TO PRE FABRICATED TWIN WALL METAL FLUE BOXES The appliance may be fitted to twin wall metal flue boxes conforming to the constructional requirements of BS 715 The top face of the box must be insulated with a minimum thickness of 50mm of non combustible mineral wool insulation or similar material The flue box must st...

Страница 8: ...ckage of the flue causing a build up of combus tion products in the room in which the fire is operated The following are important warnings relating to this spillage monitoring system 1 The spillage monitoring system must not be adjusted by the installer 2 The spillage monitoring system must not be put out of operation 3 When the spillage monitoring system is exchanged only a complete original man...

Страница 9: ...or baffle fixing screws 3 off bags of vermiculite 1 off Embaglow 4 off nylon wallplugs 4 off 30mm woodscrews 4 off No 12 x 40mm screws 2 2 INSTALLING THE FIRE BOX Establish which type of flue you are intending to install the fire in to 225 x 225mm 9 inch x 9 inch brick built chimneys 175mm 7 inch diameter lined brick or stone flue or insulated pre fabricated metal flue box to B S 715 When installi...

Страница 10: ...g screws as below in figure 4 Fig 4 2 2 2 Secure the glass clamp to the glass panel as shown below in figure 5 to remove See figure 6 overpage which shows how the glass frame is located on the top of the combustion chamber Fig 5 10 Glass clamp Side trim securing magnets Side trim Glass frame retaining screw ...

Страница 11: ...e in reverse order when re fitting the glass assembly 2 2 6 Ensure that the glass assembly is correctly located on the top flange of the combustion chamber this can be achieved by putting your hand onto the top edge of the glass frame inside the convection air aperture and pushing down firmly to check the glass frame is correctly located DO NOT OPERATE THE FIRE WITHOUT THE GLASS FRAME ASSEMBLY IN ...

Страница 12: ...ed to allow access to the burner fixings Remove the 6 off ceramic support retaining screws as shown below in figure 7 Fig 7 2 2 8 Remove the 4 off screws that hold the burner in position see figure 8 below Fig 8 12 Four off burner retaining screws Six off ceramic support retaining screws ...

Страница 13: ...as shown below in figure 9 Fig 9 2 2 10 As shown in figure 9 above the gas supply cover plate should be removed allowing access to the gas inlet valve and pressure test point as shown below in figure 10 Fig 10 13 Main burner injector Gas supply cover plate Gas inlet elbow pressure test point ...

Страница 14: ...ff switch from the inlet channel Unplug the wire from the receiver on the underside of the burner base plate taking care not to damage the wires Fig 11 2 2 12 The gas supply can be routed into the fire from the left see figure 12 below for dimensional information regarding position and route of gas supply pipe Fig 12 Burner base plate held in position by 10 off screws 14 Gas supply route ...

Страница 15: ...e opening to enable the gas supply and fire fixing to be completed There is a choice of methods of fixing the firebox which are provided to enable the installer to deal with any type of installation The preferred method of fixing which is suitable for almost all situations is the cable fixing method which is described in the following section in detail The fire may be secured using the cable metho...

Страница 16: ... this provides maximum travel for the tensioning nut 2 2 21 Fit a screwed nipple on to each of the cables and pull hand tight up against the tensioning screw then secure each nipple with a flat bladed screwdriver 2 2 22 Evenly tighten the tensioning nuts to tension both cables and pull the fire snugly against the wall Do not overtighten it is only necessary to pull the seal up against the sealing ...

Страница 17: ...D VIA A 3 AMP SWITCHED FIXED FUSED SPUR WITH A MINIMUM CONTACT SEPARATION OF 3MM IT MAY HOWEVER BE CONNECTED TO A 3 PIN PLUG TO BS 5733 THAT IS FITTED WITH A 3 AMP FUSE TO BS 1362 2 3 1 The product is supplied with a mains cable and 3 pin plug fitted The mains cable will exit the combustion chamber from the rear left hand side viewed from the front through the grommet If the supply cord is damaged...

Страница 18: ...Remove two screws from fan rear duct and lift the duct clear as shown below in figure 15 Fig 15 2 4 2 Remove two nuts securing fan assembly to base of firebox as shown below in figure 16 Fig 16 Fan duct retaining screws 18 Fan plate fixing nuts ...

Страница 19: ...ections as shown in figure 17 below Fig 17 2 4 4 Remove two screws from electric cover see figure 17 and remove cover feed wiring from lamp assemblies through the grommet in the side of the fire and make connections as shown in figure 18 below Fig 18 Screws for electric cover 19 Lamp connections ...

Страница 20: ...surfaces 2 4 7 Fit the surround up to the point of the shelf infill refer to section 2 6 2 4 8 The surround lamp assemblies are then fitted to the surround using the two nuts provided as shown in figure 20 below 2 4 9 Fit the bulbs provided in the loose items pack as shown below in figure 19 then finally fit the surround shelf Fig 19 Shown from rear for clarity Lamp assemblies Bulbs 20 ...

Страница 21: ...nd will light to high See section 3 2 for full details of the operating method for the fire 2 5 4 Check that the gas pressure is 20 0 mbar 1 0mbar 8 0 in w g 0 4 in w g 2 5 5 Turn off the fire remove the manometer and refit the pressure test point screw Check the pressure test point screw for gas tightness with the appliance turned on using a suitable leak detection fluid or detector PLEASE NOTE T...

Страница 22: ...ection to hearth ensure it is central before fixing with a suitable mastic adhesive 2 6 4 Screw the fixing plates firmly into the rear faces of the legs with the screws and rawlplugs provided 2 6 5 Place the side infills and legs in position using the shelf infill to gauge the correct width Mark the fixing hole positions on the wall remove the legs and side infills cover the hearth with a dust she...

Страница 23: ...elf Infill Section NOTE It is recommended that a spillage test is completed before fixing sealing the fire surround in place R H Infill Section L H Infill Section Shelf Top Section L H Leg R H Leg Hearth Panel Bottom Infill Section Top Infill Section Shelf Infill Section R H Infill Section L H Infill Section ...

Страница 24: ...in figure 22 Fig 22 3 1 2 Fill the edge around the rest of the burner tray with vermiculite as shown below in figure 23 ensure the pilot aperture is kept clear of vermiculite material Fig 23 24 Place a single layer of vermiculite over the burner tray as shown Keep area around the pilot clear of vermiculite material ...

Страница 25: ...bed tray on the right hand side onto the locating pins in the fuel bed tray as shown below in figure 24 Fig 24 3 1 4 Figure 25 below shows Log A correctly positioned on the fuel bed base tray Fig 25 25 Position the holes in the base of Log A onto the locating pins as shown Log A ...

Страница 26: ...nd end of Log A as shown below in figure 25 Fig 25 3 1 6 Fit Log C into position at right hand side of log A as shown below in figure 26 using the location lug in the right hand end of Log A as a guide for placement Fig 26 26 Log B Fitted onto Log A Locating Lug on Log A Log B ...

Страница 27: ...o position using locating lug that fits onto right hand end of Log A as shown below in figure 27 Fig 27 3 1 8 Figure 28 below shows Log C correctly located on Log A Fig 28 Log C Fitted onto Log A Locating Lug on Log A Log C ...

Страница 28: ... shown below in figure 29 using the locating pins in the fuel bed tray as a guide for placement Fig 29 3 1 10 Figure 30 below shows Log D correctly located on the fuel bed base tray Fig 30 28 Position the holes in the base of Log A onto the locating pins as shown Log D ...

Страница 29: ...rning Use only the logs supplied with the fire When replacing the logs remove the old logs and discard them Fit a complete set of logs of the correct type Do not fit additional logs or any logs other than a genuine replacement set This appliance does not contain any component manufactured from asbestos or asbestos related products 29 Four off charred log fragments ...

Страница 30: ...ore attempting to use the handset and the mains electrical connection has been made to the product as per section 2 3 There are 5 modes of operation of the product MANUAL mode TEMPERATURE mode TIMER mode LIGHTING DIMMER mode and CIRCULATING FAN mode 3 2 1 Operation of the Fire in MANUAL mode 3 2 1 1 Locate the ON OFF switch on the appliance it is situated below the convection air grill adjacent to...

Страница 31: ... input and LOW rate heat input by pressing the DOWN arrow on the handset To reduce the flame height of the main burner incrementally press the arrow momentarily To reduce the heat input directly down to the minimum level press the SMALL flame arrow on the handset twice LO will be displayed NOTE The flame will go to HIGH rate heat input before going to designated LOW rate heat input To return back ...

Страница 32: ...E mode there are options for either DAY TEMP or NIGHT TEMP These temperatures can be set independently to allow a higher temperature to be maintained at night than during the day or if setting the same temperature for day and night the fire will compensate for the generally cooler evening temperatures and automatically increase the heat input level accordingly 3 2 2 3 To set the temperature ensure...

Страница 33: ...erature mode to be used 3 2 3 2 Within the TIMER setting mode there are two programmable settings you can make over a 24 hour period namely P1 and P2 To set the timer ensure the handset is in TIMER mode as detailed in section 3 7 3 1 above 3 2 3 3 To set the P1 timed start setting press and hold the SET button until the P1 sun symbol is displayed as per figure 37 below and the time flashes Set the...

Страница 34: ...ights are specified 3 2 4 1 In order to change the mode of operation from MANUAL to LIGHT DIMMER briefly press the SET button to scroll through to the light bulb mode as shown below in figure 39 3 2 4 2 Press and hold the LARGE flame button to turn on the light or increase brightness 3 2 4 3 Press and hold the SMALL flame button to decrease the brightness 3 2 4 4 In the light dimmer mode the OFF b...

Страница 35: ... in figure 40 41 both fan and level icons will flash 3 2 5 2 Press and hold the LARGE flame button to turn on the fan and increase fan speed 3 2 5 3 Press and hold the SMALL flame button to decrease the fan speed see figure 40 41 for fan speed bar indicator 4 bars illuminated maximum fan speed 1 bar illuminated minimum fan speed Fig 40 Fan symbol illuminated Fan speed bars Fan speed bars Fan symbo...

Страница 36: ...batteries as necessary 3 2 7 To Set the Time on the Remote Handset 3 2 7 1 Simultanelously press the UP large flame arrow and DOWN small flame arrow buttons on the remote handset 3 2 7 2 Press the UP large flame arrow to set the hour and the DOWN small flame arrow to set the minutes 3 2 8 To Set the oC 24 Hour or oF 12 Hour Clock 3 2 8 1 Press and hold the OFF and the DOWN small flame arrow button...

Страница 37: ... person into the V module in the base of the fire in accordance with the wiring diagram supplied for the fire on page 43 section 4 8 3 2 10 INSTRUCTING THE USER PRODUCT HANDOVER 3 2 10 1 Instruct the user on the operation of the fire and the handset 3 2 10 2 Hand the glass clamp over and advise the customer to store it in a safe place 37 ...

Страница 38: ...baffle has been fitted it should be removed as shown in section 3 4 and the test repeated after the fire has cooled 3 3 4 If spillage persists the flue is not functioning correctly and a fault exists If after investigation the fault cannot be traced and rectified the fire must be disconnected from the gas supply and expert advice obtained 3 3 5 If there is an extractor fan fitted any where in the ...

Страница 39: ...ied in the loose items pack is secured with 2 off screws to the spigot area of the fire 3 4 2 Fit remove as necessary from the fire as shown below in figure 43 Fig 43 3 4 3 Check the clearance of combustion products after fitting the restrictor plate as shown in section 3 3 39 ...

Страница 40: ...EN DISCONNECTED FROM THE ELECTRICITY SUPPLY ALL ELECTRICAL REPAIR WORK MUST BE CARRIED OUT BY A COMPE TENT QUALIFIED ELECTRICIAN For Diagrams refer to Section 2 4 1 Removing the burner assembly from the fire 4 1 1 Prepare work area lay down dust sheets etc 4 1 2 Remove the glass assembly remove the ceramic logs 4 1 3 Isolate the gas supply and remove the supply pipe from the appliance inlet elbow ...

Страница 41: ...the pilot nut and remove the two screws retaining the pilot assembly Unscrew the thermocouple from the gas valve 4 3 4 Re assemble in reverse order and carry out a gas tightness test 4 4 Replacing the Radio Frequency Receiver 4 4 1 Prepare work area lay down dust sheets etc 4 4 2 The RF receiver is located on the burner unit Remove the RF receiver located in a slide in bracket disconnect the wirin...

Страница 42: ...an plate and lift fan unit clear 4 5 5 Re assemble in reverse order 4 6 Replacing the Batteries in the Handset 4 6 1 Remove and re fit the new 3 off AAA batteries by removing the cover on the back of the handset 4 7 Checking for Flue Debris 4 7 1 Remove the burner assembly as detailed in section 4 1 and remove fan plate assembly 4 7 2 Locate the removeable backplate on the rear face of the firebox...

Страница 43: ...4 8 Wiring Diagram Fig 44 IMPORTANT ALL ELECTRICAL WORK MUST BE CARRIED OUT BY A COMPETENT QUALIFIED ELECTRICIAN 43 ...

Страница 44: ...934 Ignition cable B 128100 NG ODS pilot assy B 172660 Main burner injector Cat 82 size 480 B 153080 2 metre mains cable B 128120 Convection fan B 152930 Wiring loom GV60 control module to convection fan B 186440 Glass panel B 1000658 Complete log set B 1000652 Log A only B 1000656 Log B only B 1000657 Log C only B 1000654 Log D only B 1000661 Pair of Small Log Fragments Charred B 1000662 Pair of ...

Страница 45: ...150mm No purpose made additional ventilation is normally required for this appliance when installed in G B When installed I E please consult document I S 813 1996 Domestic Gas Installation which is issued by the National Standards Authority of Ireland Any purpose made ventilation should be checked periodically to ensure that it is free from obstruction If the chimney or flue has been previously us...

Страница 46: ...Any debris or deposits should be removed from the fuel bed from time to time This may be carried out by referring to the cleaning section as described later in this book Only the correct number and type of logs must be used and only complete and genuine replacement sets must be used Always keep furniture and combustible materials well clear of the fire and never dry clothing or items either on or ...

Страница 47: ...ode 5 3 1 Operation of the Fire in MANUAL mode 5 3 1 1 Locate the ON OFF switch on the appliance it is situated below the convection air grill adjacent to the gas inlet elbow Ensure that the on off switch on the valve is in the ON 1 position as shown below in figure 1 Fig 1 5 3 1 2 The remote handset is now used to control all functions of the fire To light the fire press the UP arrow and and OFF ...

Страница 48: ...dset twice LO will be displayed NOTE The flame will go to HIGH rate heat input before going to designated LOW rate heat input To return back to HIGH rate heat input press the LARGE flame button twice To put the fire in In STANDBY MODE only the pilot remains lit press and hold the SMALL flame arrow on the handset See figure 3 below Fig 3 5 3 1 4 To turn the fire off press the OFF button this will e...

Страница 49: ...ight than during the day or if setting the same temperature for day and night the fire will compensate for the generally cooler evening temperatures and automatically increase the heat input level accordingly 5 3 2 3 To set the temperature ensure the handset is in TEMPERATURE mode and then press the SET button until the TEMP display flashes then let go Proceed to set the desired temperature by pre...

Страница 50: ... can make over a 24 hour period namely P1 and P2 To set the timer ensure the handset is in TIMER mode as detailed in section 5 3 3 1 above 5 3 3 3 To set the P1 timed start setting press and hold the SET button until the P1 sun symbol is displayed as per figure 6 below and the time flashes Set the hour by pressing the UP large flame and set the minutes in ten minute increments by pressing the DOWN...

Страница 51: ...me button to turn on the light or increase brightness 5 3 4 3 Press and hold the SMALL flame button to decrease the brightness 5 3 4 4 In the light dimmer mode the OFF button shuts off the light if you want the light on but no flame press and hold the SMALL flame button and turn to pilot flame NOTE The light bulb is displayed during light dimmer setting only 8 seconds after the light dimmer has be...

Страница 52: ...e button until all 4 speed level bars disappear NOTE 8 seconds after the light dimmer has been set the handset will automatically go into manual mode The fan starts 4 minutes after the gas supply opens from OFF or from pilot at maximum speed and goes to the displayed level after 10 seconds The fan stops 10 minutes after the gas is off or a pilot only standby mode IT IS RECOMMENDED FOR MOST EFFICIE...

Страница 53: ... agents or water Any damaged parts must be replaced by contacting your dealer or telephoning BFM Fires on the number stated on the rear cover of this book Logs must only be replaced with a complete and genuine replacement set and the fire must never be run with the wrong number or damaged logs The fuelbed must be carefully re assembled as stated in the following section CLEANING THE GLASS PANEL To...

Страница 54: ...ass frame securing screws as below in figure 11 Fig 11 5 5 2 Secure the glass clamp to the glass panel as shown below in figure 12 to remove See figure 13 overpage which shows how the glass frame is located on the top of the combustion chamber Fig 12 54 Glass clamp Side trim securing magnets Side trim Glass frame retaining screw ...

Страница 55: ...le in reverse order when re fitting the glass assembly 5 5 6 Ensure that the glass assembly is correctly located on the top flange of the combustion chamber this can be achieved by putting your hand onto the top edge of the glass frame inside the convection air aperture and pushing down firmly to check the glass frame is correctly located DO NOT OPERATE THE FIRE WITHOUT THE GLASS FRAME ASSEMBLY IN...

Страница 56: ...below in figure 14 Fig 14 5 6 2 Fill the edge around the rest of the burner tray with vermiculite as shown below in figure 15 ensure the pilot aperture is kept clear of vermiculite material Fig 15 56 Place a single layer of vermiculite over the burner tray as shown Keep area around the pilot clear of vermiculite material ...

Страница 57: ...bed tray on the right hand side onto the locating pins in the fuel bed tray as shown below in figure 16 Fig 16 5 6 4 Figure 17 below shows Log A correctly positioned on the fuel bed base tray Fig 17 57 Position the holes in the base of Log A onto the locating pins as shown Log A ...

Страница 58: ...sition using the locating lug that fits into left hand end of Log A as shown below in figure 18 Fig 18 5 6 6 Figure 19 below shows Log B correctly located on Log A Fig 19 58 Log B Fitted onto Log A Locating Lug on Log A Log B ...

Страница 59: ...osition using locating lug that fits onto right hand end of Log A as shown below in figure 20 Fig 20 5 6 8 Figure 21 below shows Log C correctly located on Log A Fig 21 59 Log C Fitted onto Log A Locating Lug on Log A Log C ...

Страница 60: ... shown below in figure 22 using the locating pins in the fuel bed tray as a guide for placement Fig 22 5 6 10 Figure 23 below shows Log D correctly located on the fuel bed base tray Fig 23 60 Position the holes in the base of Log A onto the locating pins as shown Log D ...

Страница 61: ...rning Use only the logs supplied with the fire When replacing the logs remove the old logs and discard them Fit a complete set of logs of the correct type Do not fit additional logs or any logs other than a genuine replacement set This appliance does not contain any component manufactured from asbestos or asbestos related products 61 Four off charred log fragments ...

Страница 62: ...nly B 1000661 Pair of Small Log Fragments Charred B 1000662 Pair of Large Log Fragments Charred B 120070 Emba glow material CV 107116 Bag of vermiculite 3 off bags per product Part No B 1000666 Issue 2 BFM Europe Ltd Trentham Lakes Stoke on Trent Staffordshire ST4 4TJ www bfm europe com Telephone General Enquiries 01782 339000 Telephone Service 01782 339008 62 ...

Отзывы: