


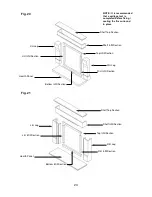


2.6
INSTALLING THE DA VINCI OR DISTINCTION SURROUNDS
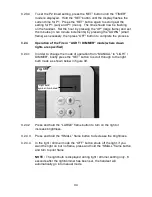
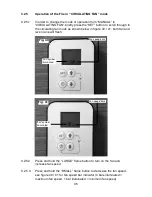
2.6.1
Unpack the surround from the wooden crate, check all parts are present
as per figure 20 (Da Vinci) or figure 21 (Distinction) overpage and
carefully store the components.
2.6.2
The underside of the hearth should be painted with a weak PVA (8 parts
water to 1 part PVA). This will prevent staining penetrating through the
stone. The hearth must be centered to the opening. If the fireplace is
to be installed on a chimney breast ensure that the opening is also
centered to the chimney breast. It is essential that the hearth is
completely level. The hearth must be bedded down on bonding or an
equivalent material. Avoid cement based products and ensure the
hearth is firmly fitted and well supported. Allow the bedding material to
set before any weight is placed onto the hearth. Wipe off any surplus
bonding material with a wet sponge.
2.6.3
Fit bottom section to hearth, ensure it is central before fixing with a
suitable mastic adhesive.
2.6.4
Screw the fixing plates firmly into the rear faces of the legs with the
screws and rawlplugs provided.
2.6.5
Place the side infills and legs in position using the shelf infill to gauge
the correct width. Mark the fixing hole positions on the wall, remove the
legs and side infills, cover the hearth with a dust sheet then drill the
fixing holes and fit the rawlplugs. Fix the side infills into place with
suitable adhesive and replace the legs, securing to the wall with the
fixing brackets.
2.6.6
Fix the top infill and shelf infill into place again with suitable mastic
adhesive.
2.6.7
Fit lamp assemblies into position as detailed in section 2.4.8 & 2.4.9.
2.6.8
Fit shelf into place ensuring it is correctly centered before sealing with
adhesive.
2.6.9
Once the fireplace is correctly installed, grout all of the joints including
between the fireplace and the wall with a water based cream mastic or
tile grout. Ensure all surplus grout is immediately removed by washing
the stonework using a sponge and clean water.
22