


Form Title:
Document #:
INSTALLATION AND MAINTENANCE MANUAL
MM-AD001
(Form: DEF-006A-1)
Revision:
4
Document Title:
Date:
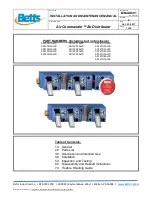
Air Commander™ Air Distributor
Oct. 23, 2017
Page:
7 of 8
Betts Industries Inc.
▪
814·723·1250
▪
1800 Pennsylvania Ave. West
▪
Warren, PA 16365
▪
www.BettsInd.com
Print Date: 10/23/2017
This form is considered uncontrolled 24 hrs. after print date.
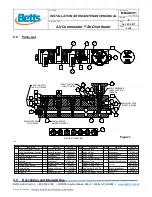
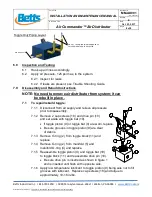
7.2
To repair/rebuild wink
:
7.2.1 Disconnect from air supply and relieve all pressure
prior to disassembly.
7.2.2 Remove 3 cap screws (18) wink piston (14) and
wink spring (7).
7.2.3 Inspect wink piston (14) for damage and be
sure red color is still intact, replace if necessary.
7.2.4 Remove wink O-ring (13) and replace.
7.2.5 Remove manifold O-ring (4) and replace.
7.2.6 Apply low temperature lubricant to wink
piston (14) in the red area, reassemble and
replace cap screws (18) and torque to
approximately 10-16 in-lbs
.
7.3
To repair/rebuild master control
:
7.3.1 Disconnect from air supply and relieve all
pressure prior to disassembly.
7.3.2 Pull up on master control knob (1) and remove master control
assembly (1) by unthreading from master control block (3).
7.3.3 Remove O-rings (2) from master control piston and replace.
7.3.4 Remove cap screws (18) from master control
block (3).
7.3.5 Remove O-ring (2) from manifold (5) and manifold
O-ring (7) and replace.
7.3.6
Reassemble master control block (3) and cap screws
(18) and torque to approximately 10-16 in-lbs
.
7.3.7
Replace O-ring (13) (see EB-1-17) and
apply low temperature lubricant to master
control piston O-rings (2) and removable
thread lock to threads of button holder and
reassemble master control assembly (1)
and torque to approximately 25-30 in-lbs.
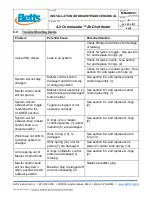
SEE TROUBLE SHOOTING GUIDE ON PAGE 9
18
7
4
14
13
13
2
1
5
18
4
3
2


