


7
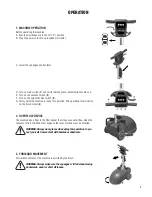
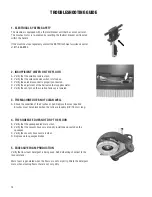
4. SUPPLY POWER FOR THE MACHINE
The machine is supplied with a 50 foot (15.2 m) power cord.
To power the machine, you must:
A. Plug the power cord into a grounded wall outlet.
WARNING: Before plugging in the power cord, place all control
switches in the off (“0”) position!
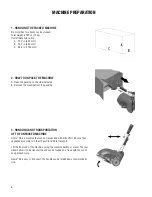
5. HANDLE
The machine is shipped with the handle folded down and must be rotated to an
upright operating position prior to machine use. To raise the handle:
A. Pull the indicated lever upwards.
B. Swing the handle to the upright working position.
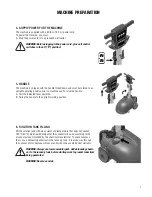
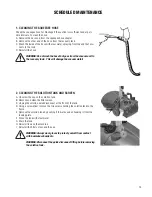
6. SOLUTION TANK FILLING
Fill the solution tank with clean water at a temperature that does not exceed
120°F (50°C). Add liquid detergent at the concentration and according to the
procedures recommended by the chemical manufacturer. To prevent excess
foam, use a defoaming chemical in the recovery tank. If foam passes through
the vacuum motor, damage will occur and will not be covered under warranty.
WARNING: Always use low-foam detergent. Add defoaming chemi-
cal to the recovery tank before starting work to prevent foam from
being generated.
WARNING: Never use acids.
MACHINE PREPARATION
Содержание GENIE CE HD APS
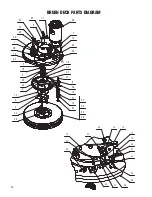
Страница 18: ...18 SQUEEGEE SYSTEM PARTS DIAGRAM 6 3 4 13 14 12 11 5 18 1 7 10 8 8 18 15 16 5 9 5 17 2 9 ...
Страница 20: ...20 SQUEEGEE YOKE PARTS DIAGRAM 4 2 11 13 10 6 7 5 2 6 7 9 14 12 8 3 1 ...
Страница 24: ...24 SOLUTION AND RECOVERY TANKS PARTS DIAGRAM 10 17 8 19 9 11 19 1 18 12 14 15 5 3 7 20 4 2 13 21 22 6 16 ...
Страница 28: ...28 ELECTRIC SYSTEM PARTS DIAGRAM 2 6 4 3 5 3 7 10 2 9 1 8 ...
Страница 30: ...30 ELECTRICAL DIAGRAM ...
Страница 31: ...31 ...


