Best Fitness BFT50 Скачать руководство пользователя страница 33

 33

TrOuBleshOOTing

eRROR cODeS

If a failure occurs with your treadmill, an error code will appear on the main console to help trouble-

shoot the unit. A list of error codes are shown below in the case such an event were to occur. If 

you experience an error code with your treadmill, please unplug your treadmill and contact your 

authorized Best Fitness dealer or a Best Fitness factory-authorized service company or contact 

Best fitness customer service.

E01: 

cOmmUnicatiOn eRROR


E01 occurs when the communication between the console and the motor control board is not 


functioning properly or the the console and/or motor control board are damaged.

         Check the communication line connections first to make sure they are not loose, the cables are 


not pinched or the wires are improperly connected.

         Replace the damaged components if necessary. 

         Turn the power off and on again to reset the treadmill.

e02: nO VOLtage SignaL DetecteD FROm mOtOR

         E02 occurs when the motor control board detects no working voltage from the DC motor power 


cords. Check the connection between motor power and controller.

         Controller board or DC Motor may be damaged.

         Use meter to check the motor control board fuse.

e03: SpeeD SenSOR eRROR


When troubleshooting this error, do not stand on the running mat!

         E03 occurs when the console is not picking up the motor speed signal. 

         In other words,  when the motor speed is not correctly fed back to the motor control board and 


console, the treadmill will shut off to protect the user and E03 will be displayed on the console.

         Check Speed Sensor connection.

         If necessary, replace the Speed Sensor or DC Motor if damaged.

      NoTe

:     

To quickly resolve the e03 error, check that the speed sensor is properly lined up, for cable damage, and the 


 integrity of all connectors. If nothing is wrong, report the e03 error to your service center by making sure you 


 note down the circumstantial details.


 For example:


1.     Is the motor not working when you push the start button and e03 display immediately?


             2.     Does the motor and running belt move when you push the start button but then stop and display an e03?


3.     Is the treadmill stopped and displaying an e03?


4.     If the motor is in operation when e03 is displayed, is the treadmill at low speed (1mph) or high speed 


        (5mph)?

e05: mOtOR OVeRLOaDing


Check if user weight is less than the maximum weight for the treadmill.


E05 occurs when the motor is being overloaded. Test if the operating current is within the rated 


current range.


If necessary, replace the motor control board and/or the drive motor.


If the treadmill is restarted and now displays an E02 error, please refer to the E02 troubleshooting 


section.

e07: SaFetY keY eRROR


E07 occurs when the safety key is not in proper contact position with the console. 


Check for positive contact from safety key to the console.


Check the magnet sensor wires inside the console for a loose connection.


Replace the magnet sensor.

Содержание BFT50

Страница 1: ...BFT50 O w n e r s M a n u a l v 091709...

Страница 2: ...steps VII Setting up your treadmill VIII OPERATING YOUR TREADMILL IX OPERATING THE CONSOLE X EXERCISE TIPS AND GUIDELINES XI Maintenance XII Troubleshooting XIII Troubleshooting Guide XIV HARDWARE XV...

Страница 3: ...improvements specifications and designs are subject to change without notice Even though we have prepared this manual with extreme care neither the publisher nor the author can accept responsibility...

Страница 4: ...tions and product manuals in order to ensure that only superior products are released from our factories Please take the time to carefully read through this manual thoroughly Instructions contained in...

Страница 5: ...or damaged Return the equipment to a service center for examination and repair Never drop or insert objects into any opening in the equipment Always check the unit before each use Make sure that all...

Страница 6: ...up the specific muscle groups you are going to be using This can be as simple as performing a warm up set of high repetitions and light weight for each exercise Always wear appropriate clothing and s...

Страница 7: ...t resistance for electrical current to reduce the risk of electrical shock This product is equipped with a cord having an equipment grounding conductor and a grounding plug This plug must be inserted...

Страница 8: ...sure safety keep young children off the treadmill at all times Exercise equipment has many moving parts In the interest of safety keep others especially children and pets at a safe distance while you...

Страница 9: ...strations only important safety notes and other tips are included in the text Some pieces may have extra holes that you will not use Use only those holes indicated in the instructions and illustration...

Страница 10: ...s from the box onto a clean area NOTE The following tools have been included to ease treadmill setup Allen Wrench M6 x 70 Allen Wrench M5 x 70 Open Ended Wrench M13 M17 B Slide Handle Bar K into Lower...

Страница 11: ...11 S T EP 1 Above shows STEP 1 assembled and completed...

Страница 12: ...Pay attention to not pinch Cable A1 88 or Cable A2 89 when securing Right Upright Post F to Mainframe A Assistance may be required C Slide Vertical Bar H into Right Upright Post F as shown in the diag...

Страница 13: ...13 S T EP 2 Above shows STEP 2 assembled and completed...

Страница 14: ...to Right Upright Post F and secure using Two 59 M5x10 phillips head bolt Two 67 M5 5 arc washer B Slide the remaining Handle Bar K into Left Upright Post G and secure using Two 59 M5x10 phillips head...

Страница 15: ...15 S T EP 3 Above shows STEP 3 assembled and completed...

Страница 16: ...able B1 to Cable B2 88 Connect Cable C1 to Cable C2 98 Connect Cable D1 to Cable D2 98 NOTE Pay attention to not pinch Cable B1 Cable B2 88 Cable C1 Cable C2 98 Cable D1 Cable D2 98 when securing Righ...

Страница 17: ...12 17 S T EP 4 Above shows STEP 4 assembled and completed...

Страница 18: ...ten all assembled hardware from Step 1 Step 5 D Congratulations Your new treadmill is completely installed WHEELCHAIR ACCESS A wheelchair non slip access ramp has been provided with the treadmill User...

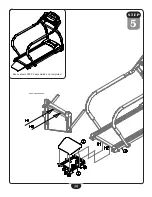
Страница 19: ...19 S T EP 5 Above shows STEP 5 assembled and completed...

Страница 20: ...ll and adjust the tension of the belt Occasionally after extended use you will find a fine black dust below your treadmill This is normal wear and DOES NOT mean there is anything wrong with your tread...

Страница 21: ...ower cord 3 Lift the rear of the treadmill to a comfortable angle 4 Simply roll the treadmill on its front two wheels to the desired location 5 Gently lower the rear of the treadmill to ground level S...

Страница 22: ...thing If the safety key is not in place or not connected properly the console will display an E07 error GETTING ON AND OFF THE TREADMILL Handle with care when getting on or off the treadmill Try to us...

Страница 23: ...only Time Distance Displays Time or Distance every 6 seconds Speed Increase or decrease speed Start Stop Press this button to begin or end a workout Safety Key Used for emergency stopping only This s...

Страница 24: ...he starting speed is 0 1 mph If the treadmill is stopped during a workout at speeds greater than the starting speed upon restart the user set speed will reset to 0 1 mph SPEED BUTTON During operation...

Страница 25: ...displayed on the screen The readout will cycle between TIME and DISTANCE displaying each individual value every 6 seconds The indicator LED beneath the display is illuminated when the current readout...

Страница 26: ...low speeds COOL DOWN Never stop exercising suddenly It is a good idea to end a workout slowly since this will allow your heart to readjust to the decreased demand Use a low speed setting during the co...

Страница 27: ...t See the Safety Guidelines section for more information A novice user should hold onto the extended handrails as the treadmill is starting Straddle the treadmill as it begins to move and use only one...

Страница 28: ...foot than the other This will cause the running belt to eventually run off centered This treadmill is designed and built to ensure proper tracking of the belt and insure it is always centered on the...

Страница 29: ...ckwise loosen IF BELT IS TOO FAR TO THE RIGHT SIDE 1 Turn the right roller bolt turn clockwise tighten 2 Turn the left roller bolt turn counterclockwise loosen RUNNING BELT TENSIONING If you plant you...

Страница 30: ...ve tensioned the running belt and are still experiencing a slipping sensation call your dealer Only an authorized dealer should perform tensioning of the drive belt NOTE Over tightening of the drive b...

Страница 31: ...e evidence of silicone on your hand then additional lubrication should be added A well lubricated deck will ensure longevity of your treadmill in addition to providing you optimal performance 2 19 2 2...

Страница 32: ...horized Best Fitness dealer or a Best Fitness factory authorized service company or contact Best Fitness customer service at one of the following Toll Free 1 800 556 3113 Or write to Best Fitness Phon...

Страница 33: ...ther words when the motor speed is not correctly fed back to the motor control board and console the treadmill will shut off to protect the user and E03 will be displayed on the console Check Speed Se...

Страница 34: ...2 Adjust drive belt tension Problem Potential Cause Correction 1 Not plugged in 1 Plug into grounded outlet 2 Safety key not inserted 2 Insert safety key into console 3 House circuit breaker 3 Reset o...

Страница 35: ...Allen Head Bolt M8x30 Qty 4 48 Allen Head Bolt M10x25 Qty 8 51 Allen Head Bolt M8x15 Qty 1 59 Machine Screw M5x10 Qty 8 54 Socket Head Bolt M8x10 Qty 4 70 Nut M10 Qty 6 71 Nut M8 Qty 4 65 Flat Washer...

Страница 36: ...otor Cover Bracket L R 2 Support Tube PART QTY DESCRIPTION DIMENSION 12 1 Safety Key 13 1 Complete Console 14 1 Motor Cover 15 2 Side Rail 17 1 Rear End Cap L 18 1 Rear End Cap R 21 1 Ramp Non Slip Co...

Страница 37: ...Round Allen Head Bolt M8 x 45 50 4 Hex Head Bolt M8 x 20 51 1 Round Allen Head Bolt M8 x 15 52 1 Allen Head Bolt M8 x 35 53 3 Allen Head Bolt M6 x 50 54 4 Allen Head Bolt M8 x 10 55 4 Round Allen Head...

Страница 38: ...ilter FT7 T31 x 19 x 15 C 87 1 Electromagnetic Filter G6 RH28 x 28 5 x 16 88 1 Control Cable 1500mm 89 1 Control Cable 400mm 90 1 Power Cord 1800mm SVT18AWG x 3C 91 4 Heart Rate Contact 92 4 Heart Rat...

Страница 39: ...39 BFT50 Wiring Diagram...

Страница 40: ...40 Exploded View Diagram...

Страница 41: ...41 Exploded View Diagram...

Страница 42: ...42 Notes...

Страница 43: ...43 Notes...

Страница 44: ...angedesignandspecificationswhenwefeelitwillimprovetheproduct Body Solidmachinesmaintainseveralpatentedandpatentpendingfeaturesanddesigns Allrightsreservedonalldesignpatentsandutilitypatents www BestFi...

Отзывы: