2
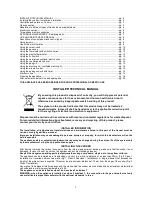
INSTALLER TECHNICAL MANUAL ............................................................................................................... pg. 2
Installing the cooker - Installation information ................................................................................................. pg. 2
Ventilation and aeration of rooms .................................................................................................................... pg. 3
Gas connection ............................................................................................................................................... pg. 3
Adaptation to different types of Gas and burner adjustments .......................................................................... pg. 4
Electric connection .......................................................................................................................................... pg. 6
Three-phase electric connection .................................................................................................................... pg. 6
APPLIANCE MAINTENANCE - Replacing parts ............................................................................................. pg. 7
USE AND MAINTENANCE MANUAL ............................................................................................................. pg. 8
Description of control panel and control types ................................................................................................. pg. 8
Using burners .................................................................................................................................................. pg. 9
Use of the electric plates ................................................................................................................................ pg. 9
Using the ceramic hob .................................................................................................................................... pg. 10
Using the gas oven ........................................................................................................................................ pg. 10
Using the thermostat with switch in series ....................................................................................................... pg. 12
Using the electric thermostat ........................................................................................................................... pg. 12
Using the 9+0 switch ....................................................................................................................................... pg. 12
Using the natural conventional electric oven .................................................................................................. pg. 13
Using the ventilated electric oven .................................................................................................................... pg. 14
Using the gas grill ............................................................................................................................................ pg. 14
Using the electric grill - ventilated electric grill ................................................................................................. pg. 15
Using the minute-minder ................................................................................................................................. pg. 15
Using the analogue clock with timer ................................................................................................................ pg. 15
Electronic timer .............................................................................................................................................. pg. 15
Cleaning the appliance .................................................................................................................................... pg. 16
After-sales technical service and spare parts .................................................................................................. pg. 25
THIS APPLIANCE HAS BEEN DESIGNED FOR NON-PROFESSIONAL DOMESTIC USE.
INSTALLER TECHNICAL MANUAL
By ensuring this product is disposed of correctly, you will help prevent potential
negative consequences for the environment and human health, which could
otherwise be caused by inappropriate waste handling of this product.
The symbol on the product indicates that this product may not be treated as
household waste. Instead it shall be handed over to the applicable collection point
for the recycling of electrical and electronic equipment.
Disposal must be carried out in accordance with local environmental regulations for waste disposal.
For more detailed information about treatment, recovery and recycling of this product, please
contact your local city council office.
INSTALLER INFORMATION
The installation, all adjustments, transformations and maintenance listed in this part of the manual must be
carried out only by skilled personnel.
Improper installation may cause damage to persons, animals or property, for which the manufacture will not be
held responsible.
The appliance safety or automatic adjustment devices may be changed during the service life of the system only
by the manufacturer or by the duly authorised supplier.
INSTALLING THE COOKER
After having removed the various loose parts from the internal and external packing, make sure that the cooker is not
damaged. In case of doubt, do not use the appliance and contact skilled personnel.
Keep all the dangerous packing parts (polystyrene foam, bags, cardboard, staples, etc.) away from children.
The appliance can be installed as a freestanding unit, next to a wall at a distance of no less than 20mm (Fig.2,
Class 1
Installation) or inserted between two walls (Fig.1, Class 2 Subclass 1 Installation). A single sidewall that exceeds the
height of the work surface is possible. This must be at a minimum distance of 70 mm from the edge of the cooker (Fig.2,
Class 1 Installation)
Any walls of the adjacent furniture pieces and the wall behind the cooker must be made with heat-resistant material that
can withstand a minimum overtemperature of 65 K.
The appliance can be installed as class 1 and as class 2 subclass 1.
WARNING: when the appliance is installed as class 2 subclass 1, the connection to the gas network must only
use metal flexible pipes that conform with the national standards in force.
Содержание TU64C61DX
Страница 16: ...16 Fig 1 Fig 2 Fig 3 Fig 4 Fig 5 ...
Страница 17: ...17 Fig 6 Fig 7A Fig 7B Fig 8 Fig 9A Fig 9B Fig 10A Fig 10B ...
Страница 18: ...18 Fig 11A Fig 11B Fig 12 Fig 13 Fig 14 Fig 15 Fig 16 Fig 17 Fig 18 ...
Страница 19: ...19 Fig 19 Fig 20 Fig 21 Fig 22 A Fig 22 B Fig 22 C Fig 23 Fig 24A Fig 24B Fig 24C Fig 24D ...
Страница 20: ...20 Fig 25A Fig 25B fig 26a Fig 26b Fig 26c Fig 26d ...
Страница 21: ...21 Fig 27 Fig 28A Fig 28B Fig 28C Fig 29A Fig 29B Fig 29C Fig 30 Fig 31 Fig 32A Fig 32B Fig 32C ...
Страница 22: ...22 Fig 33 Fig 34 Fig 35 Fig 36 Fig 37 Fig 38 ...
Страница 24: ...310796 ...


