Bernina 570 QE Скачать руководство пользователя страница 91

Practical Stitches

91

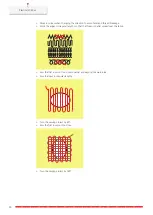
> Sew another loose row.

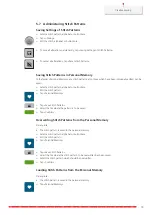
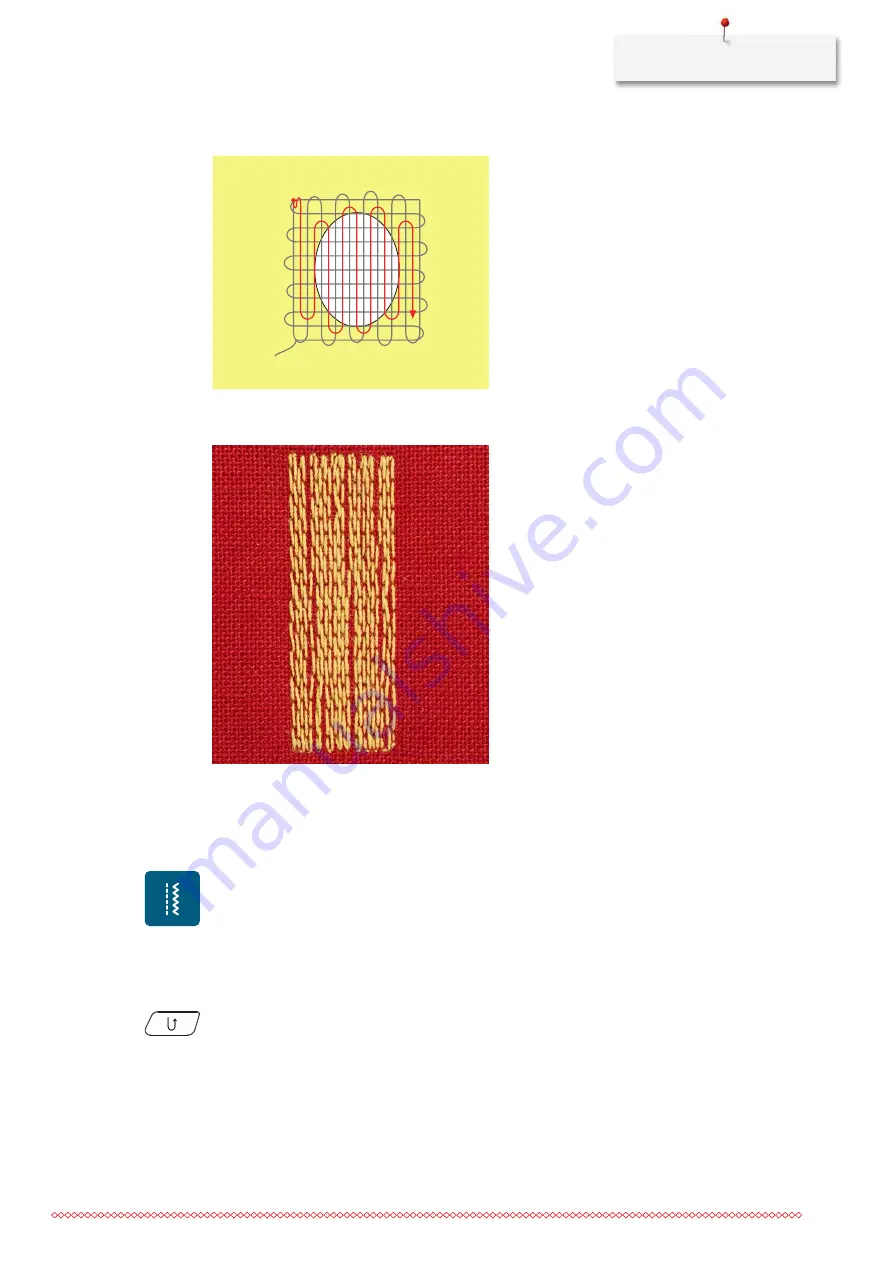
6.9 Automatic Darning

The Simple Darning Program No. 22 is particularly suitable for quick darning of worn areas or tears. It is
recommended to use fine material as a backing for the worn and damaged areas or to stick an adhesive
interlining. The Simple Darning Program No. 22 replaces the longitudinal threads in all fabrics. If the darning
area becomes distorted, correct with the balance.

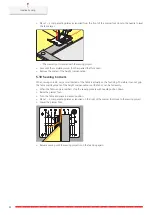
> Fit the Reverse Pattern Foot #1C or Buttonhole Foot with Slide #3A.
> Tap «Practical Stitches».
> Select Simple Darning Program No. 22.
> Hoop light-weight materials in the round embroidery hoop (optional accessory).

– The darning area stays evenly taut and cannot be distorted.

> Start sewing top left.
> Sew the first row.
> Stop the machine.
> Push the button «Quick Reverse».

– The length is programmed.

> Finish sewing the Darning Program.

The machine stops automatically.

Содержание 570 QE

Страница 1: ...BERNINA 570 QE User Manual...

Страница 2: ......

Страница 3: ...focused the highest demands on technique and the ease of use but also considered the design of the product After all we sell our products to creative people like you who do not only appreciate high q...

Страница 4: ...ol Pin 35 Horizontal Spool Pin 36 2 6 Feed Dog 37 Adjusting the Feed Dog 37 2 7 Slide on Table 37 Using the Slide on Table 37 Using the Seam Guide 38 2 8 Presser Foot 38 Adjusting the Presser Foot Pos...

Страница 5: ...ing Pattern Repeat 71 Mirror Image of Stitch Patterns 71 Edit Stitch Pattern Length 71 Programming the Stitch Counter Function 72 Sewing Stitch Patterns Using the Triple Stitch 72 Quick Reverse 72 Per...

Страница 6: ...the Buttonhole Foot with Slide 3A 113 9 9 Determining the buttonhole length with Buttonhole Foot 3C 113 9 10 Sewing a Buttonhole Automatically 114 9 11 Programming the Heirloom Buttonhole 115 9 12 Sew...

Страница 7: ...enter of the Embroidery Design 143 Virtual Positioning of the Embroidery Hoop 143 14 Setup Program 144 14 1 Adjusting the Embroidery Settings in the Setup Program 144 15 Creative Embroidering 145 15 1...

Страница 8: ...dery Speed 162 16 3 Adjusting the Upper Thread Tension 162 16 4 Embroidering via the Foot Control 163 17 Care and Maintenance 164 17 1 Firmware 164 Checking the Firmware Version 164 Updating Firmware...

Страница 9: ...magnifying glass If the LED lamp is damaged or defective have the LED lamp checked or repaired at your local authorized BERNINA dealer Switch off the machine before working in the needle area Before...

Страница 10: ...r Servicing of double insulated products To lubricate the machine only use oil recommended by BERNINA Safety Instructions While operating the machine all protective inserts must be in place and all co...

Страница 11: ...o 0 When protective covers are removed when the machine is oiled or when other cleaning and maintenance operations mentioned in this instruction manual are carried out switch off the machine and disco...

Страница 12: ...insulated Products In a double insulated product two systems of insulation are provided instead of grounding No grounding means is provided on a double insulated product nor should a means for ground...

Страница 13: ...ss it is avoided WARNING Designates a medium risk hazard which can lead to serious injuries if not avoided CAUTION Designates a low risk hazard which can lead to minor or moderate injuries if not avoi...

Страница 14: ...s are assembled with utmost care and are subjected to an extensive functionality test The integrated stitch counter therefore indicates that the machine has already sewn stitches which were performed...

Страница 15: ...can find in the weekly blog of BERNINA Our experts give useful tips and explain step by step how you can achieve the desired result In the community you can upload your own projects and exchange expe...

Страница 16: ...Overview Front Controls 1 2 3 4 5 6 7 8 9 1 Quick Reverse 6 Needle position Up Down 2 Thread Cutter 7 Upper Multi function Knob 3 Presser Foot Up Down 8 Lower Multi function Knob 4 Start Stop 9 Needle...

Страница 17: ...8 Speed Control 2 Bobbin Cover 9 Thread Take up Lever Cover 3 Connection for Accessory Optional Accessory 10 Thread Take up Lever 4 Presser Foot 11 Thread Cutter 5 Needle Threader 12 Fixing Screw 6 S...

Страница 18: ...1 12 6 5 1 Connection for Foot Control 7 Retractable Spool Pin 2 Feed Dog Up Down 8 Air Vents 3 PC Connection 9 Handwheel 4 USB Port 10 Power Switch 5 Spool Pin 11 Connection for Power Cable 6 Bobbin...

Страница 19: ...nding Unit 2 Connection for Slide on Table 10 Bobbin Winder Pretension 3 Connection for Darning Hoop 11 Thread Take up Lever 4 BERNINA Dual Feed 12 Thread Guide 5 Carrying Handle 13 Thread Cutter 6 Sp...

Страница 20: ...s optional accessories Free Hand System FHS To raise and lower the presser foot Slide On Table To increase the sewing surface Seam Guide for Slide On Table To support wide topstitching of edges Spool...

Страница 21: ...tion of the presser foot sole when sliding over thick seams Needle Assortment For any common applications Screwdriver red slot To loosen and tighten slotted screws Brush Needle Inserter To clean the f...

Страница 22: ...1D Reverse Pattern Foot For sewing different practical and decorative stitches To sew forward and in reverse 2A Overlock Foot To finish edges in stretch material 3A Buttonhole Foot with Slide To sew...

Страница 23: ...rk Foot For patchwork and other exact work if working with BERNINA Dual Feed Accessories Box 1 3 4 5 6 8 7 8 2 8 1 Drawer 5 Foam Pad 2 Presser Feet 6 Buttonhole Foot with Slide 3 Spool Pin 7 Needle As...

Страница 24: ...Tension 4 Stitch Plate Needle Selection 2 Presser Foot Indicator Presser Foot Selection 5 Feed Dog Indicator 3 Foot Pressure 6 Bobbin Thread Overview System Settings 2 1 3 4 5 6 7 8 9 1 Sewing Mode 6...

Страница 25: ...inger or stylus Tap Short tap of an element Swipe Tap an element and swipe quickly on the display Draw Tap the display and slowly move in one direction eg for scrolling up and down Navigation Illustra...

Страница 26: ...slider control Reset the value to the default value by tapping the small bullet Field Plus Minus Plus increase Minus reduce the value Yellow Frame Indication that the set value differs from the defaul...

Страница 27: ...e should be replaced regularly Only a perfect point results in a good stitching result In general the thinner the fabric the finer the needle The illustrated needles are either standard or optional ac...

Страница 28: ...s hems and topstitching decorative sewing embroidery patchwork quilting Leather Needle Leather Needle 90 14 100 16 With a cutting point LR special point to sew leather For leather imitation leather an...

Страница 29: ...wear For sewing with special effects and fancy threads especially metallic threads For embroidery with metallic thread For hems and topstitching decorative sewing and embroidery Topstitch Needle 130 7...

Страница 30: ...hank length 1 705 Flat shank 2 H Needle scarf 3 S Needle point here medium ball point 4 70 Needle size 0 7 mm 5 Thread Selection For a perfect sewing result thread and fabric quality play an important...

Страница 31: ...and goes easily through the needle eye The thread can be optimally sewn The thread can break and skipped stitches can occur when there is too much clearance in the long groove and the needle eye The t...

Страница 32: ...ose the doors of the accessory box Attach the accessory box to the machine having the back towards the machine Storing Accessory 2 3 4 5 6 7 1 1 1 1 Insert the holders 1 for bobbins feet and needles S...

Страница 33: ...cable holders of the foot control Connecting the Machine To ensure safe operation of the machine only the supplied mains cable may be used The supplied power cable is designed for the voltage range ap...

Страница 34: ...r of the Free Hand System The lateral position of the lever can be adjusted by your local BERNINA Dealer required Insert the knee lifter into the opening at the front side of the machine Adjust the si...

Страница 35: ...mmed with a second function that can be activated and deactivated by a Back kick On delivery the Back kick is programmed with the function Needle Up Down To raise or lower the needle press the foot co...

Страница 36: ...into place Inserting Foam Pad and Thread Spool The foam pad prevents the thread from getting hooked at the spool pin Place the foam pad on the spool pin Place the thread spool on the spool pin Horizo...

Страница 37: ...so that the spool net does not slip off the thread spool e g double insert the net over the thread spools or insert a part of the net into the thread spool at the rear 2 6 Feed Dog Adjusting the Feed...

Страница 38: ...ease button and engage the seam guide from the front to the back on the slide on table To determine the edge width press the release button and move the seam guide to the right or left Touch the relea...

Страница 39: ...foot 2 1 2 Guide the new presser foot upwards over the cone Press the clamping lever down Selecting the Presser Foot in the User Interface After changing the presser foot a check can be performed to...

Страница 40: ...sser foot pressure This provides the advantage that the fabric can be moved more easily When the presser foot pressure is set below 0 the presser foot even lifts to give more space to the thick fabric...

Страница 41: ...unction So that no information is lost the needle type and needle thickness can also be saved on the machine This means that the saved needle type and needle thickness can be checked at any time Tap S...

Страница 42: ...again The machine stops with needle position up as soon as the foot control is released or the button Start Stop has been pushed Changing the Stitch Plate The stitch plate is marked with vertical hori...

Страница 43: ...ssage is displayed and the machine is automatically prevented from starting 2 11 Threading Threading the Upper Thread Preparing the Threading Place the foam pad on the spool pin Place the thread spool...

Страница 44: ...Insert the thread in the thread take up lever 4 Guide the thread downwards again 5 Only release the thread now Switch the machine off Threading the Needle Guide the thread through the guides 6 7 above...

Страница 45: ...ding finger hook 11 Push the needle threading lever down as far as it will go 10 Pull the thread from left to right 11 through the needle threading slot 12 until it cathces on the wire hook Pull the t...

Страница 46: ...second thread in direction of the arrow on the left side of the tension disc 1 1 Guide the first and the second thread to the thread guide above the needle Thread the first thread manually into the r...

Страница 47: ...pin into the left and right needle by hand Thread the thread of the horizontal spool pin into the center needle manually Winding the Bobbin Thread The bobbin thread can be wound while embroidering if...

Страница 48: ...wards the bobbin again to continue the winding process As soon as the bobbin is full the machine stops the winding process automatically Remove the bobbin and cut the thread using the thread cutter at...

Страница 49: ...bin so that the silvery sensor surface is facing the back of the bobbin case Pull the thread into the slot 2 from the left 2 Pull the thread to the right under the spring 3 then pass it below the two...

Страница 50: ...bobbin case until it engages Pull the thread through the thread cutter 6 and cut 6 Close the looper cover Indicating Fill Level of Bobbin Thread When the fill level of the bobbin thread is low an ani...

Страница 51: ...am Tap Sewing Settings Tap Adjusting the Upper Thread Tension Adjust the upper thread tension Adjusting the Maximum Sewing Speed You can use this function to set the maximum speed Tap Home Tap Setup P...

Страница 52: ...nce between the fabric and the presser foot in the floating position Tap Home Tap Setup Program Tap Sewing Settings Tap Programming Buttons and Icons Tap Programming the Hovering Height of the Presser...

Страница 53: ...tter again To keep the presser foot in lowered position tap Raise the Presser Foot To raise the presser foot after securing tap Raise the Presser Foot again Programming the Button Thread Cutter The au...

Страница 54: ...up Program Tap Sewing Settings Tap Programming Buttons and Icons Tap Pressure Foot Position with Needle Stop Down Select the desired presser foot position Programming the Button Quick Reverse It can b...

Страница 55: ...tap Securing Stitches again To program subsequent securing stitches tap Securing Stitches in Close Succession To program the number of securing stitches tap Minus or Plus To program 4 securing stitch...

Страница 56: ...Setting the Embroidery Design Position when Opening As the default setting opened embroidery designs are always displayed in the center of the hoop You can use the switch Restore saved embroidery des...

Страница 57: ...onding embroidery pattern Tap Home Tap Setup Program Tap Embroidery Settings Tap Calibrating the Embroidery Hoop Use the arrow icons on the display to move the needle precisely to the center of the pa...

Страница 58: ...titches Smart Secure Embroidery designs are programmed with or without securing stitches If the embroidery design has programmed securing stitches they will be embroidered If embroidery designs are pr...

Страница 59: ...arried out it takes longer to embroider and more loose thread ends can be seen on the wrong side of the fabric especially when the function Thread away is activated too On the right side of the fabric...

Страница 60: ...inches The default setting is mm Tap Home Tap Setup Program Tap Embroidery Settings Tap Measuring Unit To display the measurements in the Embroidery Mode in inch tap inch To display the measurements i...

Страница 61: ...nctions Tap the switch in the lower section of the display to deactivate the bobbin thread indicator Tap the switch again to activate the bobbin thread indicator 3 5 Activating the Audio Signals 1 2 3...

Страница 62: ...ettings Selecting a Language Tap Home Tap Setup Program Tap Machine Settings Tap Language Selection Tap the required language Adjusting the Brightness of the Display The brightness of the display can...

Страница 63: ...es The total number of stitches by the machine and the number of stitches since the last maintenance carried out by a specialist BERNINA dealer are displayed Tap Home Tap Setup Program Tap Machine Set...

Страница 64: ...e current status of the machine can be saved on a USB stick and consequently provided to the specialized BERNINA dealer Insert a USB stick which provides enough free capacity into the USB port of the...

Страница 65: ...Tap Setup Program Tap Machine Settings Tap Factory Setting To delete all data from the Personal Memory tap Delete Data from Own Storage Medium and confirm To delete all embroidery designs from the Per...

Страница 66: ...e Buttonhole Foot 3A To start the calibration push the button Start Stop When the calibration is complete the result is shown in the display Packing the Embroidery Module To pack the embroidery module...

Страница 67: ...m The settings are adjusted 4 3 Using eco Mode If work is interrupted for an extended period the machine can be put into energy saving mode The power save mode eco also serves as a child safety featur...

Страница 68: ...Decreasing the Display Size again To select the stitch pattern via the stitch number entry tap Stitch Pattern Selection via Number 5 2 BERNINA Dual Feed The BERNINA Dual Feed feeds the fabric from abo...

Страница 69: ...ead When using different types of sewing or embroidery threads the upper thread tension may vary Therefore it may be necessary to adjust the upper thread tension according to the sewing or embroiderin...

Страница 70: ...i function Knob to the left to shorten the stitch length Turn the Lower Multi function Knob to the right to elongate the stitch length To call up other setting options tap Stitch Length 1 1 Correcting...

Страница 71: ...switched off Programming Pattern Repeat Stitch patterns can be repeated up to 99 times Select a stitch pattern or alphabet Tap i Dialog x Tap Pattern Repeat Enter the required number of stitch pattern...

Страница 72: ...itch pattern in the new length is saved until the machine is switched off Sewing Stitch Patterns Using the Triple Stitch The stitch pattern can be sewn three times for a more attractive result Not all...

Страница 73: ...Patterns Overview Combi Mode 1 2 3 4 1 Stitch Width 3 Combination Mode Single Mode 2 Stitch Length 4 Individual Stitch Pattern within the Combination Creating Stitch Pattern Combinations In the Combi...

Страница 74: ...Tap Combination Mode Single Mode Tap Personal Memory Tap Loading a Stitch Pattern Combination Select a stitch pattern combination Overwriting a Stitch Pattern Combination Prerequisite A stitch patter...

Страница 75: ...n 1 To edit the single stitch pattern tap i Dialog Deleting a Single Stitch Pattern Prerequisite A stitch pattern combination has been created Tap the desired stitch pattern 1 within the stitch patter...

Страница 76: ...ividual stitch patterns in a stitch pattern combination can be adapted to the longest and widest stitch patterns in the combination Prerequisite A stitch pattern combination has been created Tap i Dia...

Страница 77: ...y turn the Lower Multi function knob to the right Mirroring a Stitch Pattern Combination Prerequisite A stitch pattern combination has been created Tap i Dialog Tap Edit Entire Combination To mirror t...

Страница 78: ...a Stitch Pattern Combination Prerequisite A stitch pattern combination has been created Select the desired position within the stitch pattern combination where the stitch pattern combination is to be...

Страница 79: ...stitch pattern alphabet or buttonhole Edit the stitch pattern Tap Personal Memory Tap Save Stitch Pattern Select the file where the pattern is to be saved Tap Confirm Overwriting Stitch Patterns from...

Страница 80: ...Saving Stitch Patterns on the BERNINA USB Stick On the BERNINA USB stick stitch patterns also those which have been individually edited can be saved Select a stitch pattern or alphabet Editing stitch...

Страница 81: ...stitch pattern of the stitch pattern combination is secured with 4 stitches at the end Securing with the Button Pattern End The Pattern End button can be programmed with various securing stitches Pus...

Страница 82: ...wing corners only a small section of the fabric is actually on the feed dog Therefore it cannot grip the fabric well By means of the height compensation tool the fabric can be fed evenly When the fabr...

Страница 83: ...attaching lace or rubber tape 5 Securing Program For automatic securing at the start of the seam with forward and reverse stitches 6 Triple Straight Stitch For reinforced seams on heavy fabrics and de...

Страница 84: ...For flat joining seams visible hems on Lycra fabric and for stitching over seams in foundation garments 18 Stretch Stitch For stretchable seams and hems in woven and knitted fabrics 19 Reinforced Over...

Страница 85: ...34 Darning Stitch For darning together with the function Permanent reverse sewing 35 Open Overlock Stitch For simultaneously sewing together and finishing elastic fabrics with a reinforced edge 36 Ov...

Страница 86: ...tted Tap Practical Stitches Select Securing Program No 5 Press the foot control The machine secures automatically Sew the seam at the desired length Push the button Quick Reverse The machine secures a...

Страница 87: ...of the base of the zipper with needle position down Raise the presser foot and turn the sewing project Sew across the other side of the zipper and stop with needle position down Raise the presser foot...

Страница 88: ...foot Lower the presser foot and continue sewing Move the needle position to the left Sew the second side 2 in exactly the same way from bottom to top 2 1 6 6 Sewing Triple Straight Stitch The triple s...

Страница 89: ...d a poor stitch formation results slow down the movement of the sewing project If there are knots on the wrong side of the fabric move the sewing project faster When the thread breaks guide the sewing...

Страница 90: ...breakage Work the edges in irregular lengths so that the thread is better spread over the fabric Sew the first rows not too close together and beyond the worn area Sew the rows in irregular lengths Tu...

Страница 91: ...gitudinal threads in all fabrics If the darning area becomes distorted correct with the balance Fit the Reverse Pattern Foot 1C or Buttonhole Foot with Slide 3A Tap Practical Stitches Select Simple Da...

Страница 92: ...rk and the sew the Darning Program again The length is programmed and can be repeated as often as desired Fit the Buttonhole Foot with Slide 3A Tap Practical Stitches Select Reinforced Darning Program...

Страница 93: ...Edges Zigzag No 2 is suitable for all fabrics It can be used for elastic seams as well as for decorative work Use darning thread for fine materials When sewing satin stitch it is recommended to set a...

Страница 94: ...Select Double Overlock No 10 6 14 Narrow Edgestitching Fit the Blindstitch Foot 5 or Edgestitch Foot 10 10C 10D Tap Practical Stitches Select Straight Stitch No 1 Place the edge against the left hand...

Страница 95: ...guide into the hole in the presser foot Adjust the width as required Tighten the screw Guide the folded edge along the seam guide 5 8 5 8 5 8 1 25 15 15 15 75 75 6 17 Sewing Hem Edges When using the...

Страница 96: ...e The fabric edges are finished Fit the Blindstitch Foot 5 Tap Practical Stitches Select Blind Stitch No 9 Fold the fabric so that the finished fabric edge is on the right side Place the fabric under...

Страница 97: ...s particularly suitable for elastic seams in tricot made of cotton wool synthetic and mixed fibers Fit the Reverse Pattern Foot 1C 1D Tap Practical Stitches Select Tricot Stitch No 14 Iron the hem and...

Страница 98: ...ic 6 21 Sewing Basting Stitches When sewing basting stitches it is recommended to use a fine darning thread This is easier to remove The basting stitch is suitable or sewing projects where a very long...

Страница 99: ...ive stitches which are programmed with satin stitches are particularly appropriate for heavyweight materials e g Decorative Stitch No 401 For a perfect stitch formation it is of advantage to use the s...

Страница 100: ...ewing We recommend guiding your project evenly under the needle at a consistent speed following the lines of the design The stabilizer must be removed after sewing Sew a sample first to check what the...

Страница 101: ...aight line Fit the Reverse Pattern Foot 1C 1D or Open Embroidery Foot 20C 20D Select a cross stitch of the Category 300 and combine it as desired Stitch the first row using the seam guide to sew a str...

Страница 102: ...to medium weight fabrics In combination with the 3 mm twin needle 32 optional accessory 7 grooves For light to medium weight fabrics In combination with the 2 mm twin needle 33 optional accessory 9 g...

Страница 103: ...cover Pull the cord through the hook opening from the bottom and through the opening of the stitch plate Replace the stitch plate Close the hook cover Make sure that the cord slides through the thread...

Страница 104: ...wing Pintucks Insert the corresponding twin needle Threading the double needle Thread up command Sewing the first pintuck Place the first pintuck in one of the side grooves in the presser foot Sew add...

Страница 105: ...an be reinforced with embroidery stabilizer on the wrong side When working with pile or napped fabrics e g toweling use an additional water soluble stabilizer on the right side of the fabric Stitch Pa...

Страница 106: ...cal symbols tap Numbers and Mathematical Characters To use special characters tap Special Characters 2 3 4 5 To delete individual syllables of the entered text tap Deleting To close the extended Enter...

Страница 107: ...etch Buttonhole For all elastic fabrics 54 Round Buttonhole with Normal Bartack For medium weight to heavy fabrics e g dresses jackets coats and rainwear 55 Round Buttonhole with Horizontal Bartack Fo...

Страница 108: ...uttonhole with Bartack For medium weight woven fabrics e g blouses dresses and jackets 69 Decorative Buttonhole with Double Pointed Bartack For decorative buttonholes in firmer non elastic fabrics 9 2...

Страница 109: ...uttonholes to be sewn manually mark the position and the length on the fabric using chalk or a water soluble pen For the buttonholes to be sewn automatically mark the complete length of 1 buttonhole o...

Страница 110: ...tonhole and is particularly suitable for the Buttonhole No 51 Ideal cords are Perle cotton No 8 strong hand sewing thread and fine crochet yarn It is recommended to not hold the cord while sewing Prer...

Страница 111: ...o the wrong side of the fabric using a hand sewing needle and knot or secure them with stitches Using cord with the Buttonhole Foot 3C Prerequisite The Buttonhole Foot 3C is fitted and raised Insert t...

Страница 112: ...force buttonholes in leather vinyl or felt Alterations of the Balance when sewing a manual standard buttonhole as well as the Keyhole and the Round Buttonhole affect both beads in the same way With th...

Страница 113: ...ole length 9 9 Determining the buttonhole length with Buttonhole Foot 3C When the Buttonhole Foot 3C is used the buttonhole length must be determined via the function Stitch Counter The stitch counter...

Страница 114: ...ength of 4 31 mm depending on the buttonhole type The Buttonhole Foot with Slide 3A must lie perfectly flat on the fabric so that the length can be measured accurately Programmed buttonholes are all a...

Страница 115: ...lling using the arrow icons or by pressing the button Quick Reverse Prerequisite The Buttonhole Foot 3C is fitted Tap Buttonholes Select Standard Buttonhole No 51 Tap i Dialog man Tap Manual Length Ad...

Страница 116: ...requisite The Buttonhole Foot 3C is fitted Tap Buttonholes Select Round Buttonhole with Normal Bartack No 54 Tap i Dialog man Tap Manual Length Adjustment Step 1 is activated in the display to start t...

Страница 117: ...ssory Place the fabric on an appropriate wood Position the cutter in the center of the buttonhole Press down on the cutter with your hand 9 16 Sewing on a Button The Button sew on Program can be used...

Страница 118: ...with 4 holes sew the first front pair of holes first Lower the presser foot Perform the first stitches in the left hole via the handwheel Keep turning the handwheel until the needle changes to the ri...

Страница 119: ...ch Straight stitch For sewing patchwork parts together using a straight stitch with a 2 mm stitch length No 1304 No 1308 Hand look Quilt Stitch For attaching an imitation of hand look stitch with mono...

Страница 120: ...atically at the end of the Securing Program 10 3 Sewing Handlook Quilt Stitches Hand look quilt stitches are suitable for all fabrics and sewing projects that should look like hand sewn It is recommen...

Страница 121: ...movements to form the design of your choice Prerequisite The top layer the batting and the backing are pinned together or basted The feed dog is lowered The Darning Foot 9 is fitted Tap Practical Sti...

Страница 122: ...er foot a red light is on By moving the fabric the machine accelerates If the fabric isn t moved securing in place is possible without pressing an additional button When working via the foot control o...

Страница 123: ...ress both push buttons at the BSR foot against each other Pull the presser foot sole out of the guide downwards Insert the new presser foot sole into the guide and push upwards until it clicks into pl...

Страница 124: ...the presser foot goes off BSR To deactivate the BSR Mode and to quilt without automatic stitch lengths tap BSR Mode 11 7 Securing Stitches Securing in BSR1 Mode with the Button Start Stop Prerequisit...

Страница 125: ...alog Tap Securing Stitches Press the foot control or push the button Start Stop By moving the fabric some short securing stitches are sewn then the programmed stitch length is activated and the securi...

Страница 126: ...Carrying Handle 4 Guide Rails for the Machine 2 Embroidery Arm 5 Connection to the Machine 3 Coupling for Securing the Hoop 12 2 Supplied Accessories Embroidery Module Overview Accessory Embroidery M...

Страница 127: ...g included Medium Embroidery Hoop To embroider medium sized embroidery designs up to 100 x 130 mm 3 94 5 12 in Template for precise fabric positioning included Embroidery Needle Assortment For embroid...

Страница 128: ...tion 2 Presser Foot Indicator Presser Foot Selection 5 Feed Dog Indicator 3 Hoop Indicator Select Hoop 6 Bobbin Thread Overview System Settings 2 1 3 4 5 6 7 8 1 Sewing Mode 5 eco Mode 2 Embroidery Mo...

Страница 129: ...ar and tear Metallic thread is a light to medium weight thread suitable for special effects in embroidery When working with metallic threads the automatic bobbin thread cutter should be deactivated Th...

Страница 130: ...correctly read and embroidered Embroidery Test For the embroidery test always use the original material reinforced with the same stabilizer as will be used later For the embroidery test it is recomme...

Страница 131: ...mall shapes Satin stitching is however not suitable for larger areas since wide stitches are too loose and do not cover the fabric properly In addition there is the risk that with too long stitches th...

Страница 132: ...A Embroidery 132 Connecting Stitches Long stitches which are used to get from one part of the motif to the next Before and after the connecting stitch securing stitches are sewn Connecting stitches ar...

Страница 133: ...on a stable even surface Ensure that the embroidery arm can move freely Carefully slide the embroidery module from left to right into the machine s embroidery module connection 1 and the guide rail 2...

Страница 134: ...changed using different functions offered by the embroidering machine All the embroidery designs can be found at the end of this instruction manual In addition to that embroidery designs can be loaded...

Страница 135: ...rface After having fitted the appropriate embroidery foot Embroidery Foot 26 supplied accessory it can be selected and saved on the machine Moreover optional presser feet can be displayed which are av...

Страница 136: ...o Tighten the fixing screw by hand Selecting the Embroidery Needle in the User Interface After changing the needle you can check whether this can be used with the selected stitch plate Tap Stitch Plat...

Страница 137: ...a small hole in the needle area The stitch formation thread knotting of upper and bobbin thread is thus optimized This results in a more beautiful stitch appearance To lower the feed dog push the but...

Страница 138: ...in one step for a manual knotting If no securing stitches are wanted it is recommended to deactivate the securing stitches in the Setup Hold the upper thread Push the button Presser Foot Up Down The b...

Страница 139: ...nts the fabric from losing shape and slipping Appliqu s can be exactly positioned with spray adhesive The spray adhesive shouldn t be used near the machine to avoid contamination Use the spray adhesiv...

Страница 140: ...ile from poking though the embroidery Place the stabilizer on the underside of the material Use adhesive spray to adhere stabilizer if necessary For material with a pile reinforce with additional suit...

Страница 141: ...hoop so that the inner hoop including the fabric protrudes downwards by up to 1 mm Attaching the Hoop Raise the needle Raise the embroidery foot Hold the hoop with the right side of the fabric up with...

Страница 142: ...op Thread the upper thread To move the hoop back to its previous position push the button Start Stop Move Hoop to the Back To facilitate changing the bobbin it is recommended to move the hoop to the b...

Страница 143: ...le is placed exactly over the center of the embroidery design tap Center of Embroidery Design To position the hoop so that the needle is placed exactly over the motif start tap Center of Embroidery De...

Страница 144: ...Setup Program 144 14 Setup Program 14 1 Adjusting the Embroidery Settings in the Setup Program Further information about this topic see page 55...

Страница 145: ...tion Tap Loading the Embroidery Design Select a new embroidery design 15 3 Checking the Embroidery Time and the Embroidery Design Size In the display Editing at lower right 1 the estimated embroidery...

Страница 146: ...Up the Embroidery Design View The view of the embroidery design can be scaled up In addition to that the view can be adjusted with or without changing the embroidery position Select the embroidery des...

Страница 147: ...g the embroidery position Select the embroidery design To display the icon Relocating a Stitch Pattern tap Zoom In Tap Moving the Embroidery Design The icon turns dark gray Move the view of the embroi...

Страница 148: ...motif size is to be altered by more than 20 the motif should be adapted in a separate embroidery software and then reloaded onto the machine Select the embroidery design Tap i Dialog Tap Change Desig...

Страница 149: ...embroidery design longer turn the Lower Multi function Knob clockwise To make the embroidery design shorter turn the Lower Multi function Knob anti clockwise Mirroring Embroidery Designs Embroidery d...

Страница 150: ...es are embroidered too densely the stitch density can be adjusted Select the embroidery design Tap i Dialog Tap Alter Stitch Type Stitch Density 1 Adjust the stitch density 1 Checking the Size and the...

Страница 151: ...osition can be altered via the Upper Lower Multi function knobs and the complete embroidery positions can be checked again To position the needle in the center of the embroidery design tap Center of E...

Страница 152: ...sign Prerequisite A combination of embroidery designs has been created Tap the desired embroidery design in the area of the embroidery design level 1 keep it touched and drag it outwards A new window...

Страница 153: ...ombination 1 1 Tap i Dialog Tap Duplicating 2 The combination is duplicated 2 15 7 Creating Lettering Overview Embroidery Alphabets Embroidery Design Name Swiss Block Anniversary Quilt Block Childs Pl...

Страница 154: ...sign is positioned outside the area to be embroidered the hoop is outlined in red on the display By means of the hoop selection it is possible to check whether or not the embroidery design can be embr...

Страница 155: ...additional colors swipe up or down on the display To select the color by entering the color number tap Color Selection via Number Enter the number for the required color The color icon is displayed on...

Страница 156: ...stabilizer are better fixed together Select the embroidery design Tap Embroidery To embroider the basting stitches along an embroidery design tap Basting To embroider the basting stitches along the ho...

Страница 157: ...mber of stitches within the embroidery sequence To select the desired stitch by entry tap the icon Stitch Position via Number Cutting Connecting Stitches The function is activated as standard and the...

Страница 158: ...changed The movability of the embroidery arm can be limited or impeded with very narrow tubes Therefore please make sure that the embroidery hoop can move forwards and backwards sufficiently An imped...

Страница 159: ...d embroidery designs can be saved Select the embroidery design Edit the embroidery design Tap Selection Tap Save Embroidery Design The embroidery design to be saved is outlined in yellow The Embroider...

Страница 160: ...ry design to be saved is outlined in yellow Insert the BERNINA USB stick into the USB port of the machine Tap USB Stick Select the embroidery design which is to be overwritten Tap Confirm Importing St...

Страница 161: ...ck Select a personal embroidery design Deleting an Embroidery Design from the Personal Memory The embroidery designs which are saved in the personal memory can be deleted individually Tap Selection Ta...

Страница 162: ...Tap Embroidery Speed The maximum speed is activated Tap Embroidery Speed again The optimal speed is activated 16 3 Adjusting the Upper Thread Tension The default setting of the upper thread tension is...

Страница 163: ...to the default setting Tap the yellow outlined icon on the left side to reset the alteration to default setting in the Setup Program 16 4 Embroidering via the Foot Control Embroidering with the foot...

Страница 164: ...sonal data and settings are automatically transferred during a firmware update For safety reasons it is also recommended to save data and settings on a BERNINA USB stick before the firmware update is...

Страница 165: ...settings into the USB port of the machine Tap Home Tap Setup Program Tap Machine Settings Tap Maintenance Update UPDATE Tap Updating Firmware NOTICE BERNINA USB Stick Optional Accessory has been remov...

Страница 166: ...s inside the Machine Damage to mechanical and electronic components Use a brush or a soft cloth Do not use compressed air spray Clean the feed dog with the brush Cleaning the Hook CAUTION Electronical...

Страница 167: ...in the hole of the hook Insert the hook The hook is magnetic and therefore fastened to the correct position Close the hook race cover and the fastening bracket until the release bracket engages As a c...

Страница 168: ...ts so that the felts are damp and make sure that the red marked surface of the hook sleeve remains free of oil Hold the hook at the pin in the center with two fingers Guide the hook with the lower edg...

Страница 169: ...ket engages As a check turn the handwheel Insert the bobbin case Sew or embroider on a test fabric Cleaning the Thread Catcher Tap Home Tap Setup Program Tap Machine Settings Tap Maintenance Update Ta...

Страница 170: ...terns The feed dog is not lowered To lower the feed dog push the button Feed Dog Up Down The selected needle and stitch plate cannot be used in combination Replace the needle Replace the stitch plate...

Страница 171: ...ectly The contact between the machine and the embroidery module is interrupted as a result of vibrations Make sure that the embroidery module and the machine are standing on a stable even surface Conn...

Страница 172: ...e embroidery design is partly outside the hoop Reposition the embroidery design and start embroidering it again The embroidery design is too large Reduce the size of the embroidery design Attach a lar...

Страница 173: ...ssory which provides enough free capacity The firmware update has failed The latest firmware version cannot be found on the USB stick Make sure that the compressed zip file has been unzipped for the f...

Страница 174: ...ly Consult your authorized BERNINA dealer or your service center for more details Contact an authorized BERNINA dealer Delete the message temporarily by touching the icon ESC After the third deletion...

Страница 175: ...correct bobbin case is used Use the supplied bobbin case marked with the triangle Skipped Stitches Incorrect needle Use the needle system 130 705H Needle blunt or bent Replace the needle Poor quality...

Страница 176: ...headframe to the right Lower Thread Breaks The bobbin case is damaged Replace the bobbin case The stitch hole in the stitch plate damaged Contact the nearest specialized BERNINA dealer to have the dam...

Страница 177: ...zed BERNINA dealer Bobbin Thread Indicator doesn t React Settings in the Setup Program Activate it in the Setup Program The bobbin thread indicator is defect Contact an authorized BERNINA dealer Error...

Страница 178: ...tored in a cold room place it in a warm room one hour before use Switch the machine off and disconnect it from the power supply Don t store the machine outdoors Protect the machine against climatic in...

Страница 179: ...ewing Light 12 to 16 LED Maximum Speed 1000 Stitches per Minute Measurements without the Spool Pin W H D 465 330 200 18 30 12 99 7 87 mm inch Weight 11 5 kg Energy Consumption 90 W Input Voltage 100 2...

Страница 180: ...7 29 30 32 33 34 35 36 37 Buttonholes 51 52 53 54 55 56 57 58 59 60 61 62 63 64 65 67 69 Decorative Stitches Nature Stitches 101 102 103 104 106 107 108 109 110 111 112 113 114 115 116 117 118 119 122...

Страница 181: ...416 417 418 419 421 422 423 424 425 426 427 428 429 431 433 434 436 437 440 442 443 444 445 447 448 449 453 454 455 456 461 465 466 471 472 473 Geometric Stitches 601 602 603 604 605 606 607 608 609 6...

Страница 182: ...741 742 743 744 745 746 747 748 749 750 751 752 756 769 770 771 772 773 774 775 776 777 778 779 780 781 782 783 Children Stitches 901 902 903 904 905 906 907 908 909 910 911 912 913 914 915 916 917 9...

Страница 183: ...15 2017 2019 2022 2023 Quilt Stitches 1301 1302 1303 1304 1305 1306 1307 1308 1309 1310 1311 1312 1313 1314 1315 1316 1317 1318 1319 1320 1321 1322 1323 1324 1325 1326 1327 1329 1330 1331 1332 1333 13...

Страница 184: ...d additional information at https www bernina com specialeffects Detached Point PunchWork Basic CutWork Couching Fringe Embroidery Projects in the Hoop Appliqu Puffy Fonts CutWork Quilting PaintWork T...

Страница 185: ...0721 12416 03 124 x 124 mm 4 9 x 4 9 inch 5 909 1 Isacord 40 0721 12416 26 44 x 174 mm 1 7 x 6 9 inch 2 816 1 Isacord 40 3830 Nb347_48 76 x 76 mm 3 x 3 inch 2 337 1 Isacord 40 5513 Nb334_48 127 x 127...

Страница 186: ...32 122 x 105 mm 4 8 x 4 1 inch 4 506 1 Isacord 40 2920 12416 24 89 x 73 mm 3 5 x 2 9 inch 2 330 1 Isacord 40 3830 12607 16 123 x 122 mm 4 8 x 4 8 inch 1 222 1 Isacord 40 0020 12616 16 123 x 123 mm 4...

Страница 187: ...d796_48 47 x 173 mm 1 9 x 6 8 inch 521 1 Isacord 40 3654 Bd837_48 123 x 123 mm 4 9 x 4 9 inch 1 629 1 Isacord 40 0138 Bd292 95 x 95 mm 3 7 x 3 7 inch 3 036 1 Isacord 40 3332 Bd299 94 x 95 mm 3 7 x 3 7...

Страница 188: ...Bd412_48 89 x 53 mm 3 5 x 2 1 inch 1 427 1 Isacord 40 1335 Bd501_48 64 x 61 mm 2 5 x 2 4 inch 1 202 1 Isacord 40 3151 Bd502_48 62 x 61 mm 2 4 x 2 4 inch 1 139 1 Isacord 40 3151 Bd513_48 64 x 63 mm 2 5...

Страница 189: ...40 9925 4 Isacord 40 9975 5 Isacord 40 9978 6 Isacord 40 9973 7 Isacord 40 9982 8 Isacord 40 1972 12633 06 120 x 120 mm 4 7 x 4 7 inch 18 023 1 Isacord 40 0015 12473 06 133 x 120 mm 5 3 x 4 7 inch 11...

Страница 190: ...119 x 156 mm 4 7 x 6 1 inch 14 326 1 Isacord 40 1252 2 Isacord 40 1161 3 Isacord 40 1565 21021 04 123 x 150 mm 4 8 x 5 9 inch 16 176 1 Isacord 40 1161 2 Isacord 40 1252 3 Isacord 40 1565 21021 06 116...

Страница 191: ...467 1 Isacord 40 2152 2 Isacord 40 2520 82006 30 100 x 174 mm 3 9 x 6 9 inch 21 584 1 Isacord 40 0020 2 Isacord 40 4174 3 Isacord 40 0020 4 Isacord 40 4174 5 Isacord 40 0771 6 Isacord 40 0832 7 Isacor...

Страница 192: ...YLI variations 8019 13 YLI variations 8016 14 Isacord 40 1600 15 Isacord 40 1904 16 YLI variations 8020 17 Isacord 40 5912 18 YLI variations 8004 19 Isacord 40 5722 20 Isacord 40 5510 21 Isacord 40 01...

Страница 193: ...1027 17 57 x 152 mm 2 3 x 6 inch 4 179 1 Isacord 40 1805 2 Isacord 40 2723 3 Isacord 40 2520 4 Isacord 40 5100 5 Isacord 40 0506 6 Isacord 40 4103 7 Isacord 40 4114 8 Isacord 40 5115 9 Isacord 40 1805...

Страница 194: ...inch 4 343 1 Isacord 40 5220 2 Isacord 40 5210 Be790408 58 x 90 mm 2 3 x 3 5 inch 2 045 1 Isacord 40 3541 21002 02 110 x 160 mm 4 3 x 6 3 inch 8 622 1 Isacord 40 0933 2 Isacord 40 1252 Fb492_48 87 x 2...

Страница 195: ...40 0015 10 Isacord 40 0020 11 Isacord 40 5510 12 Isacord 40 5650 13 Isacord 40 4230 14 Isacord 40 4116 15 Isacord 40 0132 16 Isacord 40 0112 17 Isacord 40 0015 Ck867 122 x 133 mm 4 8 x 5 2 inch 28 88...

Страница 196: ...4 Isacord 40 1755 5 Isacord 40 3251 6 Isacord 40 1600 7 Isacord 40 2153 8 Isacord 40 2152 9 Isacord 40 2761 Be790307 142 x 127 mm 5 6 x 5 inch 19 667 1 Applique 1 2 Applique 3 3 Isacord 40 3130 4 Appl...

Страница 197: ...mm 3 9 x 4 inch 8 788 1 Applique 1 2 Applique 3 3 Isacord 40 3750 4 Isacord 40 1114 5 Isacord 40 1900 6 Isacord 40 3620 7 Isacord 40 2510 8 Isacord 40 5324 9 Isacord 40 1114 10 Isacord 40 1060 11 Isac...

Страница 198: ...ord 40 3251 5 Isacord 40 2650 6 Isacord 40 2640 7 Isacord 40 5610 8 Isacord 40 5722 9 Isacord 40 2504 10 Isacord 40 0713 11 Isacord 40 0822 Cm362_48 120 x 113 mm 4 7 x 4 4 inch 6 792 1 Isacord 40 6051...

Страница 199: ...9 x 3 5 inch 18 451 1 Isacord 40 1950 Nx696 91 x 91 mm 3 6 x 3 6 inch 9 346 1 Yenmet 7025 Fb461_48 122 x 121 mm 4 8 x 4 8 inch 7 889 1 Isacord 40 0020 2 Isacord 40 1172 12633 20 34 x 170 mm 1 4 x 6 7...

Страница 200: ...4332 Be110415 44 x 172 mm 1 7 x 6 8 inch 6 436 1 Isacord 40 6051 2 Isacord 40 0811 3 Isacord 40 1921 Fa981 35 x 142 mm 1 4 x 5 6 inch 3 709 1 Isacord 40 1055 21002 21 21 x 151 mm 0 8 x 5 9 inch 3 176...

Страница 201: ...cord 40 2155 3 Isacord 40 0651 4 Isacord 40 0101 5 Isacord 40 2532 6 Isacord 40 0640 7 Isacord 40 1352 8 Yenmet 7030 9 Isacord 40 0232 10 Isacord 40 1123 21019 14 123 x 130 mm 4 8 x 5 1 inch 23 294 1...

Страница 202: ...ord 40 5324 26 Isacord 40 1154 Hg747_48 124 x 147 mm 4 9 x 5 8 inch 18 378 1 Isacord 40 0970 2 Isacord 40 3770 3 Isacord 40 5912 4 Isacord 40 0520 5 Isacord 40 0811 6 Isacord 40 3350 7 Isacord 40 3040...

Страница 203: ...0904 3 Isacord 40 0020 4 Isacord 40 0015 12421 37 67 x 61 mm 2 6 x 2 4 inch 1 320 1 Isacord 40 0020 12421 03 46 x 48 mm 1 8 x 1 9 inch 2 328 1 Isacord 40 0020 2 Isacord 40 0015 3 Isacord 40 0111 Cm287...

Страница 204: ...d 40 0015 3 Isacord 40 1921 4 Isacord 40 3840 5 Isacord 40 3810 6 Isacord 40 4071 7 Isacord 40 3444 Nb317_48 87 x 87 mm 3 4 x 3 4 inch 2 064 1 Isacord 40 0020 2 Isacord 40 0600 3 Isacord 40 0800 4 Isa...

Страница 205: ...14 Isacord 40 1300 12611 08 80 x 120 mm 3 1 x 4 7 inch 5 770 1 Applique 1 2 Applique 2 3 Applique 1 4 Applique 2 5 Isacord 40 1154 6 Isacord 40 5440 7 Isacord 40 1902 12611 18 130 x 158 mm 5 1 x 6 2...

Страница 206: ...43 1 Isacord 40 3910 2 Isacord 40 0706 3 Isacord 40 4531 4 Isacord 40 4430 5 Isacord 40 1106 6 Isacord 40 0501 7 Isacord 40 5500 8 Isacord 40 0020 9 Isacord 40 4010 Fb148_48 101 x 89 mm 4 x 3 5 inch 1...

Страница 207: ...14 219 1 Isacord 40 1161 2 Isacord 40 1876 3 Isacord 40 1154 Cm213_48 58 x 102 mm 2 3 x 4 inch 7 866 1 Isacord 40 1840 2 Isacord 40 1055 3 Isacord 40 1252 4 Isacord 40 0651 5 Isacord 40 0660 6 Isacor...

Страница 208: ...x 205 mm 4 7 x 8 1 inch 6 820 1 Isacord 40 1030 2 Isacord 40 1030 3 Isacord 40 1030 4 Isacord 40 1030 5 Isacord 40 1030 6 Isacord 40 1030 12611 28 140 x 140 mm 5 5 x 5 5 inch 3 649 1 Applique 1 2 App...

Страница 209: ...rd 40 2830 7 Isacord 40 1725 8 Isacord 40 4071 12611 21 156 x 72 mm 6 1 x 2 8 inch 11 513 1 Applique 1 2 Applique 2 3 Isacord 40 1703 12611 23 156 x 72 mm 6 1 x 2 8 inch 12 817 1 Applique 1 2 Applique...

Страница 210: ...9 309 1 Edding 9 2 Isacord 40 0020 12448 08_pw 119 x 177 mm 4 7 x 7 inch 4 540 1 Edding 7 21022 13_dw 106 x 193 mm 4 2 x 7 6 inch 15 285 1 Edding 34 2 Edding 68 3 Edding 6 4 Applique 1 5 Applique 2 6...

Страница 211: ...inch 2 183 1 Isacord 40 3600 2 Isacord 40 1703 Be700122 119 x 37 mm 4 7 x 1 5 inch 4 124 1 Isacord 40 5833 Be700123 113 x 206 mm 4 4 x 8 1 inch 6 090 1 Punch 0004 2 Punch 0007 Be700124 141 x 134 mm 5...

Страница 212: ...ibrating the Embroidery Hoop 57 Calling Up the Creative Consultant 67 Calling Up the Help 67 Calling Up the Tutorial 67 Changing the Color 155 Changing the Needle 40 Changing the Presser Foot 39 Chang...

Страница 213: ...ervice Data 64 Seam Guide 38 Select Personal Settings 60 Selecting a Language 62 Selecting a Stitch Pattern 68 Selecting the Embroidery Design 134 Setting Securing Stitches 51 Setting the Presser Foot...

Страница 214: ...BERNINA recommends threads from BERNINA International AG CH 8266 Steckborn Switzerland www bernina com Copyright by BERNINA International AG 1028835 20A 04 2022 09 EN...

Отзывы: