background image

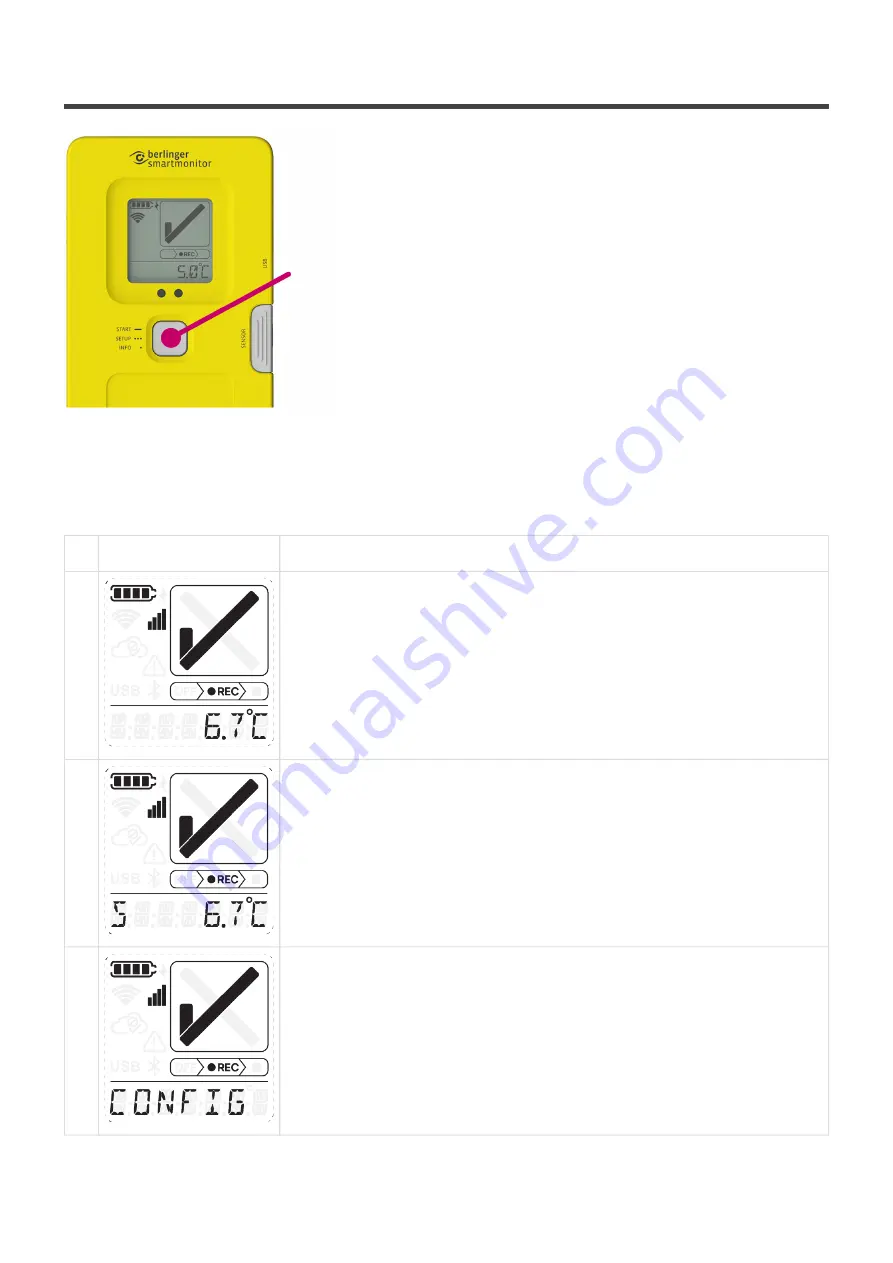
11.1. Device info when device is running

Single push the mutlifunctional button.

To scroll through available device info, single push the multifunctional button. Skip scroll text items with
button short press.

Nr. Screen

Description

1a

Home Screen: The current temperature is displayed on the screen.

1b

With external sensor

Home Screen: The current temperature of the external sensor is displayed
on the screen. To check the temperature of the SmartMonitor device, go to
SmartView.

2

The name of the configuration defined in SmartView is displayed.

Berlinger & Co. AG

User Manual SmartMonitor - 1_en

Page 50 of 72

Содержание SmartMonitor SHIP L

Страница 1: ......

Страница 2: ...User Manual SmartMonitor 1 Last update 31 October 2022 Berlinger Co AG Copyright 2022 Berlinger amp Co AG ...

Страница 3: ...tion 26 4 1 WiFi Setup for SmartMonitor SITE L only 28 5 How to configure your device 30 6 How to charge your device 35 6 1 Charging before use SmartMonitor SHIP L and SITE L 36 6 2 Permanent charging SmartMonitor SITE L only 37 7 How to place your device with external sensor 38 7 1 Site 39 7 2 Shipment 41 8 How to place your device without external sensor 43 8 1 Site 44 8 2 Shipment 45 9 Device i...

Страница 4: ...14 Additional functionalities 62 14 1 Manual flight mode 63 15 Warning 65 15 1 Display warnings 66 16 Disposal 69 17 Certification Standards 70 18 FAQ Glossary 72 ...

Страница 5: ...device Configure your device Place your device with external SmartSensor without external sensor Start your device Stop your device Prepare your device for re use Contact Berlinger Support for help The information is applicable for SmartMonitor SITE L SHIP L and SHIP M Berlinger amp Co AG User Manual SmartMonitor 1_en Page 2 of 72 ...

Страница 6: ...rmation Intended use Device handling warnings Device use Device cleaning Battery information use Device lifetime Air freight Communication Geographical Positioning Berlinger amp Co AG User Manual SmartMonitor 1_en Page 3 of 72 ...

Страница 7: ...perational handling e g light shock for quality assurance and security purposes Reusable enabling reuse and refurbishment on established trade lanes where device return and reuse is feasible The SmartMonitor is capable to supervise product and environment temperature simultaneously enabled by the optional SmartSensor SmartMonitor SHIP M Modular real time device for shipments Slim featured and sing...

Страница 8: ... g light shock for quality assurance and security purposes Additional data synchronization possibilities through WiFi The SmartMonitor is capable to monitor product and environment temperature simultaneously enabled by the optional SmartSensor Available sensor models SmartSensor Berlinger offers a range of external sensors with the SmartMonitor which can be easily and securely applied to the Smart...

Страница 9: ...0 C The glycol bottle simulates the temperature exposure behavior of vials It is ideal to reduce sudden temperature fluctuations like refrigerator door packaging opening or defrosting cycles while it accurately captures the temperature exposure of the vials monitored Berlinger amp Co AG User Manual SmartMonitor 1_en Page 6 of 72 ...

Страница 10: ...regarding coin cells Compatibility SmartMonitor device only works in combination with the SmartView software version 6 0 or higher Connectivity Real time availability of measurements may depend on local connectivity and may be delayed Damage If the SmartMonitor device is damaged don t use it and contact Berlinger support for refurbishment options General Ensure that the user manual instructions ar...

Страница 11: ...cket M5 is a sensitive part of the device If you are not using the sensor socket M5 keep it covered to protect from water dust etc When connecting a SmartSensor take care to align the SmartSensor well with the device to avoid damaging the pins of the sensor socket M5 Do not apply force as it will damage the connector Temperature Temperatures outside the device operating temperature range may damag...

Страница 12: ...help is needed contact Berlinger support at support berlinger com Manufactured by Berlinger Co AG Mitteldorfstrasse 2 9608 Ganterschwil SWITZERLAND Berlinger amp Co AG User Manual SmartMonitor 1_en Page 9 of 72 ...

Страница 13: ...h Velcro tape on the back of the SmartMonitor device Cable tie via the centered hook SmartCradle Please note that all SmartMonitor SHIP devices are dedicated for shipment monitoring whereas the SmartMonitor SITE L is dedicated for site monitoring Berlinger amp Co AG User Manual SmartMonitor 1_en Page 10 of 72 ...

Страница 14: ...e chemicals such as solvents or other organic compounds Especially high concentration and long exposure must be avoided Ketenes Acetone Ethanol Isopropyl Alcohol Toluene etc are known to cause drift of the humidity reading Berlinger amp Co AG User Manual SmartMonitor 1_en Page 11 of 72 ...

Страница 15: ...pletion of the battery without charging Shipment devices cannot be charged while monitoring Actual run time depends on environmental factors such as temperature quality of connectivity communication technologies and locations services used A comparison from the consumer environment Impact of temperature if a mobile phone is exposed to very hot or very cold temperatures it drains the battery quickl...

Страница 16: ...to technical specification Device cannot be started if battery shelf life has been exceeded to avoid early depletion of the battery during your shipment Battery shelf life and battery run time of a SITE L The device start is within the battery shelf life The device start is not within the battery shelf life Berlinger amp Co AG User Manual SmartMonitor 1_en Page 13 of 72 ...

Страница 17: ...battery run time of a SHIP M The device start is within the battery shelf life The device start is not within the battery shelf life If the device is not started within battery shelf life the battery expired The device can longer be started Devices can be returned to Berlinger for recycling and refurbishment Please find defined battery shelf life and battery run time per SmartMonitor device model ...

Страница 18: ...evice lifetime depends on number of usages to which temperature ranges the device is exposed during its lifetime careful handling amongst others Find the defined device lifetime per SmartMonitor device model in the technical specification Berlinger amp Co AG User Manual SmartMonitor 1_en Page 15 of 72 ...

Страница 19: ... require the SmartMonitor or batteries to be declared on the AWB Airway Bill For example SmartMonitor SHIP L Nickel metal hydride battery Not restricted as per Special Provision A199 SmartMonitor SHIP M Alkaline battery Not restricted as per Special Provision A123 Berlinger is not liable for approval to use the SmartMonitor on board of your selected carrier and the correct declaration of the Smart...

Страница 20: ...2 8 Communication Geographical Positioning Communication Geographical Positioning Berlinger amp Co AG User Manual SmartMonitor 1_en Page 17 of 72 ...

Страница 21: ...e device will try again within a short interval In order to not drain the battery of the device the SmartMonitor will not continue to try establishing connectivity unlike a mobile phone For shipments or usage in areas countries where only 2G technology is available the synchronization interval should be set to a longer interval 2G is still a very established network technology in low and medium in...

Страница 22: ...the most accurate position of the device Please be aware that for best performance of satellite based GNSS technologies in the SmartMonitor a good sky view is required This means packaging and warehouse environments can limit the function of GNSS technology Please be aware that the geographical position of the SmartMonitor is only communicated at the time of synchronization interval Berlinger amp ...

Страница 23: ...3 Device display information Device Display Acoustic alarm Berlinger amp Co AG User Manual SmartMonitor 1_en Page 20 of 72 ...

Страница 24: ...r SITE L only Continuous blinking red signal User indication about alarm warning 4 Removeable cap Remove for use of external sensor 5 Device use information Indication for permanent charging SITE L Indication for re useable device SHIP L Indication for battery expiry SHIP M 6 Device type SmartMonitor model 7 Serial number Uniquely identifiable number of the device 8 Barcode Contains the serial num...

Страница 25: ...istered with approval authorities 3 WLAN MAC only SITE L Unique identifier to connect the SmartMonitor to local WiFi 4 IMEI only SITE L Unique identifier to connect the SmartMonitor to local WiFi 5 IP65 Protected from dust ingress Protected from water spray from any direction 6 FCC ID unique identifier assigned to the device registered with the United States Federal Communications Commission 7 IC ...

Страница 26: ...ental protection standards 10 General warning See warnings in chapter WARNINGS 11 Learn more QR code Find more information about SmartMonitor behind the code Berlinger amp Co AG User Manual SmartMonitor 1_en Page 23 of 72 ...

Страница 27: ...ce is not measuring yet SmartMonitor is measuring SmartMonitor has stopped 5 7 digit text field Static or scrolling text to support user In home screen the text field displays the current temperature On single button interaction additional info is displayed 6 Bluetooth Indicates that manual configuration upload or data readout via Bluetooth is required 7 USB Indicates that manual configuration upl...

Страница 28: ...he SmartMonitor SITE L has an integrated buzzer to give an acoustic alarm to the user The alarm must be acknowledged and closed in SmartView Acoustic Alarm muted by next button press Berlinger amp Co AG User Manual SmartMonitor 1_en Page 25 of 72 ...

Страница 29: ...ration policy ID and or shipment sector name triple push the multifunctional button in quick succession This will initiate cloud synchronization to download the configuration Otherwise cloud synchronization and download of configuration will take place on cloud synchronization interval when connective is available Startable configuration Startable configuration can be defined in SmartView When the...

Страница 30: ...functional button is required to synchronize configuration policy After successful synchronization the SmartMonitor can be started Do not enable on configuration policies intended for shipments or sectors Berlinger amp Co AG User Manual SmartMonitor 1_en Page 27 of 72 ...

Страница 31: ...elow Step Picture Description 1 Plug in a USB C cable at the right hand side of the SmartMonitor device 2 Connect the other end of the cable via the USB port with your computer 3 When connecting the SmartMonitor to your computer a pop up window of SmartMonitor BERLINGER will appear If the pop up window does not appear locate the BERLINGER USB Drive on your computer and open it 4 Open the available...

Страница 32: ...omputer Save the file in the BERLINGER USB Drive to apply the WiFi credentials to the SmartMonitor The WiFi credentials file is now added to the SmartMonitor 7 Eject the device from your computer 8 Triple push the multi functional button for the WiFi to be setup WiFi setup 9 If successfully setup the WiFi sign will appear on the display Berlinger amp Co AG User Manual SmartMonitor 1_en Page 29 of ...

Страница 33: ...e configuration Automatic configuration 3 times short press the multifunctional button Nr Screen Description 1 Initiating configuration 2 Loading all display icons If automatic configuration fails manual configuration is required For SmartMonitor SITE L configuration via WiFi connection is possible Do not apply force as it will damage the multifunctional button Berlinger amp Co AG User Manual Smar...

Страница 34: ...ccessful Follow the manual configuration steps below Device indication that manual download for configuration is required Manual configuration If device is not able to establish connectivity with SmartView to download configuration it is required to manually upload the configuration file to the device via USB In a next step connect the device to your computer and wait for the device to appear in t...

Страница 35: ...the pop up window does not appear locate the BERLINGER USB Drive on your computer and open it 4 Log into SmartView with your credentials In SmartView navigate to Devices under the section Monitoring In the search funtion type in the serial number of the device that you would like to configure It is printed on the front of the SmartMonitor 5 Click on the serial number to open the device page Berlin...

Страница 36: ...rive 9 Disconnect the SmartMonitor from your computer 10 To check if the download has been successfully completed single push the multifunctional button The name of the configuration is displayed in the scrolling text Device is now ready to be started If the download was not successful the display of the SmartMonitor indicates CONFIG NAME but not the actual name that was given in SmartView Berling...

Страница 37: ...If more help is needed with configuring your device contact Berlinger support at support berlinger com Berlinger amp Co AG User Manual SmartMonitor 1_en Page 34 of 72 ...

Страница 38: ...quipped with a rechargeable battery In the following chapters you will find relevant information about charging Charging before use SmartMonitor SHIP L and SITE L Permanent charging SmartMonitor SITE L only Berlinger amp Co AG User Manual SmartMonitor 1_en Page 35 of 72 ...

Страница 39: ...nnected with the device and plugged into power Screen Information The lightning icon and the scrolling battery bars indicate that the device is connected to power and charging Once the device is fully charged and ready to be started the lightning icon is on and all battery bars are full To check the current battery charge single press the multifunctional button Warning The SmartMonitor SHIP L cann...

Страница 40: ...d amount of time see technical specification but not for permanent monitoring Use the USB C power charger cable that comes with the SmartMonitor SITE L Screen Information The lightning icon and the scrolling battery bars indicate that the device is connected to power and charging The device is connected to power and fully charged Berlinger amp Co AG User Manual SmartMonitor 1_en Page 37 of 72 ...

Страница 41: ...nsor at a site for a shipment To ensure display readability and optimized battery performance it is recommended to use an external sensor in frozen application For warnings during the external sensor setup process see chapter WARNINGS Berlinger amp Co AG User Manual SmartMonitor 1_en Page 38 of 72 ...

Страница 42: ... and the external sensor inside the refrigerator freezer 1 and wait for it to acclimatize The cable of the external sensor should be placed in such a way that it does not interfere with the daily handling of the personnel or the cable can be disconnected 2 Connect the USB cable of the SmartMonitor power adapter to the right of the SmartMonitor 3 Plug the power adapter of the SmartMonitor into the ...

Страница 43: ...nger eye is facing the same direction as the SmartMonitor device display Now plug the external sensor into the sensor plug Warning Do not apply force as it can damage the connector on the device and or external sensor 6 Once correctly applied tighten the connector by screwing clockwise Continue with start your device Berlinger amp Co AG User Manual SmartMonitor 1_en Page 40 of 72 ...

Страница 44: ... 1 and wait for it to acclimatize The cable of the external sensor should be placed in such a way that it does not interfere with the daily handling in order to avoid the risk of the external sensor to be disconnected from the device Place it in a way that does not obstruct with the box container opening that accurate temperature monitoring is possible The external sensor should be away from the l...

Страница 45: ...4 Once correctly applied tighten the connector by screwing clockwise Continue with start your device Berlinger amp Co AG User Manual SmartMonitor 1_en Page 42 of 72 ...

Страница 46: ...8 How to place your device without external sensor How to place the SmartMonitor without an external sensor at a site for a shipment Berlinger amp Co AG User Manual SmartMonitor 1_en Page 43 of 72 ...

Страница 47: ...ight of the SmartMonitor 3 Plug the power adapter of the SmartMonitor into the power socket for permanent charging Ensure that the cable does not represent a tripping hazard Ensure that the cable cannot easily be disconnected as PERMANENT CHARGING is required for the SmartMonitor SITE L Continue with start your device Berlinger amp Co AG User Manual SmartMonitor 1_en Page 44 of 72 ...

Страница 48: ...trolled box container and wait for it to acclimatize 2 Use the mounting option on the back of the SmartMonitor or attach the Velcro tape to the designated area to place the device securely Continue with start your device Berlinger amp Co AG User Manual SmartMonitor 1_en Page 45 of 72 ...

Страница 49: ...n Skip scroll text items with button short press Step Screen Description 1 The name of the configuration defined in SmartView is displayed 2 The defined label name e g Airway Bill Refrigerator Freezer ID etc from SmartView is displayed on the screen Berlinger amp Co AG User Manual SmartMonitor 1_en Page 46 of 72 ...

Страница 50: ...e start process this screen will be displayed as well and the LED lights up red 2 Upon longpress device interaction the start screen will be loaded 3 Hold the button until the letters are replaced with stars from left to right and the LED signal has blinked once To start the device long press the multifunctional button for longer than 3 seconds until the letters are replaced with stars Berlinger a...

Страница 51: ...lay The tick can be hidden by disabling the alarm status function in the configuration policy in SmartView In this case the field remains empty If a start delay is configured the device starts with alarming only after start delay countdown The remaining countdown is indicated on the display in days hours minutes format if 24h DDd HH MM if 24h HH MM Berlinger amp Co AG User Manual SmartMonitor 1_en...

Страница 52: ...11 Running device Device info when device is running Device alarm while running Cloud sync while running Berlinger amp Co AG User Manual SmartMonitor 1_en Page 49 of 72 ...

Страница 53: ...press Nr Screen Description 1a Home Screen The current temperature is displayed on the screen 1b With external sensor Home Screen The current temperature of the external sensor is displayed on the screen To check the temperature of the SmartMonitor device go to SmartView 2 The name of the configuration defined in SmartView is displayed Berlinger amp Co AG User Manual SmartMonitor 1_en Page 50 of 7...

Страница 54: ...e multifunction button the device can be stopped SmartMonitor SITE L only Nr Screen Description 1 Measured Maximum Temperature The measured maximum temperature within the last 24 hours 2 Measured Minimum Temperature The measured maximum temperature within the last 24 hours Berlinger amp Co AG User Manual SmartMonitor 1_en Page 51 of 72 ...

Страница 55: ...3 Current Date Time The current date time is display in the following format DDMMMYYYY HH MM Berlinger amp Co AG User Manual SmartMonitor 1_en Page 52 of 72 ...

Страница 56: ...ice indicates that there is one or more temperature and or humidity alarm violation on the device and or on the external sensor 3 Infinite scroll on alarm source SmartMonitor vs SmartSensor Temperature vs Humidity Cloud 4 To enter device info single button press Acoustic and visual alarm LED for SmartMonitor SITE L only Berlinger amp Co AG User Manual SmartMonitor 1_en Page 53 of 72 ...

Страница 57: ...Description 1 Cloud tick is blinking while syncing 2 With connectivity Static cloud tick display after sync success 3 The cloud icon disappears after 30 seconds 4 Without syncing Static cloud sync fail display until the next successful sync Berlinger amp Co AG User Manual SmartMonitor 1_en Page 54 of 72 ...

Страница 58: ...during the stop process the same screen will be displayed and the LED lights up red 2 Upon longpress device interaction the stop screen will be loaded 3 Hold the button until the letters are replaced with stars from left to right and the LED signal has blinked once The stop icon indicates that the device has been succesfully stopped SmartMonitor SITE L can be stopped via cloud command only Berling...

Страница 59: ...to manually upload the data to SmartView via USB In a next step connect the device to your computer and wait for the device to appear in your driver In a next step download the data file manually to the computer Device indicates that manual transfer of monitoring data to SmartView is required Review SmartView manual to find out how to upload the monitoring data to SmartView Manual read out Step Sc...

Страница 60: ... SmartMonitor BERLINGER will appear If the pop up window does not appear locate the BERLINGER USB Drive on your computer and open it 4 Log into SmartView and locate the Data upload functionality under the tab Monitoring Devices Choose Data upload on the top right corner 5 Click Choose Files and select the files displayed in the BERLINGER USB Drive Berlinger amp Co AG User Manual SmartMonitor 1_en ...

Страница 61: ...load File s Check Process Result to see if your files have been successfully uploaded 8 Check Process Result to see if your files have been successfully uploaded 9 When the upload has been successfully completed the display of the SmartMonitor indicates DONE Berlinger amp Co AG User Manual SmartMonitor 1_en Page 58 of 72 ...

Страница 62: ... took place during the entire monitoring period 2 Device indicates that alarm violation took place during the monitoring period 3 Infinite scroll on alarm source SmartMonitor vs SmartSensor Temperature vs Humidity Cloud How to wipe your device For SmartMonitor SHIP M only Berlinger amp Co AG User Manual SmartMonitor 1_en Page 59 of 72 ...

Страница 63: ...View and locate the device that you would like to re start under the tab Monitoring Devices Type the serial number printed on the front of the SmartMonitor into the Device overview and open the device page 3 On the top right of the SmartMonitor device page select Restart 4 Confirm on the pop up screen that you want to re start the selected SmartMonitor Berlinger amp Co AG User Manual SmartMonitor ...

Страница 64: ...on that SmartMonitor device restart has been initiated 6 To initiate the restart of the SmartMonitor triple push the multifunctional button 7 SCREENS Berlinger amp Co AG User Manual SmartMonitor 1_en Page 61 of 72 ...

Страница 65: ...14 Additional functionalities Manual flight mode Berlinger amp Co AG User Manual SmartMonitor 1_en Page 62 of 72 ...

Страница 66: ...creen is loading up confirmation 4 Static FLYMODE screen indicates the Flightmode is on During manual flight mode RF emission exceeding what is allowed on aircraft is suspended until the manual flight mode is disabled The device stores the manual flight mode state in non volatile memory to ensure that the mode stays enabled even when the device unexpectedly resets During active manual flight mode ...

Страница 67: ...mation that SmartMonitor device restart has been initiated 6 To initiate the restart on the SmartMonitor triple push on the multifunctional button Berlinger amp Co AG User Manual SmartMonitor 1_en Page 64 of 72 ...

Страница 68: ...15 Warning Display warnings Berlinger amp Co AG User Manual SmartMonitor 1_en Page 65 of 72 ...

Страница 69: ...RY LOW BATT is shown on the display the battery symbol is blinking and the LED lights up red The device charge is too low to start the device Connect the device to power to charge the battery Device start BATTERY EXPIRED ONLY SMARTMONITOR SHIP M BAT EXPIRED will be shown on the display and the battery symbol is blinking Exclamation mark is blinking The LED lights up red The battery expiry date is ...

Страница 70: ...or to the SmartMonitor If the correct sensor has been connected the display shows SENSOR OK The long green LED signal indicates that the SmartSensor has been successfully connected External sensor SENSOR NOT OK The external sensor which has been connected to the device by the user is not the SmartSensor type set to the configuration policy defined by the customer in SmartView The LED lights up red...

Страница 71: ... START ONLY SMARTMONITOR SHIP L Scroll CHARGE Static is shown on the display and exclamation mark is blinking The SmartMonitor SHIP L cannot be started when charging TBC Wait until the battery is fully charged and disconnect from charging to start the device A12 T CHARGE will be shown with scroll TEMPERATURE TOO HIGH LOW FOR CHARGING on the display and the exclamation mark is blinking The SmartMon...

Страница 72: ...dispose of the product in accordance with the regulation according to your country or return it to Berlinger according Berlinger RMA Return Merchandise Authorization process If more help is needed contact Berlinger support at support berlinger com Berlinger amp Co AG User Manual SmartMonitor 1_en Page 69 of 72 ...

Страница 73: ...tection against harmful interference in a residential installation This equipment generates uses and can radiate radio frequency energy and if not installed and used in accordance with the instructions may cause harmful interference to radio communications However there is no guarantee that interference will not occur in a particular installation If this equipment does cause harmful interference t...

Страница 74: ...yonnement et votre corps Ce transmetteur ne doit pas être place au même endroit ou utilise simultanément avec un autre transmetteur ou antenne Regulatory certification Berlinger amp Co AG User Manual SmartMonitor 1_en Page 71 of 72 ...

Страница 75: ...s measuring SmartMonitor has stopped Cloud status Upload successful Cloud status Upload not successful Connected to cellular Connected to WiFi Acoustic Alarm The warning box includes important information or warnings The information box includes helpful information Berlinger amp Co AG User Manual SmartMonitor 1_en Page 72 of 72 ...

Отзывы: