Berker 4582 Скачать руководство пользователя страница 6

Page 6/7

03-2015

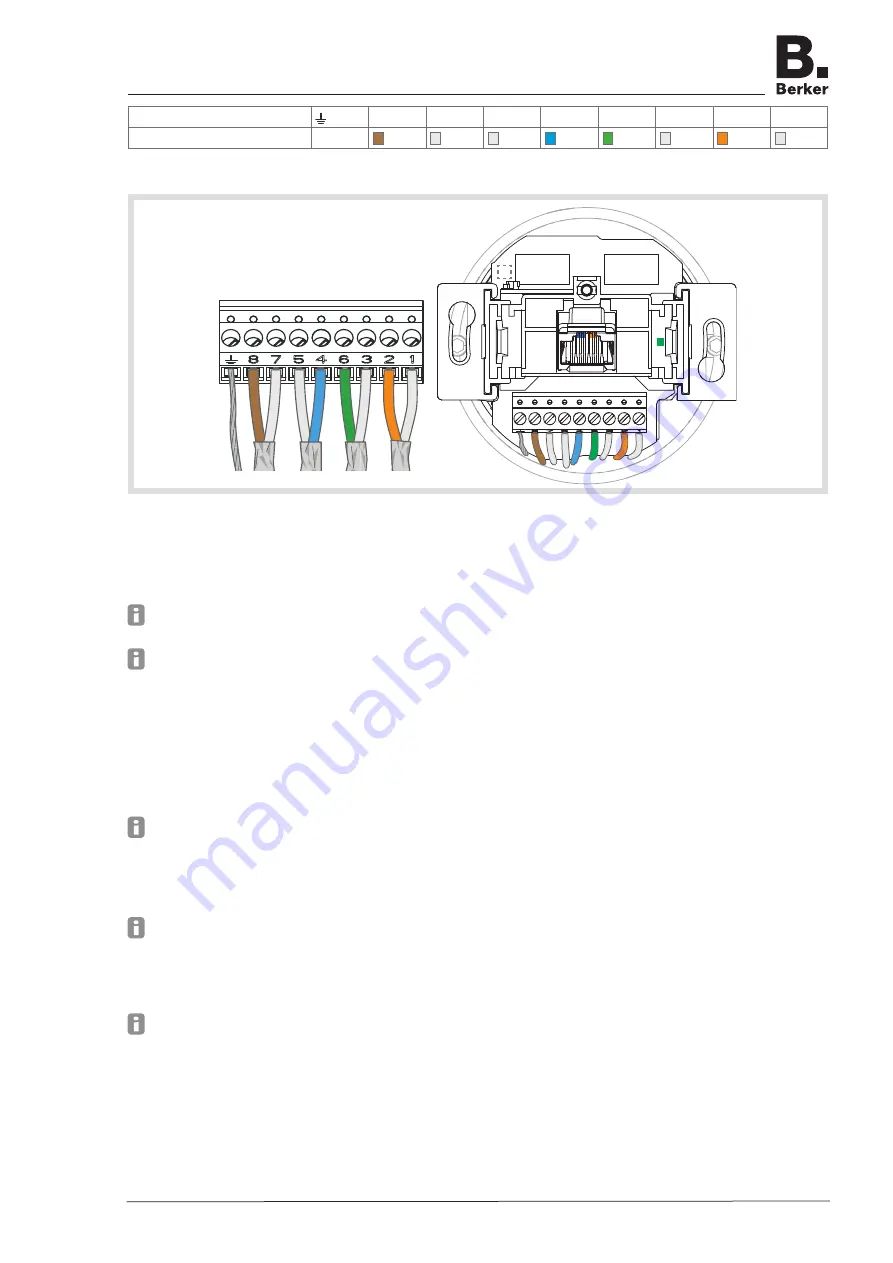
Designation terminal

8

7

5

4

6

3

2

1

Assignment

S

Table 3:  Assignment on the terminal block (2) of the WLAN Access-Point, PoE

Figure 5

Information regarding configuration

It is advisable to carry out the Initial configuration with patch cable via the LAN interface of the 

device.

  The WLAN IP-address of the configuring device must be within the range 192.168.0.xxx 


(x ≥ 0 ≤ 2 55, x ≠ 5), subnet: 255.255.255.0.

  After the initial configuration, the password should definitely be changed. When changing the 

password or SSD, do not use any spaces, numbers or characters such as ä, ü, ö, or ß.

Configure device via patch cable


„

Connect the RJ45 jack (7) at the Access-Point via a patch cable to the LAN interface e.g. via 

a PC.


„

In the Internet browser enter the IP address 

http://192.168.0.5

.


„

Log on with the password 

admin

.

  The password 

admin

 applies to the default state.

Configure device via WLAN


„

In the WLAN settings of the devices intended for the configuration, such as a tablet PC, 

select the the WLAN Access-Point.

  The Access-Point logs on in the network with the WLAN name (SSID) 

Berker

.


„

Log on at the Access-Point with the WLAN password 

wireless123

.


„

In the Internet browser enter the IP address 

http://192.168.0.5

.


„

Log on with the password 

admin

.

  The password 

admin

 applies to the default state.

WLAN Access-Point flush-mounted

6LE001255A

Содержание 4582

Страница 1: ...and accident prevention regulations of the country Hazard due to electric shock Disconnect before working on the device Take into account all circuit breakers that supply dangerous voltages to the de...

Страница 2: ...n and radio emission Additional settings can limit the device from other Access Points in order to prevent overcoupling of the WLAN areas and losses of the data rates This device can be used in three...

Страница 3: ...econds The reed contact on the Access Point is triggered The blue LED 5 flashes Reset starts Reset device to factory settings Keep a permanent magnet over the position of the reed contact 4 on the cov...

Страница 4: ...protection if necessary The circuit and connected socket outlets must be labelled clearly e g with EDV Connect network cable Run the mains cable into the wall box from above Shorten the cable to a le...

Страница 5: ...ing and twist of the pair and wires as far as possible Twist the outer shielding S and affix it in a conductor sleeve 1 mm if necessary Pull off 9pole terminal block 2 from the device and lay the wire...

Страница 6: ...haracters such as or Configure device via patch cable Connect the RJ45 jack 7 at the Access Point via a patch cable to the LAN interface e g via a PC In the Internet browser enter the IP address http...

Страница 7: ...ply accord to IEEE803 2at class 0 48 V PoE Power consumption 3 W PoE supply to RJ45 jack accord to IEEE803 2at class 2 48 V 6 49 W Warranty We reserve the right to make technical and formal changes to...

Отзывы: