Berger & Schroter IR518C Скачать руководство пользователя страница 14

14

Buttons

Function

POWER

Press 5 sec to power on/off the imager
Short press to calibrate the imager manually.

M

When no menu displayed

Press 3 sec to bring out menu.

Short press to switch between white/black hot.
When menu displayed

Press this button to select the menu items

+

When menu displayed

Press this button to choose the menu from left to right.

When no menu displayed

Switch between original image and 2X image

-

When menu displayed

Press this button to choose the menu from right to left.

When no menu displayed

Short press to take and save infrared image.

Long press to take and save image video

IR518C imager can be used as handheld device or can be stably installed on tripod, please see the
screw hold on the bottom side of the camera.

Chapter 5 Quick start guide
5.1. Preparation

1) The operator could hand hold the IR518C Thermal Imager, or fix it on the tripod.
2) According to the thermal imager interface definition, connect the enclosed video/USB cable, power
cable and 9V power adapter to the display equipment and AC power shown as below picture. When
Insert the cable plug into the thermal camera socket, please aim the convex part to the concave part
and slightly insert.

9VDC                     Video             USB             

RS232

110-240VAC

9VDC

Adapter

Monitor

PC

USB

PC port

110-240VAC

Note: When the camera connected with the PC by USB port, all button operation will be ineffective.
Thus, please do not connect the camera with the PC when observing, and only connecting when
transmitting the picture or video. The RS232 communication function is reserved.

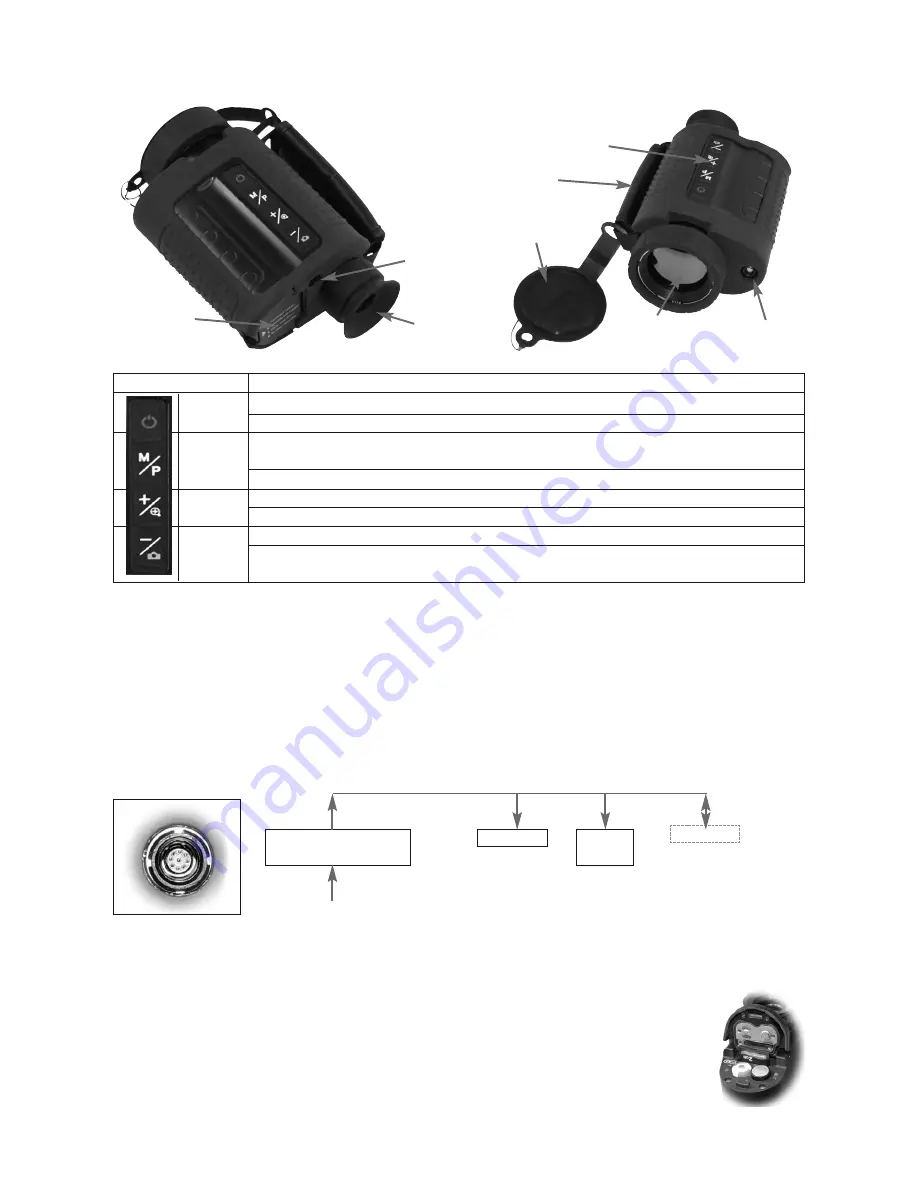
Chapter 4 Buttons and interface of imager

IR 518C Thermal Imager figure

Buttons

Wrist Strap

Interface

Infrared lens

Lens cap

Oled

Eyes
detector

Battery

3) Please use the 1.2VNi-MH batteries (4 of them) to power on the imager. Insert them
into the imager as the following picture

4) SD card is inserted into the imager as the following picture.

5) Close the battery cover

make sure the battery and SD card are accurately inserted.

Содержание IR518C

Страница 1: ...Kapitel 1 Einf hrung Diese W rmebildkamera WBK ist ein u erst kompaktes und doch leistungsstarkes Ger t das W rmequellen sichtbar macht die das menschliche Auge nicht erkennen kann Auf Grund dieser T...

Страница 2: ...as Ger t vor St en und vor Quellen statischer Aufladung Unternehmen Sie keine Reparaturversuche sondern senden Sie das Ger t bei Fehlern an den Vertreiber ein Um lange Freude an der WBK zu haben sollt...

Страница 3: ...lung f r W rmequellen w hlbar Okular Sucher Display Pixel 852 600 Suchergr er 12 78 x 9 mm Grauwert 256 Stromversorgung AC DC Adapter 110 240V zu 9VDC Akkus 4 x 1 2V 2500mAh Energieverlust 5W bei 25 A...

Страница 4: ...kann das Ger t in der Hand halten oder auf einem Stativ montieren 2 Schlie en Sie das beiliegenden Video USD Kabel und Stromkabel entsprechend der Skizze an Achten Sie beim Anschluss des Steckers in d...

Страница 5: ...en des Objektivs manuell scharfstellen Achtung Wenn Sie nicht durch das Okular sehen geht das Ger t automatisch in den Standby Modus Sobald Sie sich dem Okular wieder n hern schaltet das Ger t wieder...

Страница 6: ...Dadurch gelangen Sie automatisch in das Sub Men Kapitel 6 Genaue Funktionsbeschreibungen 6 1 Betrieb mit externer Stromversorgung Am rechten oberen Bildrand erscheint ein EURO Stecker Symbol Beim Betr...

Страница 7: ...erte werden in angezeigt Im Halbautomatischen Modus k nnen Sie die Helligkeit einstellen und das Ger t stellt automatisch den dazu passenden Kontrastwert ein Werte werden in dargestellt 6 3 Hilfe W hl...

Страница 8: ...im Sucher angezeigt Die WBK kehrt dann automatisch wieder in den Normalmodus zur ck 6 6 2 Wenn kein Menu angezeigt wird dr cken Sie lange auf um ein Video zu erstellen Das Video wird automatisch auf...

Страница 9: ...stehendes Bild Durch beenden Sie das Formatieren Durch wird das Formatieren durchgef hrt W hlen Sie das Menu DEFAULT und dr cken Sie dann M Es er scheint dann nebenstehendes Bild Durch Dr cken von bee...

Страница 10: ...rursachen Nr Fehleranzeige H ufigster Fehler 1 Die WBK l t sich nicht Batterie bzw Akkuspannung zu schwach einschalten Falsche Polarit t oder Batteriefach nicht richtig geschlossen System ausschalten...

Страница 11: ...performance IR 518C can penetrate through haze smoke rain snow and total darkness to track and aim target which is difficult to be observed by human eyes in both day and night and all we ather conditi...

Страница 12: ...ensure that the battery is taken out and the unit is stored in the protective carry case The IR518CThermal Imager integrates precision optical equipment and static sensitive electronics so please do n...

Страница 13: ...6 level gray Power System AC DC adapter 110 240VAC 9VDC Rechargeable Ni MH battery 1 2V 2500mAh X4 Power dissipation 5W 25 Operation time 2 hours 25 Environmental Parameters perating Temperature 40 60...

Страница 14: ...rding to the thermal imager interface definition connect the enclosed video USB cable power cable and 9V power adapter to the display equipment and AC power shown as below picture When Insert the cabl...

Страница 15: ...eye detector the OLED will lighten again 9 Function Brief Detailed button operation instructions such as Brightness and Contrast adjustment Polarity selection cursor choosing and checking setting lang...

Страница 16: ...o sub menu Chapter 6 System operation 6 1 Power Instructions icon When the thermal imager works with the external power supply a plug mark will present on the right corner of the screen as the below i...

Страница 17: ...t to obtain acceptable image quality Parameters of menu item B and C values are shown in percentage In the semiautomatic condition user can adjust menu item B to get satisfying image Brightness System...

Страница 18: ...en After saving the thermal imager will return to the real time infrared image status 6 6 2 Take and save the infrared video When no menu displays long press to take infrared video and save it in the...

Страница 19: ...to format SD card see below picture Choose Default then press M the below picture will shown on the screen According to the indications press to cancel the operation Press to restore factory setting 6...

Страница 20: ...the charging process If the IR518C meets troubles please check the items listed below first if the troubles beyond those ones please contact us as soon as possible No Trouble Reason Measure 1 The The...

Отзывы: